
Related Manuals for Belling BE817


Summary of Contents for Belling BE817
- Page 1 BE817 Frost Free Fridge Freezer INSTALLATION AND USER INSTRUCTIONS You must read these instructions prior to using the appliance and retain them for future reference.
-
Page 2: Table Of Contents
Contents Introduction & safety warnings...2 Electrical requirements ...3 Transportation instructions...4 Installation instructions - guidelines ...5 Getting to know your fridge / freezer...6 Suggested arrangement of food in the fridge / freezer ...7 Temperature control and adjustment ...8 Getting Started...9 Storing frozen food...9 Freezing fresh food ...10 Making ice cubes ...10 Defrosting ...11... -
Page 3: Introduction & Safety Warnings
• Leave to stand for at least 4 hours before switching on to allow compressor oil to settle if transported horizontally. • If you are discarding an old refrigerator with a lock or latch fitted to the door, disable the lock/latch, ensure that it is left in a safe condition to prevent the entrapment of young children. -
Page 4: Electrical Requirements
ELECTRICAL REQUIREMENTS Before you insert the plug into the wall socket make sure that the voltage and the frequency shown in the rating plate inside the appliance corresponds to your electricity supply. Rating label is on the left hand side of freezer inner liner. We recommend that this appliance is connected to the mains supply via a suitable switched and fused socket in a readily accessible position. -
Page 5: Transportation Instructions
TRANSPORTATION INSTRUCTIONS 1. The appliance should be transported only in a vertical upright position. The packing as supplied must be intact during transportation. 2. If during the course of transport the appliance has to be transported horizontally, it must only be laid on its left hand side when standing in the front of the appliance. -
Page 6: Installation Instructions - Guidelines
INSTALLATION INSTRUCTIONS 1. The space in the room where the appliance is installed must not be smaller than 10 cubic metres. 2. See for detailed Installation Instructions including reversing door opening direction. 3. Do not put your fridge freezer in a cold room where the temperature is likely to go below +5 degrees C (41 degrees F) during night time and/or especially in winter. -
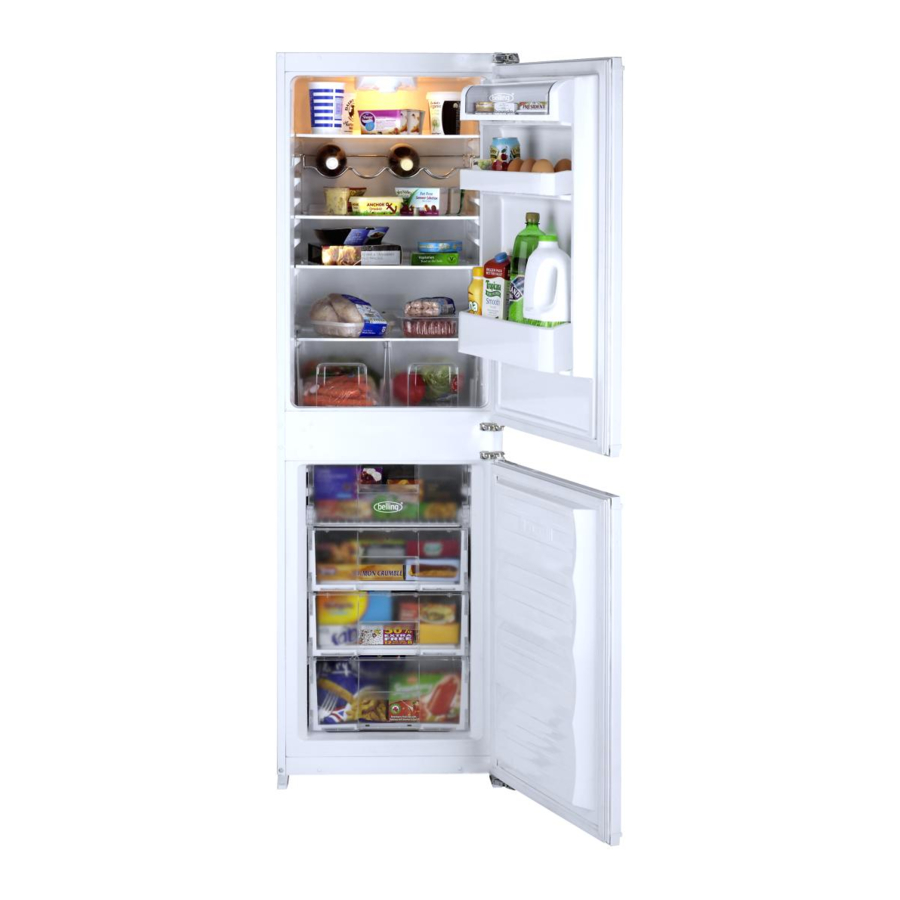
Page 7: Getting To Know Your Fridge / Freezer
THERMOSTAT KNOB INTERIOR LIGHT WINE RACK CABINET SHELVES DEFROST WATER COLLECTION CHANNEL SALAD CRISPER FAST FREEZE COMPARTMENT FROZEN FOOD COMPARTMENTS Getting to know your appliance DAIRY COMPARTMENT EGG TRAY DOOR SHELF BOTTLE SHELF... -
Page 8: Suggested Arrangement Of Food In The Fridge/Freezer
SUGGESTED ARRANGEMENT OF FOOD IN THE FRIDGE/FREEZER Arrangement Examples (See diagram) 1. Baked, chilled cooked food, dairy products, cans. 2. Wine, 3. Meat, sausages, cold cuts. 4. Fruit, vegetables, salads. 5. Frozen food and freezing of fresh food. 6. Frozen food. 7. -
Page 9: Temperature Control And Adjustment
TEMPERATURE CONTROL AND ADJUSTMENT Operating temperatures are controlled by the thermostat knob (see diagram) located on the ceiling of fridge compartment. Settings may be made from 1 to 5, 5 being the coldest position. When the appliance is switched on for the first time, the thermostat should be adjusted so that after 24 hours, the average fridge temperature is no higher than +5 C (+41 F). -
Page 10: Getting Started
GETTING STARTED Before you start using the fridge/freezer check that: 1. The interior is dry and air can circulate freely at the rear of the cabinet. 2. Clean the interior as recommended under "CLEANING AND CARE." 3. Insert the plug into the wall socket and switch on the electricity supply. •... -
Page 11: Freezing Fresh Food
FREEZING FRESH FOOD Please observe the following instructions to obtain the best results. Do not freeze too large a quantity at any one time. The quality of the food is best preserved when it is frozen right through to the core as quickly as possible. Do not exceed the freezing capacity of your appliance in 24 h which is 4 kg (9 lb) Placing warm food into the freezer compartment causes the refrigeration compressor to operate continuously until the food is frozen solid. -
Page 12: Defrosting
DEFROSTING A) FRIDGE COMPARTMENT The fridge compartment defrosts automatically. The defrosting water runs to the drain tube via a collection container at the back of the appliance (1). (see diagram) During defrosting water droplets may form at the back of the fridge compartment where concealed evaporator is located. -
Page 13: Cleaning And Care
CLEANING AND CARE ** We recommend that you switch off the appliance at the socket outlet and pull out the mains plug before cleaning. ** Never use any sharp abrasive instrument, soap, household cleaner, detergent and wax polish for cleaning. ** Use luke warm water to clean the cabinet of the appliance and wipe it dry. -
Page 14: Replacing The Interior Light Bulb
REPLACING THE INTERIOR LIGHT BULB (See diagram) Should the light fail to work, proceed as follows. 1. Switch off at the socket outlet and pull out the mains plug. • You may find it useful to remove shelves for easy access. 2. -
Page 15: Do's And Don'ts
DO'S AND DON'TS Clean and defrost your appliance regularly (See "Defrosting") Keep raw meat and poultry below cooked food and dairy products. Take off any unusable leaves on vegetables and wipe off any soil. Leave lettuce, cabbage, parsley and cauliflower on the stem. Wrap cheese firstly in greaseproof paper and then in a polythene bag excluding as much air as possible. -
Page 16: Energy Saving Tips
ENERGY SAVING TIPS 1- Ensure your appliance is installed in a well ventilated area. If the ambient temperature is low (but in no case lower than 5 degrees C), then the energy saving will be more. In this case, check temperatures of fridge and freezer compartments with an accurate thermometer and lower the thermostat setting (towards 1) if necessary. -
Page 17: Reversing The Doors
REVERSING THE DOORS Top Door 1.Unscrew top hinge (4). 2.Carefully remove the top door. 3.Unscrew lower hinge (6) 4.Remove plastic plugs (10 &11). 5.Refit top hinge (4) as lower hinge (14) on the left hand side. 6.Replace top door 7.Refit lower hinge (6) as top hinge (16) on the left hand side. Lower door 1.Unscrew top hinge (7) 2.Carefully remove the lower door. -
Page 18: Reversing The Doors
REVERSING THE DOORS... - Page 19 INSTALLATION INSTRUCTIONS (All dimensions are in mm) 45 ° 45 ° FRONT FEET...
- Page 20 45 ° REAR FEET...
- Page 21 min. 200 cm min. 35 mm min. 200 cm 86.5...
- Page 22 min.35 mm 200 cm 2 200 cm 2...
- Page 24 18 mm 1 mm...
- Page 25 2 mm 2 mm 2 mm Ensure 2 mm gaps are obtained, adjust if necessary.
-
Page 26: Guarantee Details
GUARANTEE DETAILS Your new Belling product is guaranteed against the cost of breakdown repairs for twelve months from the date of the original purchase. What is covered? • Repairs necessary as a result of faulty materials, defective components or manufacturing defect. •... -
Page 27: How To Obtain Service
problem solving section This product bears the selective sorting symbol for waste electrical and electronic Recycling equipment (WEEE). This means that this product must be handled pursuant to European Directive 2002/96/EC in order to be recycled or dismantled to minimize its impact on the environment. For further information, please contact your local or regional authorities. -
Page 28: Tecnical Data
Frozen food compartment rating Conservation time from failure Freezing capacity fresh food - kg (lb) / 24 hrs. Climate class Operating noise level dB(A) Technical data BE817 Frost Free Fridge Freezer 155 lt. (5.5) 62 lt. (2.2) 217 lt. (7.7) 4 STAR 13 h. -
Page 29: Wiring Diagram
WIRING DIAGRAM... -
Page 30: Customer Care
BELLING CUSTOMER CARE In case of difficulty within the UK, please call Belling Customer Care Centre Helpline on When you dial this number you will hear a recorded message and be given a This indicates that your call has been accepted and is being held in a queue. Calls are answered in strict rotation as our Customer Care Representatives Enter appliance numbers here for future reference: Please ensure you have the above details (Model No and Serial No) to hand...
Need help?
Do you have a question about the BE817 and is the answer not in the manual?
Questions and answers