Table of Contents
Advertisement
Advertisement
Table of Contents

Subscribe to Our Youtube Channel
Related Manuals for Roland BK-9 Performance Editor


Summary of Contents for Roland BK-9 Performance Editor
- Page 1 PERFORMANCE Editor Editor User’s Guide...
- Page 2 Intellectual Property Right • Information in this document is subject to change without notice and does not represent a commitment on the part of Roland Europe. • The software described in this document is furnished under a license agreement or nondisclosure agreement. • The software may be used or copied only in accordance of the terms of the agreement. • It is against the law to copy this software on any medium except as specifically allowed in the agreement. • No part of this document may be reproduced or transmitted in any form or by any means, electronic or mechanical, including photocopying and recording, for any purpose without the express written permission of Roland Europe. • Roland is a registered trademarks of Roland Corporation in the United States and/or other countries. • Company names and product names appearing in this document are registered trademarks or trademarks of their respective owners. • Do not use this product for purposes that could infringe on a copyright held by a third party. • We assume no responsibility whatsoever with regard to any infringements of third party copyrights arising through your use of this product. • Copyright © 2013 Roland Europe. All rights reserved.
-
Page 3: Table Of Contents
Contents What is BK-9 Performance Editor? . . . . . . . . . . . . . . . . . -
Page 4: What Is Bk-9 Performance Editor
What is BK-9 Performance Editor? BK-9 Performance Editor is an application that allows you to graphically control various aspects of the Roland BK-9 Backing keyboard. The Roland BK-9 is a powerful backing keyboard with many functions and parameters. This Editor will help you to edit the parameters related to your performances in an easy and comfortable way. In addition, each parameter that you will change by using the Performance Editor application will be immediately available in BK-9, in real time. Vice versa each parameter changed in the BK-9 will be reflected in the Performance Editor. BK-9 Performance Editor highlights: • Graphical user interface providing a fast and intuitive way to edit many BK-9 parameters related to Tones, Effects and real-time keyboard parts. • A MIXER environment allows you to balance the various Keyboard parts of your BK-9 in real time. • You can adjust the Volume of keyboard parts including Reverb, Chorus and Panpot effects. • You can handily control settings of the multi-effect processors (MFX1, MFX2), including Chorus and Reverb. • You can comfortably adjust the distinctive parameters of most tones available in BK-9. • You can swiftly set all the functions that can be assigned to the hand and foot controllers in BK-9. NOTE This guide contains instructions about how to use the BK-9 Performance Editor. For detailed information about the BK-9 parameters, please refer to the supplied BK-9 Owner’s Manual. -
Page 5: Connecting Your Equipment
BK-9 instruments to your iPad, even though the interaction occurs only in one combination at a time. MIDI cable connection Connect your iPad with your BK-9 by using a USB iPad camera connector and a USB cable . Wireless Connection Simply connect the WNA1100-RL Wireless USB Adaptor to the USB port of your BK-9, and launch BK-9 Performance Editor . -
Page 6: Before You Start Using Bk-9 Performance Editor
Before You Start Using BK-9 Performance Editor Connect your BK-9 and your iPad . See “Connecting your equipment” (p. 5) . Turn your BK-9 and your iPad on . Press the BK-9 Performance Editor icon on your iPad to open this app . checks the available devices. At the end the following page appears: BK-9 Performance Editor... -
Page 7: Using Controls
Using Controls All the controls in BK-9 Performance Editor were especially designed to provide maximum flexibility and convenience. Knob operation The Knobs control most parameters with continuous values, such as Reverb, Chorus, Cutoff and many other effects. Coarse Control To move a knob, simply touch the knob (it will retain focus) with your finger and slide your finger up or down. Its corresponding value box is updated with the current value. Fine Control To finely control values, touch the knob (it will retain focus) with your finger, slide your finger to the left or right of the knob and then slide it up or down. Its corresponding value box is updated with the current value. Default Value Press the knob twice to restore the default value. Slider operation The Sliders control the Volume for each real time part and other parameters. To move a slider, simply touch it (it will retain focus) with your finger and slide it up or down. Its corresponding value box is updated with the current value. Default Value Press the slider twice to restore the default value (This is not true for Volume sliders). Button Operation Button Type Explanation Some buttons allow you to select the groups of parameters that you want to edit ([MIXER], [PARTS EDITOR], [MFX EDITOR], [TONE EDITOR], [HAND CTRLS] and [FOOT CTRLS]). These buttons are mutually exclusive; one is always selected. Some buttons work as ON/OFF switch of parameters. When the parameter is ON the button is highlighted. Some other buttons open pop-up windows, where you can take some action (e.g. the [TUNE] button). -
Page 8: Mixer Page
MIXER PAGE The Mixer page (automatically selected at the startup) allows you to adjust the Volume,reverb, chorus and panpot for each real-time part (UPPER1, UPPER2, LOWER, MANUAL BASS, MELODY INTELLIGENT and D-BEAM). You can set the part ON or OFF. Adjusting the Volume for Each Part Use the sliders to adjust the Volume for each real-time part . See “Slider operation” (p. 7). Tones/D-BEAM Function The tone name for each part is vertically displayed at the left of each slider. The name of the function assigned to the D-BEAM is vertically displayed at the left of its slider. Adjusting the Reverb, Chorus and Panpot for Each Part Use the knobs to adjust the Reverb, Chorus and Panpot . See “Knob operation”... - Page 9 Press one of the four D-BEAM buttons . To change the effect/function, touch the field on the right-hand side of the needed D-BEAM family button and select any other one available in the displayed list . For details see “Using the D-BEAM Controller” in the BK-9 owner’s manual. Writing TEXT information The so-called “BK – TEXT INPUT” function comes in very handy every time you need to smoothly write some kind of text in your BK-9.
- Page 10 MIXER PAGE Using the READ button BK-9 Performance Editor and your BK-9 always interact in real time. But if you happen to find that some values are mismatching with each others, don’t get puzzled, but simply Press the READ button on top of the screen page and both your devices will be newly synchronized .
-
Page 11: Parts Editor Page
Press a [TONE] button to open the Tone page of the desired part . The following page appears: Select the tone you like . To select your desired tone you can search either by Tone Families (use the [FAMILY] button) or by Tone Names (use the [NAME] button). The chosen tone name is shown vertically at the left of each slider. Moreover you can mark some of the available Tones as your favorite ones; to do it, just Press the star icon in the corresponding tone name line. The star icon becomes bright. Of course, you can mark several tones as your favorite ones and they can belong to either one or several different families. Press the [NAME] button and the star icon in the right top corner of the screen page, if you wish to see a list of all your favorite tones and select only one of them. Press the [FAMILY] button and the star icon in the right top corner of the screen page, if you wish to see a list of all your favorite tones belonging to that precise family and select only one of them. NOTE All favorite Drum Sounds are grouped together at the end of the overall favorite list. Press the [BACK] button to return to the Parts Editor page . NOTE Harmonic bar sounds (i.e. any of the available organ sounds having different footages) are not affected by BK-9 Performance Editor. So, if any of them is selected the related controls are disabled. - Page 12 PARTS EDITOR PAGE Changing the Equalizer for Each Part. Press the [EQUALIZER] button of the desired part to switch its equalizer ON/OFF . If you want to edit the parameters of the equalizer, you have to push and hold the [EQUALIZER] button of the desired part .
- Page 13 PARTS EDITOR PAGE Use the knobs to change the Coarse and Fine Tune . Selecting an MFX to Process the Desired Part The BK-9 contains two multi-effect processors (MFX). Press an [MFX] field to select which MFX will process the desired part . The following pop-up window appears: Select the desired MFX for the selected part .
- Page 14 Playing Different Voices with the Left and Right Hands (SPLIT) Press the [SPLIT] button . The BK-9 is now in Split mode. If you want to change the split point to a different note from the default setting, press and hold the [SPLIT] button . The following pop-up window appears: Use the arrow buttons to set your desired split point .
- Page 15 PARTS EDITOR PAGE If this parameter is “ON” the notes of the Lower part go on sounding until you play other notes in the left keyboard area. (This function is only available while the [SPLIT] button lights.) Adjusting the Volume for Each Part Use the sliders to adjust the Volume for each real-time part . See “Slider operation” (p. 7) . Tones The tone name for each part is vertically displayed at the left of each slider. Switching a Part ON/OFF Use the buttons to switch the desired part ON/OFF . See “Button Operation”...
-
Page 16: Mfx Editor Page
MFX EDITOR PAGE In this page you can control and edit the multi-effect processors (MFX1 and MFX2) provided in BK-9 for processing tones and real time keyboard parts. You can also edit reverb and chorus. Editing and controlling the Chorus / Reverb effect Press the CHORUS / REVERB button to enable the corresponding effect (it lights red) . Press the corresponding name field . In the above example we selected the chorus effect. The CHORUS EDIT / REVERB edit page appears enabling you to make your own settings. For details, see the “Reverb” and “Chorus” paramenters, in the paragraph “Tone Part Effects parameters” of BK-9 Owner’s Manual. To choose a different Chorus / Reverb type, press the field (orange background) . A drop down menu appears to make your choice . - Page 17 MFX EDITOR PAGE Editing and controlling MFX1 and MFX2 Press either the MFX1 or the MFX2 name field to select one of the two multi-effect processors . To choose any of the 84 available multi-effect types, press the field in the central page area (orange background) . A drop down menu appears to make your choice .
- Page 18 MFX EDITOR PAGE How to control some effects using the MFX1 and MFX2 sliders BK-9 enables you to control some effects by using the MFX1 and MFX2 sliders located under the display area. Indeed every effect type is characterised by its own parameters, which you can handily control by these two sliders during your performance in real time. Press any of the two [Controls] buttons to open a pop-up window related to the multi-effect processor (MFX1 or MFX2) you want to control .
-
Page 19: Tones Editor Page
TONES EDITOR PAGE The Tone Edit function lets you comfortably adjust the distinctive parameters of most tones available in BK-9. The TONE EDITOR page shows four separate areas corresponding to the four keyboard real-time parts: Upper 1, Upper 2, M.Bass, Lower. Use the knob and slider controls inside every area to adjust the parameters of the tone selected for every part . The typical tone parameters are: Cut Off, Resonance, Attack, Decay, Release, Vibrato Rate, Vibrato Depth, Vibrato Delay, C1. For further details about all possible parameter settings, see “Tone Edit” in BK-9 Owner’s Manual. NOTE SuperNATURAL tones feature their own peculiar parameters. For details about all their possible settings, see BK-9 “SuperNATURAL INST Parameters” in the “Tone & Drum Kit List “ supplementary manual. Download it from the Web http://www.roland.com/manuals/). NOTE This function does not affect Harmonic Bar sounds. -
Page 20: Hand Controls Page
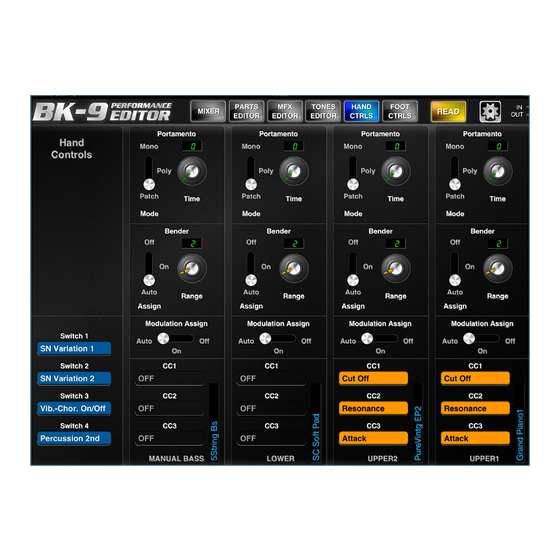
HAND CONTROLS PAGE This page collects all those functions involving hand controllers, like Pitch Bend/Modulation lever as well as the Assignable Switches. Of course, you can make separate settings for every real time keyboard part. How to control Portamento Use the slider switch and knob to set the Portamento Mode and Time for any part you wish . How to set the Pitch Bender Use the slider switch and knob to choose your desired pitch bender assignment and the corresponding range for any part you wish . - Page 21 HAND CONTROLS PAGE How to assign functions to the S1, S2, S3, S4 switches BK-9 has four assignable switches. You can use them to directly access frequently used functions that are only available via the function menu. Press the S1, S2, S3, S4 fields on your iPad to choose the function you wish to assign to any of these four switches .
-
Page 22: Foot Controls Page
How to control the Expression Pedal The expression pedal allows you to control the volume of all BK-9 real-time parts by foot, if this comes in handy during your performance. Use the slider switch to set Expression Pedal on / off . Use the knobs to set the “Up” (highest volume) and “Down” (lowest volume) values of your Expression Pedal, as you wish .
Need help?
Do you have a question about the BK-9 Performance Editor and is the answer not in the manual?
Questions and answers