Table of Contents
Advertisement
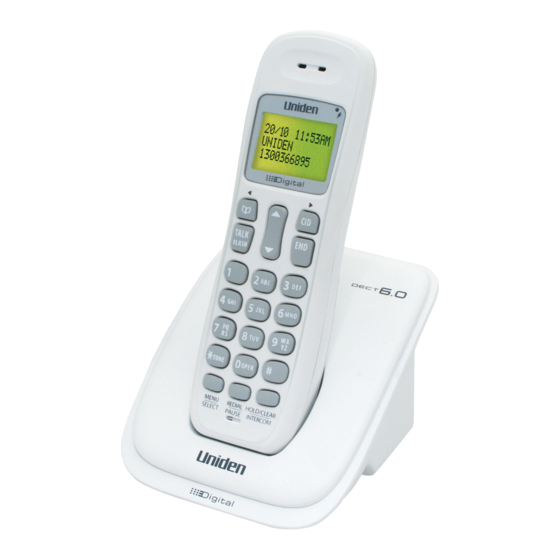
DECT 1015 Series
Owner's Manual
What's in the box?
DECT1015
base with cordless handset
Battery
Not pictured:
cover
- Rechargeable battery
(BT-694m)
- AC adapter (AAD-041S(M))
- Telephone cord
If any items are missing or damaged, contact your place of purchase
immediately. Never use damaged products!
Need Help? Get answers at our website: www.uniden.com.au for
Australian model or www.uniden.co.nz for New Zealand model.
You will also find:
Accessory handset and charger
Not pictured:
- Rechargeable battery (BT-694m)
- Battery cover
- AC adapter (AAD-600S(M))
If you
You
purchased
should
model
have:
number:
DECT1015
None
DECT1015+1
1 of each
DECT1015+2
2 of each
DECT1015+3
3 of each
DECT1015+4
4 of each
DECT1015+5
5 of each
Advertisement
Table of Contents

Related Manuals for Uniden Dect 1015 Series


Summary of Contents for Uniden Dect 1015 Series
- Page 1 - AC adapter (AAD-041S(M)) - Telephone cord If any items are missing or damaged, contact your place of purchase immediately. Never use damaged products! Need Help? Get answers at our website: www.uniden.com.au for Australian model or www.uniden.co.nz for New Zealand model.
-
Page 2: Table Of Contents
What’s in the manual? Important Information ....15 Getting Started ......3 Solving Problems ...... 15 Installing Your Phone ....3 AC Adapter and Battery Getting to Know Your Phone ..4 Information ......18 Using the Menu ......7 Mounting the Base unit on Using Your Phone ...... -
Page 3: Getting Started
CAUTION! Risk of explosion if battery is replaced by an incorrect type! Dispose of used batteries according to the instructions. Do not open or mutilate the battery. Disconnect the battery before shipping this For more details, see the Important Information section. product. -
Page 4: Getting To Know Your Phone
1. Pick up the handset from the cradle and press . You should Test the Connection hear a dial tone, and the display should say Talk. Talk If you don't hear a dial tone or the display says Check Tel Line, try checking the connection between the base and the phone jack. - Page 5 Parts of the Base FIND CHARGING CONTACTS Handset keys/LEDs and how they work Key (icon) What it does - In standby: start an intercom call. - During a call: put the call on hold and start a call HOld/ClEaR/ transfer to another handset. InTERCOM - While entering text: delete one character, or press and hold to delete all the characters.
- Page 6 Key (icon) What it does - In standby: open the menu. MEnu/sElECT - In the menu or any list: select the highlighted item. - In standby: increase the ringer volume. - During a call: increase the audio volume. up ( - In any menu or list: move the cursor up one line.
-
Page 7: Using The Menu
This table shows possible status icons and what they mean. Since the Reading the Display icons appear based on what you're doing with the phone, you won't ever see all of these icons at the same time. Icon What it means e (1 or 4 minutes) callers have to The ringer is turned off and will not ring for new calls. -
Page 8: Entering Text On Your Phone
You can change these settings separately for each handset. Handset Setup Menu Turn on T-coil mode to reduce noise on some hearing T-coil aids (for more details, see page 16). Choose this handset's ring tone. As you highlight each Ringer Tones ring tone, the phone plays a sample. -
Page 9: Using Your Phone
To switch to all capital letters, press . The phone defaults to all capital letters first (e. g. ABCabc2) until you enter a blank space or press again. (Any time you want to change case, just press If two letters in a row use the same number key, enter the first letter and wait a few seconds (or press );... -
Page 10: Changing The Volume
You can set the earpiece volume on each handset. Anytime you are Changing the Volume listening to the earpiece, press to increase the volume and decrease it. dOwn You can also set the ringer volume separately: when the phone is in standby, press to increase the ringer volume and to decrease. -
Page 11: Using The Phonebook
Delete Entry Erase the number from the list. Add the number to the phonebook. The handset prompts Store Into Pb you to edit the name and number. Delete All (CID list only) Erase all numbers from the list. Call Waiting, a service available from your telephone provider, lets you Using Call Waiting receive calls while you are on another call. -
Page 12: Finding A Lost Handset
Open the phonebook with the phone in standby, then press Phonebook Menu Options to open the phonebook menu. Choose one of these options: MEnu/ sElECT Add an entry to your phonebook. The phone prompts you Create New to enter a name and number. ... -
Page 13: Multihandset Features
2. When you hear the prompt that tells you to enter the number, open the phonebook and find the entry that contains your code number. Press ; the phone transmits the code number entered in the previous step. If you change your mind, use MEnu/sElECT to close the phonebook. -
Page 14: Voice Message Notification
To... Follow these steps: 1. Press HOld/ClEaR/InTERCOM make an intercom 2. Select the handset you want to talk with, or page All to page all handsets at the same time. cancel a page Press answer an intercom Press HOld/ClEaR/InTERCOM Talk/flasH page end an intercom call Press... -
Page 15: Important Information
IMPORTANT INFORMATION If you have any trouble with your phone, try these simple steps first. If Solving Problems you need help, visit our website listed on the front cover. If… Try… - Checking the telephone cord connection. No handsets can make - Disconnecting the base AC adapter. - Page 16 Interference is the most Noise or Static on the Line • If you have a hearing aid equipped common cause of noise or Do you use a T-Coil hearing aid? with a telecoil (T-coil) feature, the static on a cordless phone. interaction between the hearing aid Here are some common &...
-
Page 17: Liquid Damage
Sometimes, broadband Internet services that use the telephone line Installing a Line Filter or DSL Filter can interfere with phones. One of these services−DSL−often causes static on telephones. A DSL filter or telephone line filter usually solves this problem. The technician who installed your DSL service might have left some filters for you; if not, call your DSL provider or look in any electronics store. -
Page 18: Ac Adapter And Battery Information
• Use only the supplied AC adapters. Be sure to use the proper adapter for the AC Adapter and Battery Information base & any chargers. • Do not place the power cord where it creates a trip Base/Charger hazard or where it could AAD-041S(M) / become chafed and create a Part number... -
Page 19: Mounting The Base Unit On A Wall
You can mount your base directly to the wall using the horizontally Mounting the Base unit on a Wall aligned mounting slots at the back of the base unit. Before doing this, consider the following: Avoid electrical cables, pipes, or other items behind the mounting location that could cause a hazard when inserting screws into the wall. - Page 20 An optional wall mount bracket can be purchased from our online Optional Wall Mount Bracket store to mount the base to a standard wall plate that has vertically aligned mount holes. Visit our website; www.uniden.com.au for Australia or www.uniden.co.nz for New Zealand.
-
Page 21: Important Notices
IMPORTANT NOTICES Important Notice: • Under power failure conditions this appliance may not operate. Please ensure that a separate telephone, not dependent on local power, is available for emergency use. General Notices for New Zealand Model: • The grant of a NZ Telepermit for any item of terminal equipment indicates only that Telecom has accepted that the item complies with minimum conditions for connection to its network. -
Page 22: One Year Limited Warranty
Warrantor: The warrantor is either Uniden Australia Pty Limited ABN 58 001 865 498 (“Uniden Aust”) or Uniden New Zealand Limited (“Uniden NZ”) as the case may be. Terms of Warranty: Uniden Aust/NZ warrants to the original retail purchaser only that the DECT1015 (“the Product”), will be free from defects in materials... - Page 23 Product, together with satisfactory evidence of your original purchase (such as a legible copy of the sales docket) to Uniden at the addresses shown below. You should contact Uniden regarding any compensation that may be payable for your expenses incurred in making a warranty claim.
- Page 24 THANK YOU FOR BUYING A UNIDEN PRODUCT. for more exciting new products please visit our website: australia: www.uniden.com.au new Zealand: www.uniden.co.nz © 2011 Uniden Australia Pty Limited. Uniden New Zealand Ltd. Printed in Vietnam. U01UN297ZZA(0)
Need help?
Do you have a question about the Dect 1015 Series and is the answer not in the manual?
Questions and answers