Blackmagicdesign DeckLink Series Operation Manual
Hide thumbs
Also See for DeckLink Series:
- Operation manual (111 pages) ,
- User manual (38 pages) ,
- Connection diagrams (12 pages)
Table of Contents
Advertisement
Advertisement
Table of Contents

Related Manuals for Blackmagicdesign DeckLink Series


Summary of Contents for Blackmagicdesign DeckLink Series
- Page 1 Operation Manual DeckLink Series Windows ™ January 2009...
-
Page 2: Table Of Contents
Contents Overview HDMI Workflow Monitoring Via HDMI 2K Monitoring with HDLink Pro Contents Welcome Device Diagrams How to use your DeckLink card DeckLink HD Extreme 2 and Professional Breakout Cable Installation DeckLink HD Extreme 2 and Consumer Breakout Cable Hardware Installation DeckLink HD Extreme and Professional Breakout Cable Installing a DeckLink PCIe card DeckLink HD Extreme and Consumer Breakout Cable... -
Page 3: Overview
Welcome Thank you for purchasing a DeckLink broadcast video card. We hope you share our dream for the television industry to become a truly creative industry by allowing anyone to have access to the highest quality video. Previously high end television and post production required investment in millions of dollars of hardware, however with DeckLink cards, even 10 bit uncompressed is now easily affordable. -
Page 4: Installation
Before installing a DeckLink card Hardware Installation Remove the power plug from the back of your PC. This is a safety precaution before opening your computer. Ensure that you are statically discharged by using a static strap. Remove the side cover of your PC to gain access to the PCI slots. Remove your DeckLink PCIe card from the protective static bag making sure you don’t touch the gold connectors on the base of the card. - Page 5 Before installing a DeckLink card 7. After installing your DeckLink PCIe card and closing the side cover on your PC, attach the supplied DeckLink breakout cable to to the external multi-pin connector on your DeckLink card. Some card models ship with both professional and consumer breakout cables for connecting to different video hardware.
-
Page 6: Installing The Software
Installation Installing the software Contents The DeckLink software installer will install the following components for you: Blackmagic DeckLink drivers ‚ Blackmagic Media Express application ‚ Blackmagic DeckLink Control Panel ‚ Blackmagic AVI and QuickTime codecs ‚ ™ Project presets for Adobe Premiere Pro ‚... -
Page 7: Testing Your Installation
Installation Testing your installation Testing To check the installation has been successful on most DeckLink cards with Windows XP: 1. Go to the Control Panel and open Click on the tab. You should see an Display. Settings extra display which represents the extended desktop feature of your DeckLink. The size of the DeckLink display will appear differently to your computer display, and may be in HD or SD resolution. -
Page 8: Blackmagic Software
Blackmagic Software Using Blackmagic Media Express Blackmagic Media Express is a simple utility for frame-accurate capture and playback with your broadcast tape deck. It uses the RS-422 port on DeckLink and DeckLink hardware to control the deck using the Sony™ RS-422 protocol. It’s great for use with applications such as Adobe After Effects™... - Page 9 Blackmagic Software Using Blackmagic Media Express Playback 1. Click on the Playback tab. 2. Select File and choose the video file you wish to play back. Alternatively File > Open Media drag the desired video clip directly in to the Playback window. The movie will appear in the Playback window.
- Page 10 Blackmagic Software Using Blackmagic Media Express There are two ways to capture clips: A. Record Now Captures video and audio instantly. (Control-R) The REC button lights up during capture. Click the STOP button or press the Esc key on your keyboard to stop the capture.
-
Page 11: Using Blackmagic Framelink
Blackmagic Software Using Blackmagic FrameLink Blackmagic FrameLink provides seamless DPX support using uncompressed AVI movies. ™ The key to understanding FrameLink, is when you mount a movie file with FrameLink it appears as a virtual drive full of DPX frames from the movie. This virtual drive acts as a container for the DPX sequence. -
Page 12: Setting Blackmagic Preferences
Blackmagic Software Setting Blackmagic Preferences DeckLink preferences are located in the DeckLink Control Panel. Different DeckLink models have some different features. Any preferences not available to your DeckLink card will be grayed out and unavailable. The following preferences contain options for setting up your DeckLink. Settings Input and Output connections ‚... - Page 13 Blackmagic Software Setting Blackmagic Preferences DeckLink video and audio output connections All of the video and audio outputs of DeckLink cards are active all of the time and the only choice you need to make on some models is between component (Y,R-Y,B-Y) analog video, S-Video or composite NTSC/PAL analog video as they use shared connectors.
- Page 14 Blackmagic Software Setting Blackmagic Preferences Reference Output Timing Genlock, also known as black burst, reference or house sync is used to lock various equipment in your facility to the same timing point. When two or more video devices are connected to the same sync signal, their video signals can be switched without jumping or rolling.
-
Page 15: Lookup Tables (Luts) In Decklink Hd Extreme
Blackmagic Software Lookup Tables (LUT’s) in DeckLink HD Extreme 2 for Windows DeckLink HD Extreme 2 can use 1D or 3D LUT’s during playback. Lookup tables can be used for standard definition and high definition video as well as 2K film. 1D LUT’s are useful for altering the brightness of an image but do not affect color. - Page 16 Blackmagic Software Importing and exporting 3D LUT’s DeckLink HD Extreme 2 supports the popular Autodesk .3dl, IRIDAS .itx and IRIDAS .cube lookup table formats when importing 3D LUT’s. 3D LUT’s can also be exported from DeckLink in the .cube format. DeckLink uses the .cube format to store 3D LUT’s internally as this is a most memory efficient way to store complex lookup tables.
- Page 17 Blackmagic Software Setting Blackmagic Preferences Black Video Output This setting allows DeckLink to output a stable black signal on one video output, while outputting video on the other output. Black Video Output is used for video referencing a deck when you don’t have a sync generator available.
- Page 18 Blackmagic Software Setting Blackmagic Preferences Video Output Behavior Remove Filter Jitter “Remove field jitter when video is paused” allows DeckLink to display only a single field when paused, while turning this mode off will display a complete frame in pause. Single field is similar to how Betacam SP decks work when paused, eliminating field flicker from paused images.
- Page 19 Blackmagic Software Setting Blackmagic Preferences Preserving Blanking Data or VANC This feature lets you use up to 3 video lines at the top of a captured movie file to store any 3 lines from vertical blanking. This allows 3 line timecode, VITC (vertical interval test signals) subtitle info or VANC preferences.
-
Page 20: Blackmagic Disk Speed Test
Blackmagic Software Blackmagic Disk Speed Test If you want to check your disk array speed, Blackmagic Disk Speed Test can be run to check the array speed, and to provide the results in video frame rates. This makes it much easier to understand how various disk arrays will handle video capture and playback at various video resolutions and frame rates. -
Page 21: Third Party Software
Third Party Applications Adobe Premiere Pro Adobe Premiere Pro™ is a powerful real-time video and audio non-linear editing application. Full presets for Premiere Pro are included with DeckLink and will have been automatically loaded into your system during the installation process. Premiere Pro must be installed on your system before running the DeckLink installer. - Page 22 Third Party Applications Adobe Premiere Pro Audio DeckLink features support for ASIO audio output drivers. This allows Premiere Pro to use DeckLink as an ASIO audio output device. When you first start your Premiere Pro project, make sure you select DeckLink Audio.
-
Page 23: Adobe After Effects
Third Party Applications Adobe After Effects It’s very easy to setup playback and rendering in Adobe After Effects for a complete broadcast and ™ design workstation that connects direct to decks for capture and playback of clips. DeckLink also supports real time preview while working on your compositions. First, open Adobe After Effects and select the television standard frame size and frame rate you ™... -
Page 24: Adobe Photoshop
Third Party Applications Adobe Photoshop DeckLink includes Adobe Photoshop plug-ins, so you can directly capture and output still ™ frames from within the Photoshop ™ application itself. If you’re working with 10 bit HD/SD-SDI, you can even import and export 16 bit Photoshop ™... -
Page 25: Supported File Formats
Supported File Formats Uncompressed data rates for capture and playback The data rates for uncompressed video are quite high, and listed below are minimum recommended disk requirements for uncompressed standard definition and high definition video. Uncompressed 10 bit YUV (4:2:2) Standard Definition Frame Size MB per second... -
Page 26: Troubleshooting Video Capture And Playback
Troubleshooting Video Capture and Playback Using your DeckLink as a capture and playback solution when connected to a computer is exciting, but also complex due to the huge range of different software applications. Video data rates are also very high, so the disk array you use for video storage can have a big impact on your system’s performance. -
Page 27: Connection Diagrams
Connection Diagrams Connecting to a Betacam SP analog deck Cards which can be used in this workflow This example shows DeckLink HD Extreme 2 connected to an analog deck for capture and playback DeckLink SP to the deck. The HDMI and SDI outputs can be used for local monitoring. DeckLink SP PCIe DeckLink Extreme DeckLink Extreme PCIe... -
Page 28: Sdi Digital Deck
Connection Diagrams Connecting to an SDI digital deck Cards which can be used in this workflow This example shows DeckLink HD Extreme 2 connected to a digital deck in 4:2:2 SD mode for DeckLink capture and playback to the SDI deck. The HDMI, spare SDI and analog outputs can be used for DeckLink Pro local monitoring. - Page 29 Connection Diagrams Connecting to a Sony HDCAM SR deck in 4:2:2 Cards which can be used in this workflow This example shows DeckLink HD Extreme 2 connected to a Sony HDCAM SR™ series digital DeckLink SDI deck in 4:2:2 HD mode for capture and playback to the HD-SDI deck. The HDMI, spare SDI and DeckLink Studio component analog outputs can be used for local monitoring of 4:2:2 HD video.
-
Page 30: Decklink Hd Pro Pcie
Connection Diagrams Connecting to a Sony HDCAM SR deck in 4:2:2 Cards which can be used in this workflow This example shows DeckLink HD Pro PCIe connected to a Sony HDCAM SR™ series digital deck in DeckLink SDI 4:2:2 HD mode. In this case, 2 HD-SDI connections are used for HD-SDI 4:2:2 video in and out. The DeckLink Studio component analog output can be used for local monitoring of 4:2:2 HD video. -
Page 31: Sony Hdcam Sr Deck
Connection Diagrams Connecting to a Sony HDCAM SR deck in 4:4:4 Cards which can be used in this workflow This example shows DeckLink HD Pro PCIe connected to a Sony HDCAM SR™ series digital deck in DeckLink HD Pro PCI-X 4:4:4 HD mode. -
Page 32: Ntsc/Pal Monitor
Connection Diagrams Connecting to an NTSC/PAL monitor Cards which can be used in this workflow This example shows DeckLink HD Extreme 2 connected to a standard definition Sony PVM monitor DeckLink SP via composite analog video. Connect a BNC cable from DeckLink’s Y output cable to the composite DeckLink SP PCIe analog video input of the Sony PVM monitor. - Page 33 Connection Diagrams DeckLink HD Extreme 2 - connecting to S-Video This example shows the DeckLink HD Exteme Consumer Breakout Cable connecting to S-video adapter cables. The Professional Breakout Cable can also be used with S-video adapter cables. The numbering on the cables is the same on both the Consumer and Professional Breakout Cables so it’s easy to use either cable.
-
Page 34: Decklink Hd Extreme
Connection Diagrams DeckLink HD Extreme - connecting to S-Video This example shows the DeckLink HD Exteme Consumer Breakout Cable connecting to S-video adapter cables. The Professional Breakout Cable can also be used with S-video adapter cables. The numbering on the cables is the same on both the Consumer and Professional Breakout Cables so it’s easy to use either cable. -
Page 35: Yuv Component Monitor
Connection Diagrams Connecting to a YUV component monitor Cards which can be used in this workflow This example shows DeckLink HD Extreme 2 connected to a multiformat Sony BVM monitor via DeckLink SP component analog video. Connect three BNC cables from DeckLink’s Y, B-Y and R-Y output cables DeckLink SP PCIe to the corresponding component analog inputs of the Sony BVM monitor. -
Page 36: Connecting To An Hdtv
Connection Diagrams Connecting to an HDTV Cards which can be used in this workflow This example shows DeckLink HD Extreme 2 connected to a consumer HDTV via HDMI. Connect a DeckLink HD Extreme 2 HDMI cable from DeckLink’s HDMI output to the HDMI input of the HDTV. You can use this for SD or HD capture and playback monitoring of analog, SDI and HDMI video sources. -
Page 37: Hdmi Workflow
Connection Diagrams HDMI Workflow Cards which can be used in this workflow DeckLink HD Extreme 2 can use HDMI for connecting video cameras, televisions and projectors DeckLink HD Extreme 2 to your computer for use with popular editing and design applications. DeckLink HD Extreme 2 captures video in real-time directly from the HDMI output on HDV cameras, and will play back directly to large screen HDTVs or HD projectors for client-monitoring and editing. - Page 38 Connection Diagrams DeckLink HD Extreme 2 - monitoring via HDMI NTSC/PAL 16:9 Desktop NTSC/PAL 1080i 720p High Definition Desktop Connection Diagrams...
-
Page 39: K Monitoring With Hdlink Pro
Connection Diagrams DeckLink HD Extreme 2 - 2K Monitoring with HDLink Pro 30 inch Dual link DVI-D connection 2K-SDI video direct to LCD monitor 3 Gb/s 4:4:4 Connection Diagrams... -
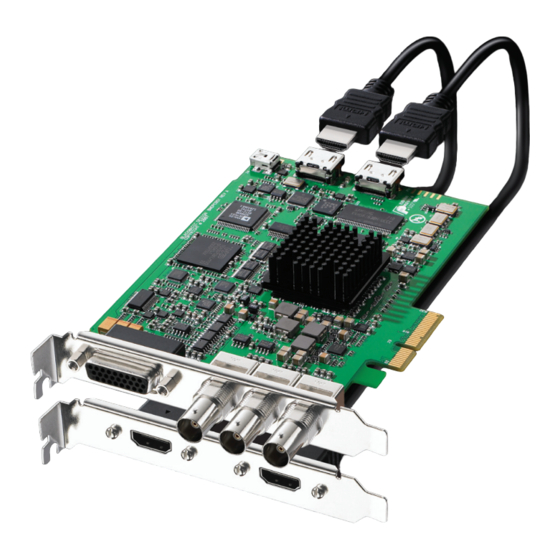
Page 40: Device Diagrams
Device Diagrams DeckLink HD Extreme 2 and Professional Breakout Cable The cable numbering is the same on both the Professional and Consumer Breakout Cables so it’s easy to use either cable. For example, component video output uses cables 3, 4 and 5 on both breakout cables. -
Page 41: Decklink Hd Extreme 2 And Consumer Breakout Cable
Device Diagrams DeckLink HD Extreme 2 and Consumer Breakout Cable The cable numbering is the same on both the Professional and Consumer Breakout Cables so it’s easy to use either cable. For example, component video output uses cables 3, 4 and 5 on both breakout cables. -
Page 42: Decklink Hd Extreme And Professional Breakout Cable
Device Diagrams DeckLink HD Extreme and Professional Breakout Cable The cable numbering is the same on both the Professional and Consumer Breakout Cables so it’s easy to use either cable. For example, component video output uses cables 3, 4 and 5 on both breakout cables. -
Page 43: Decklink Hd Extreme And Consumer Breakout Cable
Device Diagrams DeckLink HD Extreme and Consumer Breakout Cable The cable numbering is the same on both the Professional and Consumer Breakout Cables so it’s easy to use either cable. For example, component video output uses cables 3, 4 and 5 on both breakout cables. -
Page 44: Decklink Sdi
Device Diagrams DeckLink SDI Deck Control RS-422 Reference In HD/SD-SDI Output (to deck) HD/SD-SDI Input (from deck) Device Diagrams... -
Page 45: Decklink Studio
Device Diagrams DeckLink Studio 2. RS-422 Deck Control 3. Component Out 4. Component Out 5. Component Out 6. Genlock Tri-Sync In 7. Component In 8. Component In 9. Component In DeckLink Studio Breakout Cable 10. AES / EBU Out 11. AES / EBU In 12. -
Page 46: Decklink Hd Pro Pcie
Device Diagrams DeckLink HD Pro PCIe 2. Deck Control 3. R-Y/R Monitor Out DeckLink HD Pro Breakout Cable 4. Y/G Monitor Out 5. B-Y/B Monitor Out HD/SD-SDI Monitoring Output Ch A 6. Ref In HD/SD-SDI Output (to deck) Ch B 7. -
Page 47: Decklink Hd Pro Pci-X
Device Diagrams DeckLink HD Pro PCI-X 2. Deck Control 3. R-Y/R Monitor Out DeckLink HD Pro Breakout Cable 4. Y/G Monitor Out 5. B-Y/B Monitor Out HD/SD-SDI Monitoring Output Ch A 6. Ref In HD/SD-SDI Output (to deck) Ch B 7. -
Page 48: Decklink Extreme
Device Diagrams DeckLink Extreme 2. AES-S/PDIF Output (monitoring) (R) Audio Output (balanced analog) 3. (L) Audio Output (balanced analog) (R) Audio Input (balanced analog) 4. (R) Audio Output (balanced analog) (L) Audio Output 5. (L) Audio Input (balanced analog) (balanced analog) (L) Audio Input 6. -
Page 49: Decklink Extreme Pcie
Device Diagrams DeckLink Extreme PCIe 2. AES-S/PDIF Output (R) Audio Output (monitoring) (balanced analog) 3. (L) Audio Output (R) Audio Input (balanced analog) (balanced analog) 4. (R) Audio Output (L) Audio Output (balanced analog) (balanced analog) 5. (L) Audio Input (balanced analog) (L) Audio Input (balanced analog) -
Page 50: Decklink Sp
Device Diagrams DeckLink SP (R) Audio Output 2. AES-S/PDIF Output (balanced analog) (monitoring) (R) Audio Input 3. (L) Audio Output (balanced analog) (balanced analog) (L) Audio Output 4. (R) Audio Output (balanced analog) (balanced analog) 5. (L) Audio Input (L) Audio Input (balanced analog) (balanced analog) 6. -
Page 51: Decklink Sp Pcie
Device Diagrams DeckLink SP PCIe (R) Audio Output (balanced analog) AES-S/PDIF Output (monitoring) (R) Audio Input (L) Audio Output (balanced analog) (balanced analog) (L) Audio Output (R) Audio Output (balanced analog) (balanced analog) (L) Audio Input (L) Audio Input (balanced analog) (balanced analog) SPDIF Output (R) Audio Input... -
Page 52: Decklink Pro
Device Diagrams DeckLink Pro SPDIF Output (monitoring A) SPDIF Output AES-S/PDIF Output A (monitoring B) (monitoring) AES-S/PDIF Output B SPDIF Output (monitoring) (monitoring C) AES-S/PDIF Output C SPDIF Output (monitoring) (monitoring D) AES-S/PDIF Output D R-Y Output (monitoring) (monitoring) SDI-SDI Output B-Y Output (Monitoring) (monitoring) -
Page 53: Decklink
Device Diagrams DeckLink Deck Control RS-422 SPDIF/AES Output SD-SDI Output (Monitoring) SD-SDI Output SD-SDI Input Device Diagrams... -
Page 54: Developer Information
Developer Information Blackmagic 2K Format The latest Blackmagic Design products use the new 3 Gb/s SDI video, which allows twice the data rate of traditional HD-SDI video. We thought it would be a really nice idea to add 2K film support, via this new 3 Gb/s SDI technology, so we could simplify feature film workflows. -
Page 55: Blackmagic 2K Format Table
Developer Information Blackmagic 2K Format Active Lines LINE# 1618 1619... 1650 3... 17... 794... FIRST FIELD Active Lines LINE# 828... 842... 1617 1618 1619... 1649 1650 SECOND FIELD DATA STREAM DATA STREAM WORD# Developer Information... -
Page 56: Year Limited Warranty
3 Year Limited Warranty Blackmagic Design warrants that this product will be free from defects in materials and workmanship for a period of 36 months from the date of purchase. If a product proves to be defective during this warranty period, Blackmagic Design, at its option, either will repair the defective product without charge for parts and labor, or will provide a replacement in exchange for the defective product.
Need help?
Do you have a question about the DeckLink Series and is the answer not in the manual?
Questions and answers