
Related Manuals for Electrolux EXP12EN1WI


Summary of Contents for Electrolux EXP12EN1WI
- Page 1 ..................... EXP12EN1WI EN PORTABLE AIR USER MANUAL CONDITIONER...
-
Page 2: Table Of Contents
2 electrolux Electrolux. Thinking of you. Share more of our thinking at www.electrolux.com CONTENTS Safety information Operating instructions Product description Care and cleaning Accessories What to do if… Installation Environment concerns Control panel Subject to change without notice. SAFETY INFORMATION Before use, carefully read the supplied in- •... - Page 3 3 — 240V, 50Hz, 10A mains electricity • Always drain the condensate before stor- supply. ing the appliance. • The appliance must be earthed. • Make sure the drain hose is not above • The appliance is equipped with a cord the drain fitting.
-
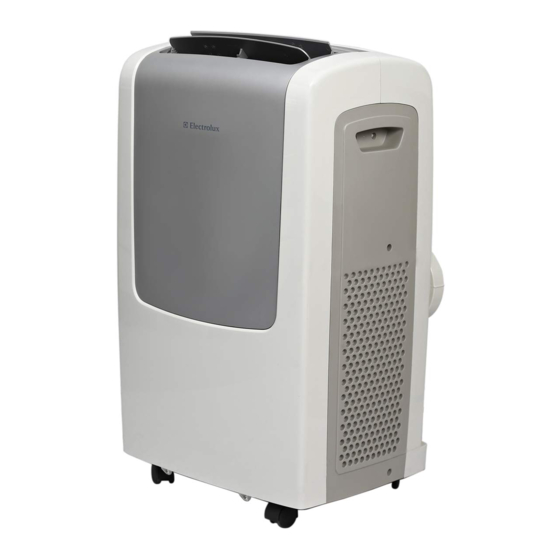
Page 4: Product Description
4 electrolux PRODUCT DESCRIPTION UNIT DESCRIPTION CONTROL PANEL EXHAUST AIR OUTLET CARRYING HANDLE (BOTH SIDES) EXHAUST ADAPTOR A REMOTE CONTROL STORAGE DOOR BOTTOM TRAY DRAIN OUTLET REMOTE CONTROL AIR INTAKE ROOM AIR DISCHARGE DEHUMIDIFYING DRAIN OUTLET CASTOR EXHAUST HOSE (STORAGE WHEN... -
Page 5: Installation
5 PART PART NAME QUANTITY Window/Exhaust Adaptor B 1 pc Window Sliding Kit 1 pc Foam Seal 3 pc Remote Control 1 pc Battery (for remote control) 2 pc Wall Adaptor (for permanent duct mounting) 1 pc Wall Plug... - Page 6 6 electrolux 4. Extend the other side of the hose and 6. Affix the adaptor B into the window screw it to adaptor B. slider kit and seal. • Window slider kit: Minimum: 67,5 cm (26,6 inches) Maximum: 123 cm (48,5 inches) Vertical window 5.
- Page 7 7 INSTALLATION IN A DOUBLE-HUNG SASH WINDOW 1. Cut the foam seals - adhesive type (A) to the proper lengths and attach them to the window and stool. WALL DISCHARGE Mount wall adaptor directly over correctly installed duct to outside. (This usually in- cludes aluminium wall ducting and an out- 2.
- Page 8 8 electrolux 4. Close the window sash securely 3. Open the window sash and place the against the window slider kit. window slider kit (B) on the window stool (C). 675-1230 5. Cut the foam seals to an appropriate length and seal the open gap between the top window sash and outer window sash, as shown.
-
Page 9: Control Panel
9 CONTROL PANEL CONTROL PANEL CHECK FILTER RESET BUTTON ACTIVATES TIMER (TIMER) DISPLAYS TEMPERATURE/TIME SET MODE (MODE) TURNS UNIT ON OR OFF ADJUSTS TEMPERATURE OR TIME REMOTE SIGNAL RECEIVER SETS FAN SPEED (FAN SPEED) SWING BUTTON (SWING) SLEEP MODE (SLEEP) -
Page 10: Operating Instructions
10 electrolux appear in the display of the remote control; lease. Use a small pin to depress these but- depress the Lock button LOCK again to re- tons. OPERATING INSTRUCTIONS Important! The following instructions by you. Under Auto mode (AUTO) you can represent the Control Panel. - Page 11 11 To cancel the timer setting simply tap button to change the timing to 0.0. SLEEP OPERATION (SLEEP) In this mode the selected temperature will increase by 1゚C 30 minutes after the mode is selected. The temperature will then in- crease by another 1゚C after an additional...
-
Page 12: Care And Cleaning
12 electrolux Fan only (FAN) or Heat (HEAT). This is to • After a power outage, the unit will memo- cover possibility of having to roll through rize the last setting and return the unit to to select another mode. -
Page 13: What To Do If
13 WHAT TO DO IF… Problem Possible cause Remedy Air conditioner will not operate Wall plug disconnected. Push plug firmly into wall outlet. Plug current device tipped. Press the reset button (RESET). House fuse blown or circuit Replace fuse with time delay breaker tripped. -
Page 14: Environment Concerns
14 electrolux Problem Possible cause Remedy Doors, windows, registers, etc. Close doors, windows, regis- open — cool air escapes. ters, etc. Unit recently turned on in hot Allow additional time to remove room. “stored heat” from walls, ceiling, floor and furniture. - Page 15 15 For other non-EU countries: Please con- with household waste. Please dispose tact your local authorities for correct meth- of used battery in an environmentally od of disposal of the used battery. sound manner. Find out about the legal regulations Battery, including those which is heavy which apply in your area.
- Page 16 2020252a0429-A-042012...