Table of Contents

Related Manuals for Jura ENA 7


Summary of Contents for Jura ENA 7
-
Page 1: Instructions For Use
Instructions for Use The Instructions for Use has been awarded the seal of approval by the independent German Technical Inspection Agency, TÜV SÜD, due to its easy-to-understand style, its thoroughness and coverage of safety aspects. -
Page 2: Table Of Contents
Important information Proper use .................................6 For your safety .................................6 1 Preparing and using for the first time JURA on the Internet ...............................7 3-colour plain text display ............................7 Setting up the machine ............................7 Filling the water tank ..............................7 Filling the bean container ............................7 First-time use ................................8... - Page 3 Prompt to take action. This symbol means that you are being prompted to perform some action. Information and tips to make it even easier to use your ENA. References to the JURA website, which provides further information that may be of interest to you: www.jura.com Display message...
-
Page 4: Control Elements
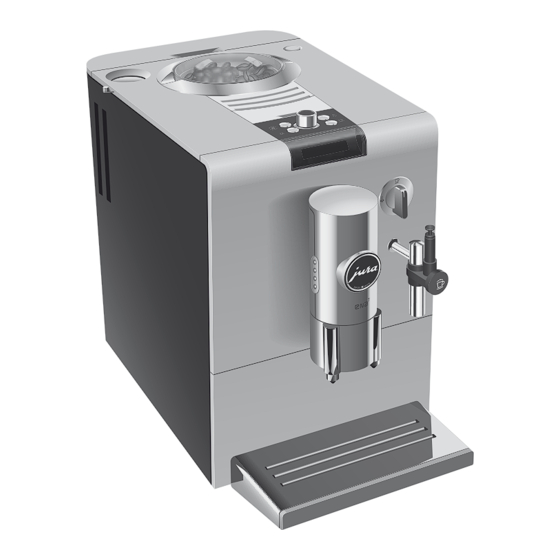
ENA 7 Control elements Figure: ENA 7 Ristretto Black 1 Water tank 6 Bean container cover 7 l Switch for hot water and steam 2 Powder chute for preground coffee 3 Coffee grounds container preparation © 4 Drip tray 8 Connector System... - Page 5 ENA 7 = Aroma Boost button 6 c Maintenance button 2 < Espresso button n Steam button Q On/Off button 8 > Coffee button 9 g Rotary Switch 4 Grinding wheel 5 Cover 10 Display © The Connector System permits the use of different cappuccino frothers. These are available from stockists.
-
Page 6: Important Information
If the mains cable of this machine is damaged, the rating plate. The rating plate is located on it must be repaired either directly by JURA or the underside of your ENA. Further technical by an authorised JURA service centre. -
Page 7: Your Ena
JURA on the Internet CAUTION Visit us on the Internet. Coffee beans which have been treated with On the JURA website (www.jura.com) you additives (e.g. sugar), preground coffee or will find interesting and up-to-date freeze-dried coffee will damage the grinder. -
Page 8: First-Time Use
ENA 7 l T Turn the switch anticlockwise to position m. First-time use SYSTEM FILLING When the ENA is switched off with the On/ CLOSE TAP Off button, the machine consumes less than y T Turn the switch clockwise to position o. -
Page 9: Determining And Adjusting The Water Hardness
ENA 7 T Insert the filter cartridge into the water tank, Determining and adjusting the water hardness exerting slight pressure. If you are using the CLARIS Blue filter cartridge and have activated it in program- ming mode, you will not be able to adjust the water hardness. -
Page 10: Adjusting The Grinder
ENA 7 k T Press the Rotary Switch to confirm the setting. 2 Preparation , the water hardness is set. You can stop the machine at any time while HARDNESS g T Turn the Rotary Switch until a coffee speciality or steam for cappuccino is EXIT being prepared. -
Page 11: Preparing Two Speciality Coffees At The Touch Of A Button
ENA 7 Preparing two speciality coffees at the T Place a cup under the coffee spout. touch of a button = T Press the Aroma Boost button to start preparation. The preparation of ‘2 espressi’ and ‘2 coffees’ fol- , the preset amount of water SPECIAL lows this same model. -
Page 12: Permanently Setting The Amount Of Water For The Cup Size
ENA 7 T Place the filler funnel for preground coffee Precondition: is displayed, the coffee READY spout is set to the ‘1 cup’ position. on to the powder chute. T Place a cup under the coffee spout. > T Press and hold the Coffee button. -
Page 13: Hot Milk And Milk Foam
ENA 7 T Place a cup under the cappuccino frother. If you are using the Professional Cappuc- cino Frother, set the selector switch to the Milk Foam position p. T Press the Steam button. HEATING As soon as the ENA has heated up, READY appears again. -
Page 14: Hot Milk With The 2-Stage Frothing Nozzle
ENA 7 T Place a cup of milk below the 2-stage Hot milk with the 2-stage frothing nozzle frothing nozzle and immerse the nozzle in Precondition: is displayed. READY the milk. T Push the 2-stage frothing nozzle to the upper position. -
Page 15: Daily Operation
ENA 7 3 Daily operation When the ENA is switched off with the On/Off button, the machine consumes less than 0.01 W of standby energy. Switching on the machine When the ENA is switched on, a prompt to per- form a rinse operation automatically appears. -
Page 16: Energy-Saving Mode
ENA 7 k T Press the Rotary Switch to enter the g T Turn the Rotary Switch until ENERGY - programme item. displayed. k T Press the Rotary Switch to enter the NORMAL g T Turn the Rotary Switch until programme item. -
Page 17: Unit For Amount Of Water
ENA 7 g T Turn the Rotary Switch until g T Turn the Rotary Switch until EXIT LANGUAGE displayed. is displayed. k T Press the Rotary Switch to exit programming k T Press the Rotary Switch to enter the mode. -
Page 18: Cleaning The Machine
READY ADD TABLET T Open the powder chute for preground coffee Cleaning the machine and drop in a JURA cleaning tablet. After 180 preparations or 80 switch-on rinses, the ENA will prompt you to clean it. CAUTION If the wrong cleaning agent is used, the machine could be damaged and/or traces could be left behind in the water. -
Page 19: Descaling The Machine
T Close the filter holder. It will click into place behind in the water. audibly. T Use only original JURA maintenance T Fill the water tank with fresh, cold water and products. reinsert it. -
Page 20: Rinsing The Cappuccino Frother
, the descaling operation DE-SCALING T Completely dissolve the contents of one is continued. blister (three JURA descaling tablets) in a EMPTY TRAY receptacle holding 500 ml of water. This T Empty the drip tray and coffee grounds may take several minutes. -
Page 21: Cleaning The Cappuccino Frother
250 ml of fresh water and immerse the milk behind in the water. pipe in it. T Use only original JURA maintenance T Empty the receptacle under the cappuccino products. frother and place it back under the frother. -
Page 22: Dismantling And Rinsing The Professional Cappuccino Frother
ENA 7 T Rinse all parts of the cappuccino frother Dismantling and rinsing the Professional Cappuccino Frother thoroughly under running water. T Reassemble the cappuccino frother. T Carefully remove the Professional Cappuc- © cino Frother from the Connector System Ensure that all individual parts are correctly twisting slightly. -
Page 23: Cleaning The Bean Container
ENA 7 Cleaning the bean container Coffee beans may be covered with a slight oil film which remains on the walls of the bean container. These traces may negatively affect the coffee result. For this reason clean the bean container from time to time. -
Page 24: Display Messages
ENA 7 6 Display messages Message Cause/Result Action T Fill the water tank (see Chapter 1 The water tank is empty. You FILL WATER TANK cannot prepare any products. ‘Preparing and using for the first time’). T Empty the coffee grounds container... -
Page 25: Troubleshooting
Grinder is making a very There are foreign objects in loud noise. the grinder. country (see Chapter 11 ‘JURA contact details / Legal information’). T Remove the cappuccino frother. Little or no water or steam The connector of the cappuc-... -
Page 26: Transport And Environmentally Friendly Disposal
ENA 7 8 Transport and environmentally 9 Technical data friendly disposal Voltage 220–240 V ~, 50 Hz Transport / Emptying the system Power 1450 W Safety test Keep the packaging for your ENA. It should be Energy consumption Approx. 13.5 Wh used to protect the machine during transport. - Page 27 ENA 7 10 Index Addresses 29 Degree of water hardness 9 Aroma Boost 11 Descaling Automatic switch-off 16 Machine 19 Water tank 23 Determining and adjusting the water hardness 9 Bean container 4 Display 5, 7 Cleaning 23 Display messages 24...
- Page 28 ENA 7 Machine Safety 6 Safety information 6 Cleaning 18 Settings Descaling 19 Permanent settings in programming mode 15 Rinsing 17 Setting up Setting up 7 Setting up the machine 7 Switching off 15 Switch for hot water and steam preparation 4...
-
Page 29: Jura Contact Details / Legal Information
Technical changes We reserve the right to make technical changes. The illustrations in these instructions for use show the ENA 7 Ristretto Black model. Some details of your ENA may vary. Feedback Your opinion is important to us! Use the contact link at www.jura.com.
Need help?
Do you have a question about the ENA 7 and is the answer not in the manual?
Questions and answers