Gaggenau VF 230 Operating And Assembly Instructions Manual
Electric deep fryer
Hide thumbs
Also See for VF 230:
- Operating and assembly instructions manual (18 pages) ,
- Instruction manual (56 pages)
Table of Contents
Advertisement
Quick Links
Download this manual
See also:
Instruction Manual
Advertisement
Table of Contents

Related Manuals for Gaggenau VF 230


Summary of Contents for Gaggenau VF 230
- Page 1 Operating and assembly instructions VF 230 Electric deep fryer...
-
Page 3: Table Of Contents
VF 230 Preface 1. Important notes Page 3-5 1.1 For your safety Page 3 1.2 Operating for the first time Page 4 1.3 About use Page 5 2. Structure and operating principle Page 6-7 2.1 Structure of the appliance Page 6 2.2 Accessories... -
Page 4: Preface
Preface Deep frying with your new deep fryer will be even more fun than before. Among other things, the appliance offers you the following advantages: – a gentle fat melting stage – thanks to exact (electronic) temperature control, the surfaces of deep fried titbits can be closed so fast that deep frying oil or fat cannot penetrate into the food you are cooking. -
Page 5: Important Notes
1. Important notes 1.1 For your safety Caution! Over-greased filters are a fire risk if the appliance is positioned under an extractor hood or Do not operate the appliance if it is damaged. adjacent to a hob ventilator! The appliance must only be connected by If a fire should break out, switch off the an authorised specialist, paying attention to electricity at fuse point and close the... -
Page 6: Operating For The First Time
1.2 Operating for the first time Remove the packaging from the appliance and dispose of it according to local regulations. Be careful to remove all accessories from the packaging. Keep packaging elements and plastic bags away from children. This appliance is labelled in accordance with the European Directive 2002/96/EG concerning used electrical and electronic appliances (waste electrical and electronic... -
Page 7: About Use
Return the “Temperature" knob to “0" after deep to do with the power supply, please contact your frying. specialist dealer or your local Gaggenau after-sales service. The appliance must not be operated empty (i.e. without oil or fat; do not use water!). If the... -
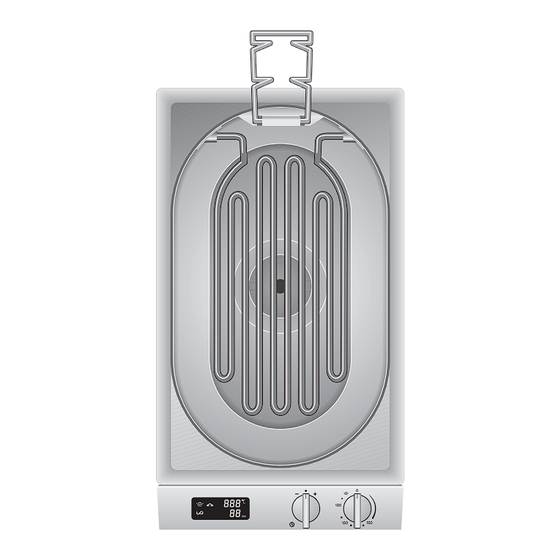
Page 8: Structure Of The Appliance
2.1 Structure of the appliance 1 Deep frying basket suspension 2 Foaming edge 3 Heating element (2300 W) Fig. 2 Panel: 4 Display offering the following possibilities: — (heating) symbol — Display of the set temperature — Display of the set short time –... -
Page 9: Operating Principle
Fig. 5 Any water contained in the food sinks to the bottom of the Gaggenau Electric Fryer into so-called cold oil zone (see 1 in Fig. 6). This prevents the oil frothing over. Also, any particles of food which break away during frying fall through the basket and sink to this cold zone. -
Page 10: Operation
3. Operation 3.1 Switching on /off “Temperature" knob The temperature can be set within the range from 135-190 °C. The fat melting stage can also be set. “Short time" knob The short time can be set within a range from 1 minute to 90 minutes (Fig. -
Page 11: Fat Melting Stage
3.2 Fat melting stage – Place approximately 3 kg of fat cut into small pieces in the deep fryer. – Turn the “Temperature" control knob to the fat melting stage position on the left. In this position, the fat is melted slowly. This prevents overheating of the heating element. -
Page 12: And This Is How To Deep Fry
3.3 And this is how to deep fry (see also 7.1) – Set the required temperature with the temperature control knob. The required temperature has been reached as soon as the (heating) symbol goes off. Important: Only ever switch on the appliance after having placed deep frying fat or oil in the deep frying tub. -
Page 13: Operating The Child Lock
3.4 Operating the child lock Activating the child lock – Turn the “Short time" control knob to the left to the minus position. Hold the knob in this position. – Turn the “Temperature" control knob to any temperature on the right. –... -
Page 14: Cleaning And Care
4. Cleaning and care Please clean the appliance thoroughly before operating it for the first time. Cleaning the deep frying tub: – Take out the deep frying basket and tilt up the heating element. Clamp the heating element onto the deep frying basket suspension (Fig. 17). –... -
Page 15: Draining The Deep Frying Oil
5. Draining the deep frying oil Draining the deep frying oil and fat Drain used oil only after it has cooled down. Melt used fat at the melting stage. In the cold oil zone, the fat melts only slowly. Use a temperature-resistant bucket with a capacity of at least 10 litres to collect the oil/fat. -
Page 16: Maintenance
If the power supply is functioning correctly, but your appliance still does not work, please contact your dealer or your local Gaggenau customer service agency. Specify the appliance type (see rating plate on the rear of the operating and assembly instructions). -
Page 17: Practical Tips
7. Practical tips 7.1 Cooking table Item Temperature Quantity Deep frying Remarks (°C) time (min.) Snacks and hors d'oeuvres Camembert, breaded Spring rolls 160 -170 4 - 6 4 - 6 Depending on size Pears filled with Roquefort cheese Turn frequently Flaky pasties (e.g. -
Page 18: Recipes
7.2 Recipes Fishballs in a cabbage jacket Game skewers For 4 skewers Ingredients Ingredients 400 g fillet of cod 4 giant prawns 300 g hare fillet 1 head of Chinese cabbage 1 lime 300 g deer fillet 2 tablespoons soya sauce 2 eggs 12 shallots 2 spring onions... -
Page 19: Tips And Tricks
7.3 Tips and tricks – If you have large quantities of food to deep – Remove ice from deep frozen foodstuffs. Fill the fry, you are advised to remove the basket from the basket outside of the deep fryer. tub after 1-2 minutes to allow the oil or fat to –... -
Page 20: Assembly Instructions
8. Assembly instructions 8.1 Technical data Total rating: 2.3 kW Fuse: 10 Ampère Appliance dimensions: 288 x 510 x 198.5 mm 8.2 Important notes on assembly The installing techician is responsible for Electrical connection perfect functioning of the appliance at its The appliance must only be connected by an installation location. -
Page 21: Installation
8.3 Installation – Produce the recess for one or several Vario appliances in the worktop. Proceed as shown in the installation sketch and the dimension table. The dimension table contains the space requirement for the connecting strip between the appliances. Important: the angle between the cut surface 1,7 m and the worktop must amount to 90°. - Page 24 GAGGENAU HAUSGERÄTE GMBH CARL-WERY-STR. 34 · D - 81739 MÜNCHEN Y (0 89) 45 90 - 03 FAX (0 89) 45 90 - 23 47 www.gaggenau.com...
Need help?
Do you have a question about the VF 230 and is the answer not in the manual?
Questions and answers