Table of Contents
Advertisement
Quick Links
AV SURROUND RECEIVER
AVR-4810
Owner's Manual
Bedienungsanleitung
Manuel de l'Utilisateur
v
English
Deutsch Français
Book 1
Book 2
Italiano
Español Nederlands Svenska
G
raphical
English
Use this manual in combination with the
operating guide displayed on the GUI screen.
GUI Menu Operation (vpage 29)
GUI Menu Map (vpage 28)
Language (vpage 56)
Remote Control Unit Operations (vpage 99)
Deutsch
Verwenden Sie dieses Handbuch zusammen
mit den Bedienungsanweisungen auf dem GUI-
Bildschirm.
GUI-Menübedienung (vSeite 29)
GUI-Menüplan (vSeite 28)
Sprache (vSeite 56)
Bedienung mit der Fernbedienung (vSeite 99)
Français
Utilisez ce manuel en même temps que le guide
d'utilisation affiché sur l'écran GUI (Interface
graphique).
Fonctionnement du menu de l'interface graphique
GUI (vpage 29)
Plan
du
menu
(vpage 28)
Langue (vpage 56)
Fonctionnement de la télécommande (vpage 99)
PRESET CODE
U
I
ser
nterface
de
l'interface
graphique
GUI
Advertisement
Table of Contents

Related Manuals for Denon AVR-4810


Summary of Contents for Denon AVR-4810
- Page 1 GUI-Menübedienung (vSeite 29) AV SURROUND RECEIVER GUI-Menüplan (vSeite 28) Sprache (vSeite 56) Bedienung mit der Fernbedienung (vSeite 99) AVR-4810 Français Utilisez ce manuel en même temps que le guide d’utilisation affiché sur l’écran GUI (Interface graphique). Fonctionnement du menu de l’interface graphique Owner’s Manual...
-
Page 2: Safety Precautions
Con la presente D&M Holdings Inc., Denon Brand Company dichiara and maintenance (servicing) instructions in the literature l’alimentazione all’unità e deve essere facilmente accessibile all’utente. che questo AVR-4810 è con-forme ai requisiti essenziali ed alle altre accompanying the appliance. PRECAUCIÓN:... - Page 3 SVENSKA NEDERLANDS ESPAÑOL ITALIANO FRANCAIS DEUTSCH ENGLISH NOTE ON USE / HINWEISE ZUM GEBRAUCH / OBSERVATIONS RELATIVES A L’UTILISATION / NOTE SULL’USO / NOTAS SOBRE EL USO / ALVORENS TE GEBRUIKEN / OBSERVERA ANGÅENDE ANVÄNDNINGEN CAUTION: • The ventilation should not be impeded by covering the ventilation openings with items, such as newspapers, tablecloths, curtains, etc.
- Page 4 ENGLISH DEUTSCH FRANCAIS ITALIANO ESPAÑOL NEDERLANDS SVENSKA 1. IMPORTANT NOTICE: DO NOT MODIFY THIS PRODUCT A NOTE ABOUT RECYCLING: This product, when installed as indicated in the instructions contained in this manual, meets R&TTE directive This product’s packaging materials are recyclable and can be reused. Please dispose of any materials requirements.
-
Page 5: Table Of Contents
Playing a Blu-ray Disc Player/DVD Player ····································64 Playing an iPod ® Using a Control Dock for iPod ························64 Preparations ··················································································3 Other Operations ········································································88 Playing an iPod ® Connected Directly to the AVR-4810’s Accessories ··················································································3 Playing a Blu-ray Disc Player Compatible About the Remote Control Unit ····················································3 USB Port ·····················································································66... -
Page 6: Getting Started
Presetting ·················································································100 Check once again that all connections are correct and that there are Operating Preset Components ·················································101 Perform the operations leading to playback on the AVR-4810 in the no problems with the connection cables. Setting the Remote ID ······························································104 order shown below. -
Page 7: Preparations
To prevent damage or leakage of battery fluid: Accessories • If you are using a non-DENON AV device, or if you cannot operate • Do not use a new battery together with an old one. the device even after registering the preset code, memorize the •... -
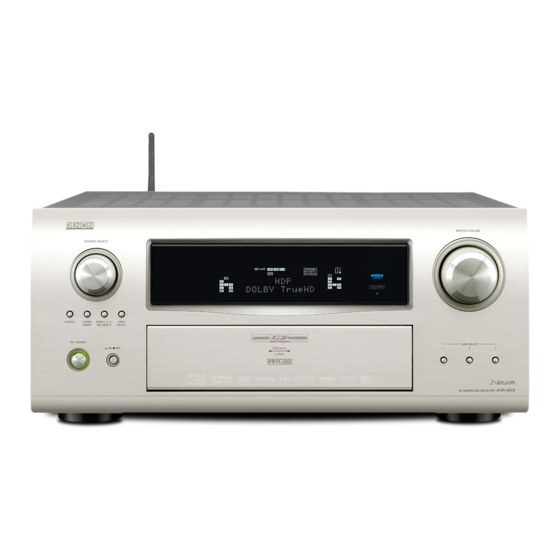
Page 8: Part Names And Functions
ENGLISH GWith the door openH Part Names and Functions Front Panel For buttons not explained here, see the page indicated in parentheses ( ). Q7 W7 Headphones jack (PHONES) ······················ (76) HDMI IN connector ····································· (17) W8 ZONE2 ON/OFF button ······························ (97) USB (iPod DIRECT) port ·····························... -
Page 9: Display
D.LINK indicator This lights to indicate that party mode has surround back or LFE channel) is input. If there This lights when playing using DENON LINK started as Organizer. are two or more extension channels, the “ ”... -
Page 10: Rear Panel
DOCK CONTROL jack ································· (19) USB (iPod DIRECT) port ····························· (23) PRE OUT connectors ···························· (24, 96) SIGNAL GND terminal ······························· (19) Digital audio connectors ····················(18 ~ 23) EXT. IN connectors ····································· (24) Speaker terminals ······························ (14 ~ 16) DENON LINK connector ····························· (22) -
Page 11: Remote Control Unit
Operations Possible by Main Remote Control Unit Remote Control Unit Operations on the AVR-4810 Main Remote Control Unit (RC-1126) Operations on devices other that the AVR-4810 • Preset the remote control codes of the devices to be operated ( v page 100). •... - Page 12 ENGLISH Part Names and Functions Sub Remote Control Unit (RC-1121) Selected Device Function button Button name select button indicator ZONE indicators ······································· (109) Preset Channel buttons ·······················(67 , 68, 72) QUICK SELECT buttons ······················· (91, 98) Tuner system buttons ····························(67 ~ 69) Input source select buttons ·····················...
-
Page 13: Connections
• Do not bundle power cords together with connection cables. Doing Analog so can result in humming or noise. Other cables (White) connections (Red) DENON LINK (stereo, surround) connections Audio cable DENON LINK cable Analog Network connections connections (monaural, for Audio cable Ethernet cable (wired LAN) subwoofer) Speaker... -
Page 14: Converting Input Video Signals For Output (Video Conversion Function)
Use the terminals according to the devices to be connected. Input Output This function automatically converts various formats of video signals input to the AVR-4810 into the format Output Input used to output the video signals from the AVR-4810 to a monitor. (vpage 119 “Relationship Between... -
Page 15: Speaker Layout
Installing the Speakers Installing the speakers When only one surround back speaker is being used The AVR-4810 supports up to 11.1-channel surround The illustration below shows the recommended speaker layout. Use the layout shown in the illustration below for the surround back sound playback by adding front height and front wide speaker. - Page 16 Installing the Speakers s Example Installation of Speakers The AVR-4810 supports a wide variation of surround playback such as in the example speaker installations “Amp Assign” setting shown below (11.1/9.1/7.1/6.1/5.1ch). It is also possible to have speaker output in rooms other than the...
- Page 17 ENGLISH Installing the speakers When using front speakers with bi-wiring or bi-amping “Amp Assign” setting Example of speaker installation (vpage 38 ~ 40) • When bi-wiring : MAIN ZONE Set “Front” to “Bi-WIRING”. • When bi-amp : Set “Front” to “Bi-AMP”. b Bi-wire or bi-amp the front speakers to the front speaker terminals and Bi-Wir./Bi- Amp speaker terminals.
-
Page 18: Speaker Connections
Speaker Connections : S.BACK/F.HEIGHT/F.WIDE and F.HEIGHT/ F.WIDE speaker terminals The AVR-4810 can be connected to a maximum of three subwoofers. The same signal is output from each subwoofer terminal. Use when connecting surround back speakers, front height speakers or front wide spekars. - Page 19 ENGLISH Speaker Connections When front speakers for dedicated 2-channel DIRECT/STEREO : ZONE2 and ZONE3 speaker terminals : Bi-Wir. or Bi-Amp speaker terminals mode playback are bi-wired or bi-amped Use when installing multi-zone speakers or dedicated 2-channel Use when front speakers are bi-wired or bi-amped. Speaker connections speakers.
- Page 20 Service center after switching off. Connecting the Speaker Cables Carefully check the left (L) and right (R) channels and + (red) and – (black) polarities on the speakers being connected to the AVR-4810, and be sure to interconnect the channels and polarities correctly.
-
Page 21: Connecting Devices
ENGLISH Connections Connecting Devices Connecting Devices Equipped with HDMI Terminals The AVR-4810 allows connection of inputs from up to 6 HDMI devices and output to 2 monitors. Important Information Video Digital Connecting Devices Satellite cassette video About HDMI HD player... -
Page 22: Connecting The Playback Components
• When the AVR-4810 is connected to other devices with HDMI cables, also connect the AVR-4810 and TV using an HDMI cable. The audio signals output from the HDMI connectors are only the For instructions on HDMI connections, see “Connecting Devices •... - Page 23 Set other than when iPod is assigned to the VCR (iPod) terminal. “Input Assign” – “iPod dock“ (vpage 59) The SIGNAL GND terminal of the AVR-4810 is not a safety ground connection. Connect it to reduce noise when noise is excessive.
-
Page 24: Connecting The Recording Components
Set as Necessary NOTE assigned. To record video signals through the AVR-4810, use the same type Set this to change the input signal to which the input source is “Input Assign” (vpage 57) of video cable for connection between the AVR-4810 and the player assigned. - Page 25 ENGLISH Connecting Devices Satellite Receiver / Cable Tuner (Set Top Box) Connect the Tuner Select the terminal to use and connect the device. For instructions on HDMI connections, see “Connecting Devices Equipped with HDMI Terminals” on page 17 . Select the terminal to use and connect the device. For instructions on HDMI connections, see “Connecting Devices Satellite Receiver / Cable Tuner Equipped with HDMI Terminals”...
-
Page 26: Connections To Other Devices
In addition, refer to page 88 “Playing a Blu-ray Disc Player Compatible a. With the antenna on top of any (small, supplied) with DENON LINK 4th” for information on connecting a player that stable surface. supports DENON LINK 4th edition. - Page 27 USB port on the front panel. “Input Assign” (vpage 57) • To connect an iPod to the AVR-4810, use the USB cable supplied with the iPod. NOTE • When you want to playback a movie file stored on the iPod, use the...
- Page 28 ENGLISH Connecting Devices Component with Multi-channel Output connectors External Power Amplifier The video signal can be connected in the same way as a Blu-ray Disc • Select the terminal to use and connect the device. player / DVD player (vpage 18 “Blu-ray Disc Player / DVD Player”). •...
-
Page 29: External Controller
ENGLISH Connecting Devices External Controller Connecting to a Home Network (LAN) When you connect the AVR-4810 to a home network, you can enjoy RS-232C connector REMOTE CONTROL jacks listening to music files stored on your PC, internet radio audio and When you connect an external control device, you can control other sources. - Page 30 “Network Modem Connecting” (vpage 45). • With the AVR-4810, it is possible to use the DHCP and Auto IP Router functions to make the network settings automatically. • When using the AVR-4810, we recommend you use a router •...
-
Page 31: Connecting The Power Cord
ENGLISH Connecting the Power Cord Once Connections are Symbols used to indicate buttons in this manual Completed Button located on both the main unit Wait until all connections have been completed before connecting the BUTTON and the remote control unit power cord. -
Page 32: Settings
ENGLISH Settings GUI Menu Map Symbols used to indicate buttons in this manual MENU Pressing displays the GUI menu. From this menu, you can move Button located on both the main unit Source Select (vpage 56) to various setting screens. BUTTON and the remote control unit SAT/CBL, VCR, DVR, V.AUX, NET/USB,... -
Page 33: Gui Menu Operation
ENGLISH GUI Menu Operation • When a TV is connected to the AVR-4810, the GUI menu, sound field GExample 2H Audyssey Auto Setup screen Examples of GUI Menu Screen Displays parameters, etc., can be displayed on the TV. (with illustration) This allows you to operate the AVR-4810 and make settings on it Typical examples are described below. -
Page 34: Selecting The Input Source
Use the device selection buttons on the main remote control unit to set the device to be operated beforehand. • When using with an iPod connected directly to the AVR-4810’s USB The currently selected input source SOURCE SELECT port, select “USB/iPod” for the input source. -
Page 35: Make The Optimal Speaker Settings, And Correct The Room Acoustics (Audyssey™ Auto Setup)
ENGLISH Make the Optimal Speaker Settings, and Correct the Room Acoustics (Audyssey™ Auto Setup) When Using the Front Height Speakers The acoustic characteristics of the connected speakers and Important information listening room are measured and the optimum settings are made GExample qH GExample wH automatically. - Page 36 Turn on the TV and subwoofer power. Setup Cell phones should be placed away from all audio electronics during Change the TV input to AVR-4810 input. microphone the measurement process as Radio Frequency Interference (RFI) may cause measurement disruptions (even if the cell phone is not Turn on the AVR-4810 power.
- Page 37 If you set the channels you will not use beforehand, those channels : This is the usual configuration. NORMAL and ZONE3 speaker terminals on the AVR-4810 to suit the speaker will not be measured. Therefore, you can save an amount of time environment being used (vpage 38 ~ 40 “Amp Assign”).
- Page 38 ENGLISH Make the Optimal Speaker Settings, and Correct the Room Acoustics (Audyssey™ Auto Setup) STEP3 Measurement STEP4 Calculation d Perform Audyssey Auto Setup Move setup STEP3 • Audyssey Auto Setup detects the presence of each speaker and AUDYSSEY AUTO SETUP AUDYSSEY AUTO SETUP microphone screen, select “Next...
- Page 39 Store remeasurement or the error message still appears, it is possible takes about 30 seconds that the speakers are not connected properly. Turn the AVR-4810 Enter Cancel to complete. RETURN off, check the speaker connections and repeat the measurement Apply and store measurement result process from the beginning.
-
Page 40: Error Messages
• Included setup microphone is not connected. • Connect the included setup microphone to the Again AUDYSSEY AUTO SETUP SETUP MIC jack of the AVR-4810. ENTER Press to select “Retry”, and then press Caution! • Not all speakers could be detected. - Page 41 ENGLISH Make the Optimal Speaker Settings, and Correct the Room Acoustics (Audyssey™ Auto Setup) Subwoofer Level Error Message and How to Adjust Check the Measuring Results and The optimal level of the subwoofer channel is 75 dB. During subwoofer level measurement ( :Perform Audyssey Auto Setup, “...
-
Page 42: Making Detailed Settings (Manual Setup)
ENGLISH Making Detailed Settings Making the Speaker Settings (Speaker Setup) (Manual Setup) Default settings are underlined. Perform when setting the speakers manually or when changing settings made in Audyssey Auto Setup. For details on how to select, set and cancel settings for each menu, see “GUI Menu Operation”... - Page 43 5.1ch+FW 5.1ch+SB+FW S.BACK / F.HEIGHT / 5.1ch+FH 5.1ch+SB+FH 5.1ch+FH+FW FRONT CENTER SURROUND F.HEIGHT / F.WIDE F.WIDE Determine the maximum number of channels used by the AVR-4810. FRONT CENTER FRONT FRONT FRONT CENTER CENTER CENTER CENTER S.BACK *1 SURROUND SURROUND SURROUND...
- Page 44 ENGLISH Making Detailed Settings (Manual Setup) Setting items Setting contents Setting items Setting contents Amp Assign Configuration : Select MAIN ZONE channel configuration. Speaker Configuration Subwoofer : Set the presence of a subwoofer. Change power • (Continued) • Yes : Use a subwoofer. 5.1ch / 7.1ch / 9.1ch / 11.1ch amp assignment to suit Extra Channel : Select the channels to be used from among surround...
- Page 45 ENGLISH Making Detailed Settings (Manual Setup) Setting items Setting contents Setting items Setting contents Speaker Configuration Front Height : Set the presence and size of the front height speakers. Distance Meters / Feet : Set the unit of distance. (Continued) •...
- Page 46 ENGLISH Making Detailed Settings (Manual Setup) Setting items Setting contents Making the HDMI Settings (HDMI Setup) Channel Level Default : Reset all distance settings to factory default. Default settings are underlined. (Continued) • Yes : Reset to the defaults. • No : Do not reset to the defaults.
- Page 47 This can be set when “Control“ is set to “ON“. controls operations of a Power Off Control : The power of the AVR-4810 and external device turn If “Speaker Configuration” – “Subwoofer” (vpage 40) is set to TV that is compatible with off together.
- Page 48 ENGLISH Making Detailed Settings (Manual Setup) Setting items Setting contents Setting items Setting contents 2ch Direct/Stereo Crossover : Outputs at below set frequency, each speaker’s bass signal EQ Customize Audyssey Byp. L/R : Set when not using “Audyssey Byp L/R” equalizer. (Continued) output from the subwoofer.
- Page 49 RETURN Select access point to connect 2. Turn on the AVR-4810 (vpage 27 “Turning the Power On”). e If there is an encryption setting for the access point you selected in 3. Set the access point at the “Network Connecting”.
- Page 50 Enter Cancel RETURN Terminate setup Start connection AVR-4810 performs automatic network setup due to the DHCP This WPS (push-button) setup screen can be displayed directly function. by pressing and holding on the main unit for at least 3 When connecting to a network without a DHCP function, you will need seconds.
- Page 51 ENTER press The types of characters that can be input are as shown below. DENON GLower case charactersH abcdefghijklmnopqrstuvwxyz GUpper case charactersH ABCDEFGHIJKLMNOPQRSTUVWXYZ GSymbolsH ! “ # $ % & ’ ( ) * + , - . / : ; < = > ? @ [ \ ] ˆ _ ` { | } ˜...
- Page 52 3. Set the IP address at the “Network Connecting”. function is set to “ON” in the AVR-4810’s default settings. • If the AVR-4810 is being used connected to a network without the NETWORK CONNECTING NETWORK CONNECTING DHCP function, the network settings must be made. In this case, some knowledge of networks is required.
- Page 53 RETURN Proxy server is used Friendly Name Edit : The Friendly Name is the name AVR-4810 displayed q On the GUI menu, select “Network Connecting” – “Detail” or “Manual” on the network. Up to 63 characters can be input. The default Friendly...
- Page 54 You can set to the upper limit set with “Volume Limit” (vpage 52) . Network Information Friendly Name / Network=Wired/Wireless / SSID / Network Status : Displays up to a maximum of 10 DENON products DHCP= ON/OFF / IP Address / MAC Address Display network information.
- Page 55 ENGLISH Making Detailed Settings (Manual Setup) Setting items Setting contents Making the Multi-zone Settings (Zone Setup) Volume Level Variable : Volume adjustment enabled by main unit and remote control Default settings are underlined. Set the volume output level. unit. Set the audio to playback with multi-zone (ZONE2, ZONE3). –40dB (41) : Fix volume at –40 dB.
- Page 56 Wall Paper : Set wallpaper to display the background when playback is OPTION Default settings are underlined. (Continued) stopped, etc. • Picture : Set the background to a picture (DENON logo). Setting items Setting contents • Black : Set the background to black. Volume Control Volume Display : Set how volume is displayed.
- Page 57 ENTER 4. Pressing , select the brand name. Then press n Default settings for preset codes DVD Player REMOTE PRESET CODES [1/3] DENON [32134] OPTION -DVD- Video Cassette Recorder H & B Tivo [20739] Haaz Haier...
- Page 58 ENGLISH Making Detailed Settings (Manual Setup) Setting items Setting contents Setting items Setting contents Remote Preset Codes 5. The procedures for registering remote control codes and remote Quick Select Name 4. Repeat steps 1 ~ 3 to change the display name. (Continued) control preset registration are displayed.
- Page 59 Used when receiving menu and updates can be carried out. If the procedure has not been Only use this function if so instructed by a DENON serviceperson or maintenance from a DENON carried out, “Not Registered” is displayed. installer. service engineer or custom The ID number shown on this screen is needed when carrying out the installer.
-
Page 60: Making The Input Settings (Source Select)
• • In the event of an update error during update or upgrade, turn the AVR-4810’s power off and then on Changing the Input Source’s Display Name (Rename) vpage 61 again. “Update retry” appears on the display and update restarts from the point at which update failed. -
Page 61: Input Assign
ENGLISH Making the Input Settings (Source Select) Input Assignments Menu Operations Important Information MENU Press to move the gray uio p About the Display of Input Sources in This Manual The GUI menu is displayed on the TV highlight to the item you want to set. screen. - Page 62 3 / D.LINK (DENON LINK) z the component video input terminal is disabled, even if it is assigned. z : “D.LINK” is set when the AVR-4810 is connected by DENON LINK to a DENON Blu-ray disc / DVD player (vpage 22 “Components Equipped with a DENON LINK Connector”).
- Page 63 By default on first use, it is assigned to “VCR (iPod)”. • If control dock for iPod is not connected to the AVR-4810, assignment of the “iPod dock” is disabled, and you can use it as a standard input source.
- Page 64 When “Video Convert” is set to “OFF”, the video conversion function Aspect This can be set when the input source is DVD SAT/CBL does not work. In this case, connect the AVR-4810 and TV with the same Set the aspect ratio for the V.AUX NET/USB .
-
Page 65: Input Mode
ENGLISH Making the Input Settings (Source Select) Changing the Input Mode and Decoding Mode Changing the Input Source’s Display Name (Rename) (Input Mode) Default settings are underlined. Setting items Setting contents Rename ENTER 1. Press The selectable input modes depend on the input source and “Input Assign” ( page 57) setting. -
Page 66: Playback Mode
ENGLISH Making the Input Settings (Source Select) Displaying the Playback Screen for the Different Setting the Media Server, USB/iPod and Napster Input Sources (Play) Playback Mode (Playback Mode) When the input source is “ NET/USB ( Favorites ) Internet Radio Media Server USB/iPod Napster... - Page 67 ENGLISH Making the Input Settings (Source Select) Setting Preset Channels so that They are not Displayed When Tuning (Preset Skip) Default settings are underlined. Setting items Setting contents A ~ G This can be set when the input source is TUNER . Set the preset channels that All : All the preset channels in the selected memory block are skipped.
-
Page 68: Playback
Playback preparation. q Connecting the DENON control dock for iPod to the AVR- 4810 (vpage 19 “Control Dock for iPod”). w Set the iPod ® in the DENON control dock for iPod. Playing Components Turn the AVR-4810 power on. (vpage 27 “Turning the Power On“) - Page 69 When an iPod equipped with a video function is connected to a Stopping playback temporarily (vpage 76) DENON ASD-11R control dock for iPod, video files can be played in There are two modes for display the contents recorded on the Fast-forwarding or fast-reversing (vpage 76) the browse mode.
-
Page 70: Playing An Ipod ® Connected Directly To The Avr-4810'S
Control Unit”). BUTTON and the remote control unit • Music stored on an iPod can be played on the AVR-4810 when the <BUTTON> Button only on the main unit When no control dock for iPod is connected, this operation is also AVR-4810 and iPod are connected by USB cable. -
Page 71: Tuning In Radio Stations
If the desired station cannot be tuned in with auto tuning, tune it in functions may not operate. manually. • DENON will accept no responsibility whatsoever for any loss of iPod • When tuning in stations manually, press and hold data. -
Page 72: Rds (Radio Data System)
ENGLISH Tuning in Radio Stations – FM/AM Broadcasts Listening to Preset Stations RDS (Radio Data System) Symbols used to indicate buttons in this manual [A ~ G] Press to select the memory block (A to G). Button located on both the main unit RDS (works only on the FM band) is a broadcasting service which BUTTON and the remote control unit... -
Page 73: Rds Search
[SEARCH] three times to select “PTY”. • The AVR-4810’s Internet radio station list is created using a radio To turn the display off, press station database service (vTuner). This database service provides a If no text data is being broadcast, “NO TEXT DATA” is displayed. - Page 74 MPEG-4 AAC – of music they want to hear on the AVR-4810. Before you can use The AVR-4810 plays back image (JPEG) files in the orientation in Napster, you will need to visit the Napster website on your PC to FLAC (Free which they are stored in the folder.
-
Page 75: Listening To Internet Radio
Select menu, then select “ ” (vpage 30). • On the AVR-4810, folder and file names can be displayed as titles. Any characters that cannot be displayed are replaced with Set the main remote control unit to the “NET/USB” “. (period)”. - Page 76 [A ~ G] [1 ~ 8] The selected Internet radio station is cleared. After pressing , press to select the registered preset number. To cancel the operation without clearing the station, press The AVR-4810 automatically connects to the Internet and playback begins.
-
Page 77: Playing Files Stored On A Computer
ENGLISH Playing Network Audio, USB Memory Devices Playing Files Stored on a Computer • When playing still picture (JPEG) files, files can also be selected Use this procedure to play music files, image files or playlists. using the operation described below. [TU d] [TU f] During playback, either press... -
Page 78: Playing Files Stored On Usb Memory Devices
[SOURCE SELECT] to display the GUI Source • The AVR-4810 is equipped with two USB ports, one each on the front Select menu, then select “ ” (vpage 30). and rear panels. It is not possible to use the set with USB memory devices connected to both the ports at the same time. -
Page 79: Listening To Napster
ENGLISH Playing Network Audio, USB Memory Devices Registering Tracks in My Napster Library Adjust the items below. Listening to Napster Adjusting the master volume (vpage 76) Press while the track you wish to register is Playback preparation. Selecting the surround mode (vpage 78) playing. -
Page 80: Operations During Playback
ENGLISH Operations During Playback Symbols used to indicate buttons in this manual Button located on both the main unit Adjusting the Master Volume To Stop BUTTON and the remote control unit <BUTTON> Button only on the main unit MASTER VOLUME ENTER to adjust the volume. -
Page 81: Playing Repeatedly
ENGLISH Operations During Playback Playing Repeatedly Playing in Random Order Press [REPEAT] Press [RANDOM] GUI menu GUI menu display during display during menu Display menu Display Setting contents Setting contents remote control remote control display display unit operation unit operation Repeat all songs. -
Page 82: Selecting The Surround Mode (Surround Mode)
ENGLISH Selecting the Surround Mode (Surround Mode) Surround Playback of 2-channel Sources q Playing Sources According to the Symbols used to indicate buttons in this manual STANDARD The mode switches as shown below each time Sources’ Audio Signal Format/ Button located on both the main unit pressed. -
Page 83: Direct Playback
: This is displayed when the input signal is “DTS-ES Matrix 6.1” and the AVR-4810’s “AFDM” (vpage 82) setting is set to “ON” z2 : This is displayed when the input signal is “DTS-ES Discrete 6.1”. -
Page 84: Stereo Playback
ENGLISH Selecting the Surround Mode (Surround Mode) r Stereo Playback Symbols used to indicate buttons in this manual Button located on both the main unit This is the mode for playing in stereo. The tone can be adjusted. BUTTON and the remote control unit Sound is output from the front left and right speakers and subwoofer. -
Page 85: Adjusting The Sound And Picture Quality
ENGLISH Adjusting the Sound and Picture Quality (Audio/Video Adjust) For details on how to select, set and cancel settings for each menu, see “GUI Menu Operation” (vpage 26). Setting items Setting contents Adjusting the Sound (Audio Adjust) Surround Parameters LFE : Adjust the low-frequency effects level (LFE). Default settings are underlined. - Page 86 ENGLISH Adjusting the Sound and Picture Quality (Audio/Video Adjust) Setting items Setting contents Setting items Setting contents Surround Parameters Front Height : Set the Dolby PLgz Height mode to ON or OFF. Surround Parameters For multi-channel sources (Continued) (Continued) Set the decoding method for the surround back channel. •...
- Page 87 ENGLISH Adjusting the Sound and Picture Quality (Audio/Video Adjust) Setting items Setting contents Setting items Setting contents Tone Tone Control : Sets the tone control function ON and OFF. Dynamic EQ : Solves the problem of deteriorating sound quality as Audyssey Settings Adjust the tonal quality of •...
- Page 88 ENGLISH Adjusting the Sound and Picture Quality (Audio/Video Adjust) Setting items Setting contents Setting items Setting contents Reference Level Offset : Audyssey Dynamic EQ is referenced to the Audyssey Settings Audyssey Settings About Dynamic Volume (Continued) standard film mix level. It makes adjustments to maintain the reference (Continued) Audyssey Dynamic Volume™...
- Page 89 ENGLISH Adjusting the Sound and Picture Quality (Audio/Video Adjust) Setting items Setting contents Setting items Setting contents Audyssey DSX Settings RESTORER OFF : Do not use RESTORER. About Audyssey Dynamic Surround Expansion (DSX) (Continued) This function restores Mode 1 (RESTORER 64) : Optimized mode for compressed sources with Audyssey DSX is a scalable surround expansion system that adds new compressed audio...
-
Page 90: Adjusting The Picture Quality (Picture Adjust)
ENGLISH Adjusting the Sound and Picture Quality (Audio/Video Adjust) Adjusting the Picture Quality (Picture Adjust) Default settings are underlined. • This can be set when the input source is DVD SAT/CBL V.AUX NET/USB . With input sources other than the ones above, this can be set when “Video Select” is selected. In this case, the original input source settings are called out. -
Page 91: Checking The Status (Information)
ENGLISH Checking the Status (Information) Setting items Setting contents Setting items Setting contents Analog/PCM 2ch / Digital 2ch / Digital 5.1ch / Multi ch MAIN ZONE Auto Surround Status Shows information about settings for MAIN ZONE. Mode This can be displayed when “Auto Surround Mode” is set to “ON”. The items displayed differ according to the input source. -
Page 92: Other Operations And Convenient Functions
When a BD is played with the input mode set to “Auto”, playback connections with the compatible Blu-ray disc player. is performed in the DENON LINK 4th mode. When a disc other than a BD is played with the input mode set to “Auto”, playback is <ZONE2/3/4 / REC SELECT>... -
Page 93: Playing Super Audio Cd
ENGLISH Other Operations Playing Super Audio CD Recording on an External Device <ZONE2/3/4 / REC SELECT> <SOURCE • To cancel, press , then turn (REC OUT mode) Either assign the input source to be used to “HDMI” SELECT> until “ZONE2 SOURCE” is displayed. (vpage 58), or assign “D.LINK”... -
Page 94: Convenient Functions
QUICK SELECT uio p • When you want to listen to TV audio by AVR-4810, connect optical If the HDMI control function does not operate properly, check the digital or analog audio (vpage 21 “TV“). following points. -
Page 95: Setting The Power To Standby After A Certain Amount Of Time (Sleep Timer Function)
All of the settings in step 1 can be memorized together. By memorizing frequently used settings, you can quickly access and enjoy a playback With this function, you can set the AVR-4810 so that the power is Adjust the Volume of the Different Speakers environment that is consistently the same. -
Page 96: Playing The Same Network Audio On Different Devices Connected In A Network (Party Mode Function)
Button only on the remote control unit the same network audio as on the organizer is played. DIRECT) can be played on multiple DENON products equipped with • If there are fewer than four attendees, a device can join the party the Party Mode function and connected in a network. -
Page 97: Operating A Wireless Lan-Compatible Mobile Terminal To Play Music And Still Pictures
Select a player. Mobile terminal device When selecting the AVR-4810 from the mobile terminal device, the name of the AVR-4810 is displayed at “Friendly Name” (vpage 49 “Friendly Name Edit”). From the mobile terminal device, browse the media server in the same network and The following operations are possible from the mobile terminal device: •... -
Page 98: Operating The Avr-4810 With A Browser (Web Control Function)
Normally, there is a change to the latest information each time box. you operate. When operated from the main unit, click because For example, if the IP address of AVR-4810 is “192.168.100.33”, the screen is not updated. enter “http://192.168.100.33”. z8: Click to return to the top menu. -
Page 99: Various Memory Functions
ENGLISH Convenient Functions GExample 2H Setup menu screen GExample 4H PDA menu screen GExample 6H Dedicated iPod Touch screen DENON Web Controller SOURCE SELECT ReLoad When accessed from the iPod Touch browser, an optimized Main Zone Control SETUP MENU Source SAT/CBL operation screen is displayed. -
Page 100: Playing In Zone2/Zone3/Zone4 (Multi-Zone Function)
The source selected for ZONE2 is also output from the recording output connectors. ZONE4 The audio signals of the AVR-4810’s ZONE2 and ZONE3 audio output terminals are output to the ZONE2 and ZONE3 amplifiers and played MAIN ZONE on these amplifiers. -
Page 101: Playback
Audio Output (PRE OUT)”. <BUTTON> Button only on the main unit Turn on the AVR-4810’s power. Adjust the item below. [BUTTON] Button only on the remote control unit (vpage 27 “Turning the Power On“) Adjust the Volume <ZONE2/3/4 / REC SELECT>... -
Page 102: Menu Operation
ENGLISH Menu Operation Quick Select Function Symbols used to indicate buttons in this manual Button located on both the main unit The settings related to tone adjustment and volume can be made. It is also possible to save three settings for multi-zone. BUTTON and the remote control unit In the zone mode for which you want to operate,... -
Page 103: Sleep Timer Function
“OFF”. MAIN] : iPod The sleep timer is also canceled when the AVR-4810 is set to the : Network / USB standby mode or the ZONE2 or ZONE3 power is turned off. : Blu-ray Disc Player / HD DVD Player /... -
Page 104: Presetting
ENGLISH Operating the Main Remote Control Unit [MAIN] The mode switches each time is pressed. Signal Presetting transmission GMAIN modeH GZONE2 modeH GZONE3 modeH The included main remote control unit can be preset to operate indicator SAT/CBL] devices of various brands. [ DVD/HDP] [DEVICE SELECTOR]... -
Page 105: Operating Preset Components
ENGLISH Operating the Main Remote Control Unit CD Player / CD Recorder Digital Video Recorder / Video cassette Recorder / Operating Preset Components Cassette Deck EL Display EL Display Press [DEVICE SELECTOR] for the component to be EL Display operated. Device select EL Display button... - Page 106 ENGLISH Operating the Main Remote Control Unit Set top box for Satellite / Cable / IP TV / HD TV iPod EL Display EL Display EL Display EL Display EL Display EL Display Device select Device select Device select button button button 1-track/All-track repeat play...
- Page 107 ENGLISH Operating the Main Remote Control Unit Tuner (FM/AM) NET/USB EL Display EL Display EL Display EL Display Device select Device select button button A ~ G Preset memory block selection A ~ G Preset memory block selection TU df Tuning +/–...
-
Page 108: Setting The Remote
When using multiple DENON AV receivers in the same room, make If your AV devices are of a brand other than DENON or if they cannot TUNER] [DEVICE this setting so that only the desired AV receiver operates. -
Page 109: Macro Function
ENGLISH Operating the Main Remote Control Unit Calling out MACRO Function [MAIN] • With some remote control units, the signals cannot be learned or the Press , to select “MACRO”. This function lets you register a series of operations at a single device will not operate properly even when the signals have been button. -
Page 110: Punch Through Function
ENGLISH Operating the Main Remote Control Unit Signal Punch Through Function Setting the Time the Backlight Stays Lit transmission indicator DVD/HDP (including BD and CD) or VCR/DVR mode buttons can be Press and hold in [RC SETUP] for at least 3 seconds. SAT/CBL] stored at unused TV or SAT/CBL mode buttons. -
Page 111: Specifying The Zone Used With The Main Remote Control Unit
ENGLISH Operating the Main Remote Control Unit Punch-Through Function Specifying the Zone Used with the Main Resetting the Main Remote Control Unit [RC SETUP] Press and hold in for at least 3 seconds. Remote Control Unit Learning Function The signal transmission indicator flashes twice. [MAIN] When the Device Select button is pressed, only the set zone... -
Page 112: Operating The Sub Remote Control Unit
• The sub remote control unit can also be used for multi-zone, so you ZONE ON Power turned on ( b 1) can use it to control the AVR-4810 from other rooms. INPUT SOURCE SELECT Input source selection ( b 2) •... -
Page 113: Switching Zones
Setting the Remote ID Remote Control Unit is Used Use this procedure to select the zone to be operated by the sub When using multiple DENON AV receivers in the same room, make this (ZONE SELECT LOCK Mode) remote control unit. -
Page 114: Other Information
Dolby Pro Logic g is a matrix decoding technology developed by Dolby Dolby Pro Logic gz introduces a new dimension to Home Entertainment The AVR-4810 is equipped with a digital signal processing circuit that Laboratories. through the addition of a pair of front height channels. Compatible with... - Page 115 ENGLISH Explanation of Terms Audyssey Dynamic Surround Expansion™ (DSX) DTS 96/24 DTS Surround Realistic reproduction of sound relies on the ability of audio systems DTS 96/24 is a digital audio format enabling high sound quality to match human hearing performance. Three key requirements are: playback in 5.1-channels with a sampling frequency of 96 kHz and 24 DTS Digital Surround (i) frequency response;...
- Page 116 DENON LINK 4th uses the clock of the AV amplifier connected by Equipped foe not only front left and right channels but also for the DENON LINK to achieve HDMI signal transfer with little jitter when Manufactured under license from Audyssey Laboratories.
- Page 117 This is key information used for encrypting data when conducting of Secure Content Owners. data transfer. On the AVR-4810, the same WEP key is used for data encryption and decryption, so the same WEP key must be set on both devices in order for communications to be established...
-
Page 118: Surround Modes And Parameters
ENGLISH Surround Surround Modes and Parameters Signals and adjustability in the different modes Channel output Parameter (default values are shown in parentheses) Surround Mode Front Surround Surround Front Wide Front Height D. COMP AFDM Surround Center Subwoofer Cinema EQ. Mode Room Size Effect Level Back L/R... - Page 119 ENGLISH Surround Signals and adjustability in the different modes Parameter (default values are shown in parentheses) NEO:6 MUSIC Surround Mode PRO LOGIC g/gx MUSIC mode only EXT. IN only mode only Dynamic Delay Time Subwoofer Front Height Tone Control MultEQ XT Dynamic EQ RESTORER Volume...
- Page 120 ENGLISH Surround Differences in Surround Mode Names Depending on the Input Signals Button Input signals DTS-HD DOLBY DOLBY DIGITAL MULTI CH PCM Super Audio CD WMA (Windows LINEAR DTS-HD DOLBY DOLBY Note Media Audio) / DTS-HD DTS ES DTS ES DOLBY DOLBY DOLBY...
- Page 121 ENGLISH Surround Button Input signals DTS-HD DOLBY DOLBY DIGITAL MULTI CH PCM Super Audio CD WMA (Windows LINEAR DTS-HD DOLBY DOLBY Note Media Audio) / DTS-HD DTS ES DTS ES DOLBY DOLBY DOLBY DOLBY Surround Mode ANALOG PCM / High DOLBY DIGITAL DIGITAL EX...
- Page 122 ENGLISH Surround Button Input signals DTS-HD DOLBY DOLBY DIGITAL MULTI CH PCM Super Audio CD WMA (Windows LINEAR DTS-HD DOLBY DOLBY Note Media Audio) / DTS-HD DTS ES DTS ES DOLBY DOLBY DOLBY DOLBY Surround Mode ANALOG PCM / High DOLBY DIGITAL DIGITAL EX...
- Page 123 ENGLISH Relationship Between Video Signals and Monitor Output MAIN ZONE MONITOR OUT Input Signals Output Signals GUI menu displayed Video Convert HDMI COMPONENT S-VIDEO VIDEO HDMI COMPONENT S-VIDEO VIDEO HDMI COMPONENT S-VIDEO VIDEO ON/OFF Only the GUI menu is displayed VIDEO VIDEO VIDEO...
-
Page 124: Troubleshooting
Make sure the remote control IDs of the main unit and remote 55, 104, 109 control unit match. If the IDs do not match, “AVAMP z” (z is the main unit’s remote control ID) appears on the AVR-4810 display when the remote control unit is operated. •... - Page 125 Page Symptom Cause / Countermeasure Page No picture appears. • Check the connections of the AVR-4810’s video output terminals 17 , 18 No sound is produced • When playing monaural audio sources, select a surround mode 78 ~ 80 and the TV’s input terminals.
- Page 126 PC Application, it is registered to “My Internet radio cannot • Ethernet cable is not properly connected or network is 25, 26 Library”. In this way, the playlist can be played in AVR-4810. be played. disconnected. Check the connection status. Cannot delete Tracks, •...
-
Page 127: Restoring All The Settings To As They Were At The Time Of Purchase (Resetting The Microprocessor)
The settings of the SSID and network key (WEP) are incorrect. 45 ~ 47 network. Match the network settings with the AVR-4810’s settings. Perform this procedure if the display is abnormal or if operations cannot be performed. • The reception is poor and the signals cannot be received. Shorten –... -
Page 128: Specifications
ENGLISH Specifications Audio section Tuner section [FM] [AM] • Power amplifier (note: µV at 75 Ω/ohms, 0 dBf = 1 x 10 Rated output: Front: Receiving Range: 87 .5 MHz ~ 108.0 MHz 522 kHz ~ 1611 kHz 140 W + 140 W (8 Ω/ohms, 20 Hz ~ 20 kHz with 0.05 % T.H.D.) Usable Sensitivity: 1.0 μV (11.2 dBf) 19 µV... - Page 129 31224 Dayton 31158 Global Link 31224 Kennex 30770, 30713, 30898 Audiosonic 30690 Daytron 31040 Global Sphere 31152 Kenwood 30490, 30534, 30682 Denon 32258 Audix 30713 30831 Go Video 30783, 30869, 31099 Kiiro 30770 Integra 32147 Autovox 30713 Decca 30770, 31115...
- Page 130 Mirror 30752 Radiotone 30713 Sound Color 31233 Umax 30690, 31151 E:max 31321 30695, 30675, 30713, 30788, Mitsubishi 30521, 30713, 31403 30522, 31759 Soundwave 30713, 30783, 31530 Ellion 31421 United 30884, 31115, 31152, 31228, Mizuda 30770 30490 Standard 30831, 30651, 30788, 30898 Eltax 31321 31233, 31367...
- Page 131 Acoustic Research 40420 CD Recorder 20081, 20037, 20042, 20089, Miro 40000 Hitachi Crown 20278, 20037 20240, 20593 Advantage 40032 Mission 40157 Denon 42868, 43868 Hoeher 20278, 20642 Cybernex 20240 40157 40000, 40032, 40468, 40087, Modulaire Sony 40100 Hornyphon 20081 40179, 40420...
- Page 132 20081, 20045, 20043, 20742, Dish Network Magnadyne 20081 Palladium 20037, 20348 Sei-Sinudyne 20081 Toshiba 00775 21008 System 20226, 20225, 20837, 21162, Magnasonic 20278, 20593 Seleco 20037 Panasonic Totevision 20037, 20240 01075 21262 Magnavox 20081, 21593 Semp 20045 Pathe Cinema 20043 Tradex 20081 Dream Multimedia...
- Page 133 20029 10556, 10037, 10668, 11037, Daytron Akito 10037 10178, 10374 Basic Line 10218, 10455, 10009, 10163, Cascade 10037, 10009 Denon 20076, 20371, 22471 10037, 10714, 10668, 11037, De Graaf 10548, 10163, 10208 10217, 10374 Casio 10037 Garrard 20308 10264, 10218, 10009, 10163,...
- Page 134 10037, 10610, 10370, 10009, Easy Living 10877, 11217, 11248 Hampton 10217 Ingersol 10009 Kontakt 10487 Friac 10499 Ecco 10773 Hanimex 10218 Inno Hit 10218, 10009, 10217 Korpel 10037 Frontech 10264, 10009, 10163, 10217 10556, 10037, 10625, 10714, 10037 Innowert 10865, 11298 Korting 10370 Fujimaro...
- Page 135 10556, 10037, 10264, 10218, 10037, 10714, 10668, 11037, Manesth 10037, 10264, 10035, 10217 Musikland 10218 Profex 10361, 10009, 10163 Osaki 10217, 10374 Roadstar 10715, 10264, 10218, 10009, 10037, 10668, 11037, 10778, Mx Onda 11498 Profi 10009 Manhattan 10418 Osio 10037 10876, 11267 Myryad 10556...
- Page 136 10037, 10668, 10195, 11037, Shintoshi 10037 Sunwood 10037 Teletech 10037, 10668, 11037, 10009 Yokan 10037 10361, 10264, 10370, 10036, 10037, 10264, 10370, 10218, Shivaki 10037, 10443 Superla 10217 Teleton 10036, 10217 10618, 10808, 10631, 10512, Yoko 10009, 10217 Universum 10480, 10418, 10362, 10346, Siarem 10163 SuperTech...
- Page 137 Luker 11982 Weltstar 30713 Hitachi 11904 Telefunken 20278 Audioline 01672 Luxor 30713, 30884 Weltstar 11037 Hypson 20037 Telefunken 10074 Austar 00497, 00863 Luxor 11037 Wharfedale 31115 Internal 20278 Thomas 11904 Axiel 00710 Matsui 30713, 30884 Internal 11909 Thomson 20278 Axil 01413, 01457, 01659, 01993 Matsui 11037...
- Page 138 01111, 00173, 00125, 00299, Daewoo 01111, 00713, 01296, 01743 Eutra 00740 Lodos 01284 Nikko 00723, 00200, 00713 Hirschmann 00442, 00710, 00740, 00882, 01993 Expressvu 00775 Logik 01284 Noda Electronic 01704, 01705 01085, 01232, 01412 01127, 00853, 00723, 00873, Dantax 01626 Fenner 00713 Logix...
- Page 139 01099, 01100, 01195, 01197, Radiola 00200 Sky Television 01014 Xcom 00123 Taihan 00778 Telestar 01251, 01334, 01610, 01626, 00847, 00123, 00713, 01214, Radix 00394, 00882, 01113, 01317 Sky XL 01251, 01412 Telewest 01068 01672 Xsat 01323 00143, 00392, 00566 Sky+ 01175 Torx 00003...
- Page 140 *[ ] : Förinställda koder har ställts in vid transporten från fabriken. Förinställda DVD-koderCodes DVD Player / DVD-Player / Lecteur DVD / Lettore DVD / Reproductor de DVD / DVD-speler / DVD-spelare préréglés DVD DENON [32134] DVD-3800 Model No. DVD-900 DVD-1920 DVD-800 Video Cassette Recorder / Videokassettenrecorder / Magnétoscope / VCR (videoregistratore) / Videograbadora /...
- Page 144 D&M Holdings Inc. Printed in China 5411 10381 008DB...
Need help?
Do you have a question about the AVR-4810 and is the answer not in the manual?
Questions and answers