Advertisement
Table of Contents
- 1 Technical Data
- 2 General Description
- 3 Ideal Operating Conditions
- 4 Description of Main Features
- 5 Description of Accessories
- 6 Installation for Air-Conditioning Function
- 7 Electrical Connections
- 8 Preparing Unit for Use
- 9 Final Check
- 10 CONTROL PANEL (Mod. CT300H)
- 11 Control Panel (Mod. Ct300)
- 12 How to Start up Conditioner
- 13 End of Season Operations
- 14 Troubleshooting
- Download this manual
Advertisement
Table of Contents

Related Manuals for DeLonghi Pinguino CT300H


Summary of Contents for DeLonghi Pinguino CT300H
- Page 1 ISTRUZIONI PER L’USO Climatizzatore CT300 - CT300H...
- Page 2 Dear Sir/Madam We thank you for purchasing this Pinguino appliance and congratulate you on your wise choice. Please make the time and effort to read this manual carefully. Becoming familiar with the Pinguino is an essential step if you are to benefit fully from its exceptional qualities, during both installation and actual use.
-
Page 3: Technical Data
GENERAL DESCRIPTION Pinguino is a very versatile air conditioner because it can operate both through water condensation as well as air condensation. The User may choose the operational method: 1) WATER FUNCTION - When excellent efficiency, lower energy consumption, and greater speed in reaching the ideal climatic conditions are desired. -
Page 4: Description Of Main Features
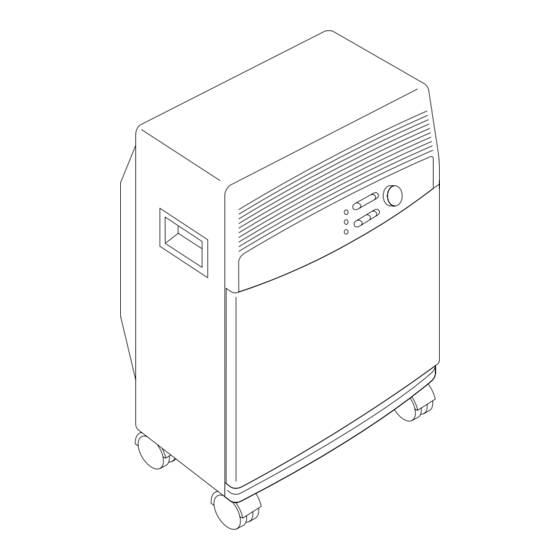
Timer ON/OFF button M DESCRIPTION OF MAIN FEATURES Tab. 4 Air outlet grid Control panel Programmer (timer) Timer ON/OFF (model CT300H only) Water container Castors Castor stops Water collecting tray Water container compartment door Air filter Air intake grid Warranty envelope... -
Page 5: Description Of Accessories
DESCRIPTION OF ACCESSORIES Tab. 5 PARTS DESCRIPTION SUPPLIED Exhaust hose Stopper + flange Castor stop De-scaling fluid Window nozzle Suction cup set... -
Page 6: Installation For Air-Conditioning Function
INSTALLATION FOR AIR-CONDI- TIONING FUNCTION Our air-conditioner is portable and versatile: it can be used as a permanent installation or wise easily moved from one room to another. The appliance must be fitted at least 30 cm. from the surrounding walls. When installed permanently, all air discharged from the rear hose is extracted from the room in which the appliance is installed. -
Page 7: Electrical Connections
— to lower the blind partially, without obstructing the outlet, thereby reducing exposure to direct sunlight and indoor/outdoor air exchange. INSTALLATION FOR HEATING FUNCTION (Model CT300H) The unit is simply placed in the room to be heated; there is no need for the discharge hose to be installed. -
Page 8: Preparing Unit For Use
PREPARING THE UNIT FOR USE 1) Fit the exhaust tube in place; if your conditioner is supplied with a bayonet tube, it is fitted as illustrated in the diagram. 2) For permanent installation, place the appli- ance near the wall or window outlet. Make sure it is standing on a level surface and fit the special shock absorbers/castor stops under- neath the castors. -
Page 9: Final Check
AIR COOLING FUNCTION If the air cooling function of air-conditioner is chosen, it is not necessary to fill the water container. FINAL CHECK In order to obtain maximum performance from your air-conditioner, make sure that: — doors and windows in the room to be air-conditioned are closed (except for temporary installation, in which case a window must be left partially open). -
Page 10: Control Panel (Mod. Ct300H)
CONTROL PANEL (Mod. CT300H) ON/OFF pilot light ON/OFF button Heating pilot light air-conditionig/ Selecting fan heating button Timer ON/OFF pilot light speed button Thermostat Timer notches PROGRAMMED MODE SETTING THE TIMER The programmer/timer, like all clocks, must be set to the 1) Position the timer switch in the TIMER ON position (the exact time. - Page 11 HOW TO START UP THE CONDITIONER (Mod. CT300H) (see control panel on the opposite page) Insert the plug into the electrical outlet and press the A button The warning light will turn on Select the "programmed" or "non programmed" mode (see...
-
Page 12: Control Panel (Mod. Ct300)
CONTROL PANEL (Mod. CT300 ON/OFF pilot light ON/OFF button working pilot light Timer ON/OFF Selecting fan Timer ON/OFF pilot light button speed button Thermostat Timer notches PROGRAMMED MODE SETTING THE TIMER 1) Release B TIMER button The programmer/timer, like all clocks, must be set to the 2) Set the operating times by pushing out the notches on exact time. -
Page 13: How To Start Up Conditioner
HOW TO START UP THE CONDITIONER (Mod. CT250) (see control panel on the opposite page) Plug the appliance into the mains. Select the "programmed" or "non programmed" mode (see previous page) Select the fan speed required pressing "Fan speed" key C. AIR-CONDITIONING Turn the thermostat to Max. - Page 14 IMPORTANT WARNINGS • This appliance has been manufactured for use in home air conditioning and should not be used for other purposes. • It is dangerous to modify or otherwise alter in any way the characteristics of this appliance. • The appliance must be installed according to the national technical systems regulations.
-
Page 15: End Of Season Operations
SERVICING PRECAUTIONS: during cleaning and normal maintenance operations, remember to disconnect the plug. Under no circumstances should the appliance be washed with running water. Damage could be caused to the electrical circuit. AIR-FILTER CLEANING — A clogged air filter reduces air circulation and the efficiency of the appliance. Clean the filter once a week. -
Page 16: Troubleshooting
(mod. CT300H only) reconnect. SERVICING In case of malfunction turn off and disconnect the air-conditioner from power outlet and contact the nearest Service Centre for qualified assistance. - Page 17 Periodic Servicing (IMPORTANT) This appliance should be de-scaled whenever the calcium deposit becomes excessive (on average after 400 operating hours) or in any event at least once every season. INSTRUCTIONS FOR DE-SCALING You will need: 1/4 liter de-scaling fluid (supplied with appliance) 1 liter clean water = 80% dilution a) Remove the container from the unit and drain away any water left in the collecting...