Table of Contents
Advertisement
Quick Links
Advertisement
Table of Contents

Related Manuals for Intel Reader

Summary of Contents for Intel Reader
- Page 1 Intel® Reader User Manual...
-
Page 3: Table Of Contents
Mises en garde importantes relatives à la batterie et au stockage ..14 Précautions relatives à la manipulation de la batterie au lithium-ion Symboles de sécurité utilisés sur les étiquettes du Reader ..... 17 Autres symboles utilisés sur le Reader ..........17 Recyclage ..................17... - Page 4 Replacing the Battery ..............22 Chapter 3. Parts of the Reader Introducing the Reader's Features ........... 23 Top Edge of the Reader ..............23 Face of the Reader ................26 Bottom Edge of the Reader ............. 29 Right Edge of the Reader ..............31 Chapter 4.
- Page 5 Renaming a Text or Audio File ............46 Saving a Text File as Audio ............. 47 Adding Pages to a Text File ..............48 The Help Menu ................48 Storing the Reader ................50 Chapter 5. Capturing and Playing Text Introduction ..................51 Setting the Camera Flash ..............51 Capturing Multiple Pages ..............
- Page 6 Display Settings ................63 Voice Settings .................. 67 Security Settings ................69 Restoring Default Settings ............... 72 Chapter 7. Using the Reader with Other Devices Introduction ..................73 Connecting to the Portable Capture Station ........73 Using the Reader with a Keyboard ........... 73...
- Page 7 Using the Reader with a Computer ..........76 Connecting the Reader to an External Drive ........80 Chapter 8. Frequently Asked Questions and Customer Support Frequently Asked Questions ............84 Customer Support ................87 Appendix A. Technical Specifications Reader Specifications ..............88 Battery Pack Specifications ............
-
Page 9: Chapter 1. Important Safety Information And Warnings Fcc Part 15 Compliance Statement
Reader User Manual Chapter 1. Important Safety Information and Warnings FCC Part 15 Compliance Statement This equipment has been tested and found to comply with the limits for a Class B digital device, pursuant to Part 15 of the FCC Rules. These limits are designed to provide reasonable protection against harmful interference in a residential installation. -
Page 10: Canada Compliance Statement (Industry Canada)
CD you own to your own digital music player. Intel assumes no liability for such uses, and encourages end users to ensure they possess the appropriate legal rights to materials prior to downloading such materials onto the Reader, or using any material created by the individual with the Reader. -
Page 11: Respect Des Principes D'utilisation Juste (Fair Use)
Intel respecte les droits de propriété intellectuelle et les droits des auteurs sur leur travail. L ’utilisation du Reader pour capturer des images et écouter du texte dans le cadre d’un usage personnel est généralement acceptée et couverte en vertu des principes d’utilisation juste, ou "fair use"... -
Page 12: Safety Precautions
Avoid Electric Shock • Do not spill liquid on the Reader or allow it to get wet. Do not operate the Reader near water. • Do not use the Reader in the kitchen or bathroom. - Page 13 Reader User Manual • Do not connect or disconnect cables to the Reader or operate the Reader during an electrical storm or when lightning is present. • Use only the power cord and power supply provided with the Reader. Power supplies can have similarly-sized and shaped connectors, so be sure to use the right one.
- Page 14 Avoid personal injury or injury to others • Do not set up, use, recharge or leave the Reader or battery near a heat source, such as fire, a radiator, a stove, a heater, or another device that produces heat. •...
-
Page 15: Important Battery And Storage Warnings
Doing so could damage the retinas of their eyes. Never fire the flash unit closer than approximately 1 yard (1 meter) from infants. Important Battery and Storage Warnings • Low battery: When the battery charge becomes low, the Reader presents a warning message. Recharge the battery as soon as possible. •... - Page 16 Store the battery in a cool, dry environment, but do not allow it to freeze. • To recharge the battery pack, use only the Reader and the power supply provided with the unit. Power supplies can have similarly-sized and shaped connectors, so be sure to use the right one.
-
Page 17: Safety Symbols Used On The Reader Labels
Safety Symbols Used on the Reader Labels WEEE symbol. Indicates compliance with Waste Electrical and Electronic Equipment (WEEE) directive 2002/96/EC. WARNING! Indicates a risk that could occur if the Reader is used or handled improperly. Direct Current symbol. Indicates that direct current is present inside... -
Page 18: Other Symbols Used On The Reader
USB Symbol. Identifies a USB port on the Reader. Recycling Do not dispose of the Reader or accessories in a landfill or other disposal site where harm to the environment might occur. Instead, follow local procedures for recycling electronic equipment and packaging materials. -
Page 19: Mesures De Sécurité
Éviter les chocs électriques • Ne pas renverser de liquide sur le Reader, ni le mouiller. Ne pas opérer le Reader à proximité d’un point d’eau. • Ne pas utiliser le Reader dans la cuisine ou la salle de bains. - Page 20 Ne pas essuyer l’écran avec un tissu humide. Pour plus de renseignements, se référer à la section Techniques de nettoyage recommandées. • Ne pas connecter de câbles au Reader, ni les déconnecter, ni faire fonctionner l’appareil pendant un orage électrique ou en présence d’éclairs. •...
- Page 21 Reader User Manual • Le Reader est un appareil de catégorie I du point de vue de la protection contre les chocs électriques. MISE EN GARDE : Ne pas essayer de modifier le cordon d'alimentation fourni et ne pas utiliser un cordon d'alimentation qui n'est pas du type requis Éviter la surchauffe du Reader...
-
Page 22: Mises En Garde Importantes Relatives À La Batterie Et Au Stockage
Lorsque la charge de la batterie devient extrêmement faible, le Reader affiche un message d’avertissement puis s’éteint. Si le Reader s'éteint à cause de la faible charge de la batterie pendant le traitement d'images, les images en cours de traitement peuvent être perdues. -
Page 23: Précautions Relatives À La Manipulation De La Batterie Au Lithium-Ion
Reader User Manual • Lorsque l'espace de stockage devient Stockage extrêmement limité : extrêmement limité, le Reader affiche un message d’avertissement et cesse d’accepter des fichiers supplémentaires. Précautions relatives à la manipulation de la batterie au lithium-ion Avant d’utiliser la batterie au lithium-ion, s’assurer de lire et de respecter les mises en garde de ce manuel. - Page 24 Ne pas mettre la batterie dans un four à micro-ondes ou un contenant pressurisé. • Garder le Reader et la batterie hors de la portée des jeunes enfants. • Si une opération de chargement n’est pas terminée à l’issue du temps de chargement recommandé, cesser l’opération de chargement immédiatement.
-
Page 25: Symboles De Sécurité Utilisés Sur Les Étiquettes Du Reader
Symbole USB. Identifie un port USB sur le Reader. Recyclage Ne pas éliminer le Reader ou ses accessoires dans une décharge ou tout autre site d’élimination des déchets pouvant être néfaste pour l’environnement. Plutôt, respecter les procédures locales en matière de recyclage des équipements... -
Page 26: Techniques De Nettoyage Recommandées
Chapter 1. Important Safety Information and Warnings Techniques de nettoyage recommandées • Nettoyer le Reader à l’aide d’un tissu doux et sec, comme un tissu pour nettoyer les lunettes. • Si le Reader devient vraiment sale, le nettoyer avec un tissu doux légèrement humide et une solution détergente douce. -
Page 27: Chapter 2. Getting Started About The Reader
Set the Reader on a work surface, with the display screen facing down and the angled corner at the upper left. Set the battery on top of the Reader with the flat side down, the angled corner at the upper left, and the Intel logo facing up. In this position, the notch at the bottom of the battery is lined up to meet the raised tab on the bottom edge of the Reader. -
Page 28: Charging The Battery
NOTE: Be sure to lock the battery firmly into place. The battery is locked when you hear it click into place. The Reader will turn on, even if the battery is not completely locked in place, but improper installation can cause damage to the locking mechanism. -
Page 29: Keeping The Battery Charged
You can leave the Reader plugged in indefinitely. You will not over-charge the Reader by leaving it plugged in, though it is a good idea to unplug it if there is danger of an electrical storm, to prevent damage to the Reader. -
Page 30: Replacing The Battery
Chapter 2. Getting Started button at the lower right of the Reader face. On the Guide menu, select Device Status and press OK. The Device Status screen appears. The second line under the screen title tells you the amount of charge for your battery. -
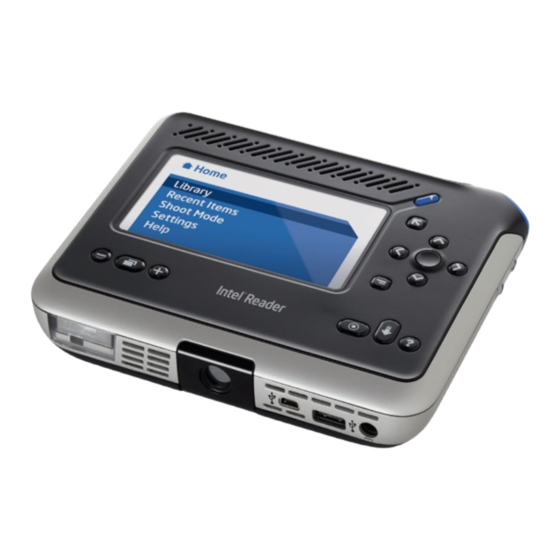
Page 31: Chapter 3. Parts Of The Reader Introducing The Reader's Features
Bottom Edge Top Edge of the Reader The top edge of the Reader is the edge that is on top when the display screen faces you, the angled corner is at the top right, and the camera lens is pointed down. - Page 32 Lanyard Socket Lanyard: A cord that fits around your wrist, to help you keep hold of the Reader. Air Vents: Vents are located to the right of the lanyard and to the right of the Power button. To avoid overheating the Reader, do not block these vents. Keep the air vents clear of debris.
- Page 33 Reader is turned on and ready for use. A blinking green light indicates that the Reader is turned on and in Sleep mode. Power: A round button at the center of the top edge of the Reader. Use the Power button as follows: •...
-
Page 34: Face Of The Reader
Shoot: A large, flat button on the angled corner of the Reader. Press this button once to enter Shoot mode. Position the Reader above the text, then press Shoot again to capture text images. - Page 35 Texts menu, select the file name in the menu, then press OK. This action opens the file and begins playing it. When you pause a text reading, you can press OK for more than one second to have the Reader spell a word aloud.
- Page 36 Favorites: An oval, raised button below the Options button, and the left-most of the three buttons in the lower right corner of the Reader face. As you play a file, press Favorites to add the current file to the Favorites category. You can also press Favorites at any time to access the Favorites category.
-
Page 37: Bottom Edge Of The Reader
Bottom Edge of the Reader The bottom edge of the Reader is at the bottom when the display screen is facing you. The bottom edge includes the camera, the flash unit, two USB ports, and the... - Page 38 You can also turn off the flash. Camera: A round, recessed lens in the center of the bottom edge of the Reader. The camera uses text in the upper left quadrant of the display screen to adjust focus.
-
Page 39: Right Edge Of The Reader
Right Edge of the Reader The right edge of the Reader is on the right-hand side when the Reader is held with the display screen facing you, and the angled corner at the upper right. -
Page 40: Chapter 4. Using The Reader Introduction
Point, Shoot, Listen Typically, you will use the Reader to capture images of text and play the text back to you. This section is designed to help you with those basic tasks. For more detailed information about capturing text, refer to Chapter 5, Capturing and Playing Text. - Page 41 Reader User Manual For best results, hold the Reader so that the entire one- or two-page text fills the display screen. Typically, you'll hold the Reader approximately at nose level when seated. Adjust the position of the Reader until you can see all the text on the display screen.
- Page 42 Chapter 4. Using the Reader Below the gear icon are two numbers, one above the other, separated by a bar. The bottom number is the total number of shots you have taken. The top number is the number of pages that have been processed and are ready for playback. For the first page you capture, zero is the top number, and one is the bottom number, to indicate that one page has been captured, but the page is not yet processed.
- Page 43 When the entire first page is ready to play, the Reader announces, "Page one of one processed," if you have the menu reading option turned on. At the same time, a tone plays, to alert you that you can start listening.
-
Page 44: Tips For Good Results
To listen to your text or audio file, press the Play button. Play is the diagonal button on the face of the Reader, above the upper-right corner of the display screen. To stop or pause the playback, press the Play button again. - Page 45 Light that shines too brightly on the page can interfere with the Reader's ability to capture a good image. Keep the Reader at least 5 feet (1.5 meters) from an overhead light and 1.5 feet (45 centimeters) from a desk lamp or window. These distances reduce glare and improve the accuracy of the playback.
-
Page 46: Using Reader Menus
Reader announces each option as you highlight it. If you try to scroll past the first or last item in a menu, the Reader emits a tone. To select a menu item, press OK when the item is highlighted. -
Page 47: The Library
Reader. The Library All files created or stored on the Reader are saved in the Library. You add files to the Library either by capturing them with the Reader, or by connecting the Reader to a computer or external drive and downloading files. For information about the types of files you can download, refer to the section titled Using Categories, later in this chapter. -
Page 48: Using Categories To Organize Library Files
The first item in the Library menu is Categories. Categories help you quickly access your files, by grouping similar files together. Categories can hold audio and text files. These files must be in a format that the Reader can accept, including unformatted .txt format, DAISY book format, .mp3 or .wav format. -
Page 49: Adding A File To An Existing Category
Options button. Select Add to Category, and press OK. The Add to Category menu appears. This menu shows all the categories on your Reader. Select the category you want, and press OK. A confirmation message appears. Select Yes, and press OK. Another confirmation message appears. You... -
Page 50: Removing A File From A Category
Chapter 4. Using the Reader TIP: To add a file to a category as you view or listen to the file, press the Options button. Select Add to Category, and then choose the category. On the confirmation message that appears, select Yes, and press OK. -
Page 51: Renaming A Category
NOTE: You cannot rename the Favorites category. Using the Texts and Audio Menus The Texts menu lists the text files on the Reader. Similarly, the Audio menu lists the audio files on the Reader. These menus display the files that you capture using the Reader, and those that you download from a computer or external drive. -
Page 52: Getting File Information
Info. Then press OK. The Info screen appears. This screen provides: • The title of the file • The type of file, such as Reader book, DAISY book, or Audio • For Reader and DAISY books, the number of pages... -
Page 53: Permanently Deleting A File
Reader User Manual Permanently Deleting a File There are three ways to permanently delete files from the Reader. You can delete a file that you have open, as it is playing. You can delete a single file from the Library. -
Page 54: Renaming A Text Or Audio File
You can rename a text or audio file that you have open, or you can select a file from the Library and rename it. NOTE: You can rename any text file that you capture using the Reader. You cannot rename text files that you download to the Reader from another source. -
Page 55: Saving A Text File As Audio
Another message displays the name change. Saving a Text File as Audio The Reader can convert a text file to audio format and store it in the Library. You can then play the file on the Reader or download it to another device. The Reader retains the text version of the file as well as the audio file. -
Page 56: Adding Pages To A Text File
After you capture a text file, you can add pages to it at any time. You can add pages only to a text file that you captured using the Reader, not to a file you downloaded from another device. When the text is playing, press Options to begin adding pages. - Page 57 . This option contains the topics in this manual that provide User Manual detailed information about using your Reader. If you need help with tasks such as saving files to a computer, organizing your files into categories, or customizing your Reader, select this option.
-
Page 58: Storing The Reader
Reader display screen from scratches. To enable you to capture images when the Reader is in its case, the case does not cover the camera lens. Therefore, you will want to store the Reader carefully, to protect the lens. -
Page 59: Chapter 5. Capturing And Playing Text Introduction
Reader features to help you work with your files. Setting the Camera Flash The Reader includes a camera flash that you can turn on or off when the Reader is in Shoot mode. To change the flash setting, press the Shoot button once or select Shoot Mode from the Home menu. -
Page 60: Capturing Multiple Pages
Chapter 5. Capturing and Playing Text Capturing Multiple Pages When you capture several images at a time, the images are grouped into a single file called a session. As long as you keep capturing pages, those pages will be grouped together, even if they come from different printed material. For example, you can capture four pages of a book and a magazine article in the same file. - Page 61 Reader User Manual When text is playing: • Press the up arrow to skip backward one sentence at a time. • Press the down arrow to skip forward one sentence at a time. • Press and hold the right-pointing arrow to fast forward.
-
Page 62: Audio Playback Navigation
Chapter 5. Capturing and Playing Text When text is playing or paused: • Press the up arrow to skip to the beginning of the current sentence. If you are already at the beginning of a sentence, pressing the up arrow skips to the beginning of the previous sentence. - Page 63 Reader User Manual • Press the left arrow once to go to the beginning of the file. Hold the left arrow to quickly move back through the file. Rewind or move Fast forward back quickly To navigate in an audio book file, use the following arrow buttons as the file is playing: •...
-
Page 64: Navigating To A Specific Page
Viewing the Text Image If you are listening to a text file you captured with the Reader, and you want to view the image you took, instead of the text the Reader is playing back to you, press the View Toggle button. -
Page 65: Spelling A Word In A Text File
Spelling a Word in a Text File As you play a text file, the Reader can spell an individual word out loud for you. To hear the spelling, press Play to pause the playback on the word you want spelled. -
Page 66: Viewing Recent Files
Chapter 5. Capturing and Playing Text change applies to every menu that displays your file names, including the Recent Items menu. To change the way your files are sorted, highlight Library on the Home menu. Do not open the Library menu. Press the Options button. The Library Options menu appears. -
Page 67: Chapter 6. Customizing The Reader The Settings Menu
There are a number of ways to change the Reader's default settings. You can customize how the Reader displays text and plays it back to you, and you can change the date and time formats. You can protect your privacy by setting a Personal Identification Number (PIN) for your Reader. - Page 68 Date and time settings are important because the Reader attaches a date and time stamp to the files you capture. When you first start up the Reader, the current date and time are set. You may need to change these settings to adjust for daylight savings time, or when the battery is fully discharged or removed.
- Page 69 On the Date and Time menu, select Set Date and press OK. The Set Date screen appears, displaying the currently set date. Press the up or down arrow buttons to select the month. If you have the menu reading option turned on, the Reader reads each month aloud as you select it.
- Page 70 Sleep mode drains the battery at a slower rate than normal use. The best practice, therefore, is to use Sleep mode when you set aside the Reader for a short period of time. If you do not plan to use the Reader for a day or more, turn it off completely.
-
Page 71: Display Settings
Changing the Sleep Setting The Reader goes into Sleep mode after 10 minutes of inactivity. You can change this setting, so that the Reader goes to sleep more quickly when you are not using it, or never goes into Sleep mode. - Page 72 TIP: To quickly change the menu text size while you are viewing a menu, press the Zoom In (+) button on the face of the Reader to make the text larger, or press the Zoom Out (-) button to make the text smaller.
- Page 73 The Reader dims the light on the display screen after a period of inactivity. When the display screen is dim, the Reader is not turned off. The LED indicator next to the Power button remains lit. However, you cannot see anything on the screen.
- Page 74 Chapter 6. Customizing the Reader Selecting a Display Theme The default color theme for the Reader's menus is blue. In the blue theme, the menu title on a page is blue on a white background, and the sub-menu titles are white on a blue background.
-
Page 75: Voice Settings
However, you cannot turn off the display and menu reading at the same time. Voice Settings The Reader can read your text files and menu selections in either a male or female voice, and at the speed and voice pitch you select. You can also choose not to hear the Reader menus. - Page 76 You can also change voice speed by pressing the Voice Speed button on the face of the Reader. Voice Speed is the middle of the three buttons at the lower right of the Reader face. This button takes you to the Voice Speed menu.
-
Page 77: Security Settings
Select either Very Low, Low, Normal, High, or Very High. As you make a selection, the Reader plays the voice at the selected pitch, even if you turned off the menu reading option. Press OK to select the pitch. Then press Back to return to the Voice menu. - Page 78 On this screen, you will use the up and down arrow buttons to select four digits for your PIN. TIP: If you have menu reading turned on, the Reader will play individual numbers aloud as you select them, and will also play aloud the entire PIN. For privacy, plug in earphones, or enter your PIN in a private location.
- Page 79 Resetting Your PIN If you forget your PIN, you can clear the old PIN using the Options button, when the Reader prompts you for your PIN when you start or re-start the Reader. Then you can reset your PIN. CAUTION: If you reset your PIN, you will lose all files on the Reader, including files you captured with the Reader and those you copied to the Reader.
-
Page 80: Restoring Default Settings
Home menu appears. Restoring Default Settings After making changes to any of the Reader's default settings, you can restore the default settings that your Reader used when you first started it. If you restore settings, you restore all settings. -
Page 81: Chapter 7. Using The Reader With Other Devices Introduction
And you can connect the Reader to a computer or an external flash drive, to transfer data to or from the Reader. In most cases, you connect the device to either the Reader's mini-USB port or the standard USB port, using the USB cable the comes with your Reader. - Page 82 Chapter 7. Using the Reader with Other Devices The following table explains how to use keyboard keys for each Reader function. Reader Button Keys to Press on Keyboard Play Hold down the Ctrl key as you press the letter p.
-
Page 83: Using The Reader With A Mouse
Reader User Manual Playing Text or Audio Using the Keyboard Connect the keyboard to the Reader's standard USB port. To select an item from the Library, press Enter. Use the down or up arrow keys to find the item you want. -
Page 84: Using The Reader With A Computer
Texts menu, and once again to return to the Library. Using the Reader with a Computer You can connect the Reader to your computer to back up Reader files onto your computer, and also to transfer audio files, DAISY books, and unformatted text files from the computer to the Reader. - Page 85 Reader. If you copy a file from your computer to one of these folders, that file is stored in the same folder on your Reader. If you delete a file from one of these folders, it is deleted from your Reader.
- Page 86 When you capture a text file, you are actually creating two files on the Reader. One has an .opf file extension. This is the file that you see in menus on the Reader, and that you can play on the Reader or on a DAISY book player. The other version is a plain-text file that you can read on your computer without a DAISY book reader.
- Page 87 NOTE: The Reader supports the DAISY 2.02 and DAISY 3 formats. Copying Files from a Computer to the Reader To copy files from a computer to the Reader, connect the Reader to a computer, as described in the section titled Connecting the Reader to a Computer. Navigate to the IntelReader folder.
-
Page 88: Connecting The Reader To An External Drive
Reader using a USB port. Using an external drive, you can transfer files to and from the Reader. The files you transfer to the Reader must be in one of the file formats that the Reader accepts, as described in the section titled Reader-compatible Files. - Page 89 Reader User Manual Connecting the Reader to a Flash Drive To connect a flash drive to the Reader, plug the drive into the standard USB port on the bottom edge of the Reader. A message confirms that an external drive is connected.
- Page 90 To cancel the copying process at any time, press the Back button. Copying Duplicate Files If a file on the external drive has the same name as a file on the Reader, a message appears and gives you the following options when you try to copy the file to the...
- Page 91 Copying continues with the next file. • Skip this File. This option keeps the existing Reader file, and does not copy the file from the external drive. Copying continues with the next file.
-
Page 92: Chapter 8. Frequently Asked Questions And Customer Support
Question: Can I leave the Reader on when I am not using it? Answer: You should shut the Reader down if you will not be using it for a couple of days. You can leave it on during shorter periods of inactivity. - Page 93 And finally, be sure there is no excess light on the page. Keep the Reader at least 5 feet (1.5 meters) from an overhead light and 1.5 feet (45 centimeters) from a desk lamp or window.
- Page 94 Chapter 8. FAQs and Customer Support Question: I copied my Reader files to a computer but it is difficult to find a file on the computer. How can I make files easier to find? Answer: When you back up files, copy the files as a group so that they are organized in the same way on the computer as they are on the Reader.
-
Page 95: Customer Support
Intel recommends that you contact your local dealer or reseller before contacting Intel, if you have any questions about the Reader. In the event your dealer or reseller is not able to resolve the issue, you can contact Intel Customer Support in... -
Page 96: Appendix A. Technical Specifications Reader Specifications
Focus range of 10 cm to ~1 meter (4 in. to ~3 ft.) Mechanical shutter Flash Variable intensity based on available light. Maximum 30 lux at 1 meter Polarized Data Storage 4 GB Intel Z-P140 Solid State Drive (SSD) Approximately 2 GB available for user files. - Page 97 Formats NISO 2002 (z2002 or DAISY 3) NISO 2005 (z2005 or DAISY 3) NIMAS 1.0, NIMAS 1.1 Additional: .jpg (created by the Reader), .mp3, .wav, ASCII text Connectivity USB 2.0 type A connector USB 2.0 type mini-B connector AC Power Standard 2.5 mm (1/8 in.) stereo audio jack for external...
-
Page 98: Battery Pack Specifications
DC 7 .4V, 3300 mAh Charging Time 150 minutes from 10% to 100% Operating Time With a fully charged battery, the Reader can: • Play over 4 hours of text-to-speech or .mp3 audio • Capture and process over 85 images of text •... -
Page 99: Ac Adapter Specifications
Reader User Manual Dimension Description Dimensions (W x H x D) 15.5 cm x 13.2 cm x 1.5 cm (6.10 in. x 5.2 in. x .6 in.) Weight .16 kg (0.35 lbs.) Battery operating time will vary depending on the type of content being captured or played, usage conditions such as screen and flash settings, as well as environmental factors such as temperature. -
Page 100: Appendix B. Updating Your Reader Software About The Software Update Process
Before you begin updating your software, you might want to note the software version on your Reader, so that you can tell if there is a more recent version on the web site. To check your current software version, select Help from the Home menu and press OK. -
Page 101: Updating Reader Software Using A Computer
Turn on the Reader and wait for the Home menu to appear. Using the USB cable that comes with your Reader, plug the mini-USB end into the Reader. Then plug the standard USB end into the computer. A message on the Reader display screen confirms that you are connected to the computer. - Page 102 Computer if you use Windows, or in Finder on the Mac. Save the update file. NOTE: It can take several seconds to save the file. Do not use your Reader, disconnect the USB cable, or turn off the Reader or computer until the process is complete.
-
Page 103: Updating Reader Software Using A Flash Drive
The license agreement appears. Read this agreement and click Accept. Copying Software from the Flash Drive to the Reader After you accept the license agreement, the Downloads page displays the name of the product and the language you selected, along with a link to begin... - Page 104 Computer if you use Windows, or in Finder on the Mac. Save the update file. NOTE: It can take several seconds to copy the file. Do not use your Reader, disconnect the flash drive, or turn off the Reader until the process is complete.
- Page 105 OK. When the Drive Ejected message appears, you can remove the drive. To verify that the update was successful, select Help from the Home menu and press OK. Then choose About and press OK again. The new software version appears on the first line of the Intel Reader screen.
-
Page 106: Index
Index 12-Hour Clock setting 61 12-hour time format 60 Back button 24-Hour Clock setting 61 canceling an action with 27, 48 24-hour time format 60 described 27 navigating with 38 battery About option 49 and long-term storage 22 Add Pages option 48 care and maintenance 7–18 Adobe PDF files 76 charging 20–22, 36, 48... - Page 107 Reader User Manual all audio or all text files 46 canceling an action 27 a single file 45 carrying case 6 categories Device Status message 22 adding files to 41 Direct Current Symbol 9, 17 display themes 66 creating 40–41...
- Page 108 58 renaming 46–47 audio files 58 saving text files as audio files 47 hourglass 35 flash drive connecting to the Reader 80 text files 58 downloading Reader software with text processing 33 95–97 Info screen 44 flash unit...
- Page 109 Reader User Manual Flash Setting 51 Guide 21 lanyard 37 Help 39, 48 LED indicator 24 Home 38–50 Library Library 38–46 adding files to 39 Library Options 58 deleting files from 45 navigating in 76 sorting files in 57–58 Read Menus 68 lithium-ion battery.
- Page 110 Power button 25 and text playback 53–54 power cord 5 described 27 power socket 31 using with zoomed images 29 Reader OK button 27 auto-focus LED 30 One Word At a Time mode 64 carrying case 6 Options button cleaning 10...
- Page 111 Reader User Manual power cord 5 menu text size 64 product code 39, 49 PIN protection 69 recycling 10 playback text size 64 serial number 39, 49 time 62 Sleep mode indicator 25 time format 61 software version 39, 49...
- Page 112 Index text-to-speech software 86 time format 61 text Turn Flash Off setting 51 capturing 35 Turn On PIN? prompt 70 changing size of 29 saving as audio 47 starting a new session 35 View Toggle button 29, 56–57 text fields, using 41 Voice Speed button 28, 74 text files Volume Down button 31...
Need help?
Do you have a question about the Reader and is the answer not in the manual?
Questions and answers