Table of Contents
Advertisement
Advertisement
Table of Contents

Related Manuals for Abit NF-M2SV


Summary of Contents for Abit NF-M2SV
- Page 1 NF-M2P NF-M2S NF-M2SV Motherboard AMD Socket AM2 Installation Guide...
- Page 2 For more detailed information about recycling of this product, please contact your local city office, your household waste disposal service or the shop where you purchased the product. NF-M2P/NF-M2S/NF-M2SV...
-
Page 3: Table Of Contents
1.1.1 NF-M2P .............1 1.8.5 Front Panel Audio Connection Header ....15 1.1.2 NF-M2S .............2 1.8.6 PCI and PCI Express X16, X1 Slots ....15 1.1.3 NF-M2SV ............3 1.9 Connecting Rear Panel I/O Devices......16 1.2 Motherboard Layout ...........4 2. BIOS Setup ............17 1.2.1 NF-M2P .............4... - Page 4 NF-M2P/NF-M2S/NF-M2SV...
-
Page 5: Hardware Setup
• 4x SATA 3Gb/s support SATA RAID 0, 1, 10, 5, JBOD Expansion Slots • 1x PCI-E X16 slot • 1x PCI-E X1 slot ※ Specifications and information contained herein are subject to change without notice. • 2x PCI slots NF-M2P/NF-M2S/NF-M2SV... -
Page 6: Nf-M2S
• 1x PCI-E X16 slot • 1x PCI-E X1 slot • 2x PCI slots Internal I/O Connectors • 1x Floppy port ※ Specifications and information contained herein are subject to • 1x ATA 133 IDE connector change without notice. NF-M2P/NF-M2S/NF-M2SV... -
Page 7: Nf-M2Sv
• 2x USB 2.0 headers 1.1.3 NF-M2SV • 2x SATA 3Gb/s connectors • 1x FP-Audio header • 1x CD-In connector • Socket AM2 processor with 2000MT/s system bus • Supports AMD Cool ‘n’ Quiet Technology Rear Panel I/O • 1x PS/2 Keyboard connector Chipset •... -
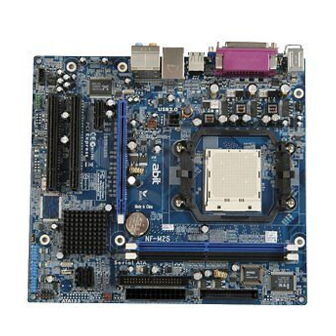
Page 8: Motherboard Layout
1.2 Motherboard Layout 1.2.2 NF-M2S 1.2.1 NF-M2P NF-M2P/NF-M2S/NF-M2SV... -
Page 9: Nf-M2Sv
1.2.3 NF-M2SV 1.3 Choosing a Computer Chassis • Choose a chassis big enough to install this motherboard. • As some features for this motherboard are implemented by cabling connectors on the motherboard to indicators and switches or buttons on the chassis, make sure your chassis supports all the features required. -
Page 10: Checking Jumper Settings
CPU ratio/clock was incorrectly set in the BIOS menu, or (d) whenever there is modification on the CPU or memory modules. This header uses a jumper cap to clear the CMOS memory and have it reconfigured to the default values stored in BIOS. NF-M2P/NF-M2S/NF-M2SV... - Page 11 ※ Dispose of used batteries according to the battery manufacturer’s An onboard battery saves the CMOS memory to keep the BIOS instructions. information stays on even after disconnected your system with power source. Nevertheless, this backup battery exhausts after some five NF-M2P/NF-M2S/NF-M2SV...
-
Page 12: Connecting Chassis Components
HD LED - Message LED - 300W or higher is recommended. RESET Power Switch ATX 12V 4-Pin Power Connector: RESET Power Switch Reserved This connector supplies power to CPU. The system will not start without connecting power to this one. NF-M2P/NF-M2S/NF-M2SV... -
Page 13: Fan Power Connectors
This header provides the connection to chassis speaker. your system. • CPU_FAN1: CPU Fan Power Connector • SYS_FAN1: System Fan Power Connector • PWR_FAN: Auxiliary Fan Power Connector ※ These fan connectors are not jumpers. DO NOT place jumper caps on these connectors. NF-M2P/NF-M2S/NF-M2SV... -
Page 14: Installing Hardware
Be careful to insert the CPU into the socket. The CPU only fits in mounting-lug. Hook the spring clip to the one orientation with the socket. DO NOT force the CPU into the mounting-lug. socket. NF-M2P/NF-M2S/NF-M2SV... -
Page 15: Ddr2 Memory Slots
※ A higher fan speed will be helpful for better airflow and heat-dissipation. Nevertheless, stay alert to not touch any heatsink since a high temperature generated by the working system is still possible. NF-M2P/NF-M2S/NF-M2SV... -
Page 16: Connecting Peripheral Devices
※ Make sure to configure the “Master” and “Slave” relation before connecting two drives by one single ribbon cable. The red line on the ribbon cable must be aligned with pin-1 on both the IDE port and the hard-drive connector. NF-M2P/NF-M2S/NF-M2SV... -
Page 17: Serial Ata Connectors
1.8.3 Additional USB 2.0 Port Headers Each header supports 2x additional USB 2.0 ports by connecting bracket or cable to the rear I/O panel or the front-mounted USB ports of your chassis. NF-M2P: NF-M2S/NF-M2SV: NF-M2P/NF-M2S/NF-M2SV... -
Page 18: Internal Audio Connectors
1.8.4 Internal Audio Connectors NF-M2S/NF-M2SV: This connector connects to the audio output of internal CD-ROM drive or add-on card. Pin Assignment Pin Assignment Data0 - Data1 - Data0 + Data1 + Ground Ground ※ Make sure the connecting cable bears the same pin assignment. -
Page 19: Front Panel Audio Connection Header
Right Channel audio signal to Front Panel Right Channel Audio signal to Return AUD_RET_R from Front Panel REVD Reserved No Pin AUD_F_L Left Channel Audio signal to Front Panel Left Channel Audio signal to Return from AUD_RET_L Front Panel NF-M2P/NF-M2S/NF-M2SV... -
Page 20: Connecting Rear Panel I/O Devices
Line-Out: Connects to the front left and front right channel. Mic-In: Connects to the plug from external microphone. • AUDIO1: (For model NF-M2SV) Line-In: Connects to the line out from external audio sources. NF-M2SV: Line-Out: Connects to the front left and front right channel. -
Page 21: Bios Setup
BIOS menu. The BIOS setup screens and descriptions illustrated in this manual are for your reference only, and may not completely match with what you see on your screen. ※ Do not change the BIOS parameters unless you fully understand its function. NF-M2P/NF-M2S/NF-M2SV... -
Page 22: Driver & Utility
[Utility]: Click to enter the utilities installation menu. Place the “Driver & Utility CD” into the CD-ROM drive in your system. • [abit Utility]: Click to enter the installation menu of utilities The following installation auto-run screen appears. If not, browse the exclusively developed by abit. -
Page 23: Appendix
• 內建 7.1 聲道 HD 音效 • 符合 Windows Vista 硬體需求 Serial ATA • 4 個 SATA 3Gb/s 支援 SATA RAID 0、1、10、5、JBOD 擴充插槽 • 1 個 PCI-E X16 插槽 • 1 個 PCI-E X1 插槽 ※ 本手冊的規格與資訊若有變動,恕不另行通知。 • 2 個 PCI 插槽 NF-M2P/NF-M2S/NF-M2SV... -
Page 24: Nf-M2S
Serial ATA • 符合 Windows Vista 硬體需求 • 2 個 SATA 3Gb/s 支援 SATA RAID 0、1 擴充插槽 • 1 個 PCI-E X16 插槽 • 1 個 PCI-E X1 插槽 • 2 個 PCI 插槽 內部輸入/輸出接頭 • 1 個軟碟埠 ※ 本手冊的規格與資訊若有變動,恕不另行通知。 NF-M2P/NF-M2S/NF-M2SV... -
Page 25: Nf-M2Sv
4.1.3 NF-M2SV • 1 個 ATA 133 IDE 接頭 • 2 個 USB 2.0 接頭 處理器 • 2 個 SATA 3Gb/s 接頭 • 支援具備 2000MT/s 系統匯流排的 Socket AM2 處理器 • 1 個 FP-Audio 接頭 • 支援 AMD Cool ‘n’ Quiet 技術... -
Page 26: 规格(简体中文
• Micro ATX 主机板规格(244mm x 220mm) 串行 ATA • 符合 Windows Vista 硬件需求 • 4 个 SATA 3Gb/s 支持 SATA RAID 0、1、10、5、JBOD 扩充插槽 • 1 个 PCI-E X16 插槽 • 1 个 PCI-E X1 插槽 • 2 个 PCI 插槽 ※ 本手册的规格与信息若有变动,恕不另行通知。 NF-M2P/NF-M2S/NF-M2SV... -
Page 27: Nf-M2S
• 2 个 SATA 3Gb/s 支持 SATA RAID 0、1 扩充插槽 • 1 个 PCI-E X16 插槽 • 1 个 PCI-E X1 插槽 • 2 个 PCI 插槽 内部输入/输出接头 • 1 个软盘端口 • 1 个 ATA 133 IDE 接头 ※ 本手册的规格与信息若有变动,恕不另行通知。 NF-M2P/NF-M2S/NF-M2SV... -
Page 28: Nf-M2Sv
4.2.3 NF-M2SV • 2 个 USB 2.0 接头 • 2 个 SATA 3Gb/s 接头 处理器 • 1 个 FP-Audio 接头 • 支持具备 2000MT/s 系统总线的 Socket AM2 处理器 • 1 个 CD-In 接头 • 支持 AMD Cool ‘n’ Quiet 技术 后面板输入/输出接头... -
Page 29: Troubleshooting (How To Get Technical Support?)
The same procedure as Step 2, but while discharging the CMOS data, pull out Example: Intel 650 3.4GHz (OC FSB=220MHz) the ATX power connectors from motherboard and remove the button battery • during CMOS discharge. Memory brand: Type in the brand and model name of your memory module. NF-M2P/NF-M2S/NF-M2SV... -
Page 30: Technical Support Form
Is the motherboard dead? Do I need to return it to where I bought from or go Operating system: through an RMA process? After you have gone through the troubleshooting procedures, yet the problem still exists, Problem description: or you find an evident damage on the motherboard, please contact our RMA center. (http://www2.abit.com.tw/page/en/contact/index.php?pFUN_KEY=18000&pTITLE_IMG) NF-M2P/NF-M2S/NF-M2SV... -
Page 31: Contact Information
Taiwan Head Office Germany and Benelux (Belgium, Poland Netherlands, Luxembourg), France, Italy, Universal ABIT Co., Ltd. Universal ABIT Poland (Rep. office) Spain, Portugal, Greece, Denmark, No. 323, Yang Guang St., Neihu, Strzegomska 310/2, 54-432 Wroclaw Norway, Sweden, Finland, Switzerland Taipei, 114, Taiwan Tel: +48-71-718-12-39 Universal ABIT NL B.V. - Page 32 P/N: 4310-0000-81 Rev. 2.00...
Need help?
Do you have a question about the NF-M2SV and is the answer not in the manual?
Questions and answers