Table of Contents
Advertisement
Quick Links
Download this manual
See also:
User Manual
Advertisement
Table of Contents

Related Manuals for Chauvet COLORband PiX


Summary of Contents for Chauvet COLORband PiX
- Page 1 User Manual...
-
Page 2: Table Of Contents
Automatic Mode ....................16 Custom Static Color Mode ..................16 Master/Slave Mode ....................17 5. Maintenance ..................18 Product Maintenance .................. 18 Contact Us ....................19 Returns ....................... 19 6. Technical Specifications ..............20 Page 2 of 20 COLORband PiX™ Mini User Manual Rev. 5... -
Page 3: Before You Begin
CHAUVET®. Failure to do so in a timely manner may invalidate your claim with the carrier. In addition, keep the container and all the packing material for inspection. -
Page 4: Product At A Glance
Please contact the nearest authorized technical assistance center. · Keep this User Manual for future consultation. If you sell the product to another user, be sure that they also receive this document. Page 4 of 20 COLORband PiX™ Mini User Manual Rev. 5... -
Page 5: Introduction
2. I NTRODUCTION Product Overview Microphone Power In LED Display Power Out Sound Sensitivity Knob Bracket Adjustment Knob 5-pin DMX Connectors 3-pin DMX Connectors COLORband PiX™ Mini User Manual Rev. 5 Page 5 of 20... -
Page 6: Product Dimensions
Product Dimensions Page 6 of 20 COLORband PiX™ Mini User Manual Rev. 5... -
Page 7: Setup
3. S ETUP AC Power The COLORband PiX™ Mini has an auto-ranging power supply and can work with an input voltage range of 100~240 VAC, 50/60 Hz. To determine the product’s power requirements (circuit breaker, power outlet, and wiring), use the current value listed on the label affixed to the product’s back panel, or refer to the product’s specifications chart. -
Page 8: Power Linking
Product Product Other products You can power link up to 20 COLORband PiX™ Mini units on 120 VAC or up to 35 COLORband PiX™ Mini units on 230 VAC. The power linking diagram shown above corresponds to the North American version of the product ONLY! If using the product in other markets, you must consult with the local CHAUVET®... -
Page 9: Mounting
Before mounting the product, read and follow the safety recommendations indicated in Safety Notes. Orientation The COLORband PiX™ Mini may be mounted in any position; however, make sure adequate ventilation is provided around the product. · Rigging Before deciding on a location for the product, always make sure there is easy access to the product for maintenance and programming purposes. -
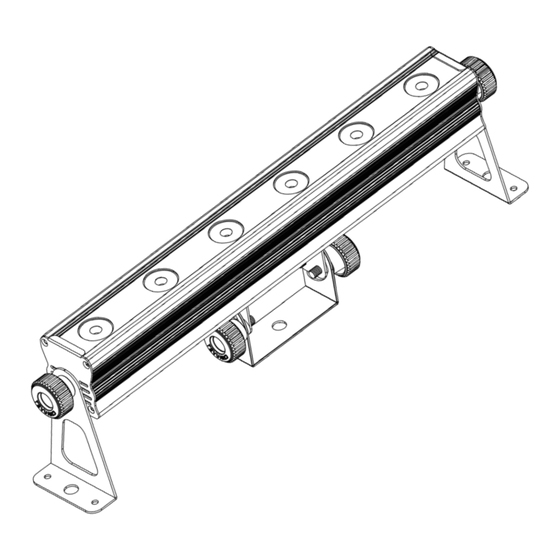
Page 10: Cbb-6 Instructions
CBB-6 Instructions The CBB-6 works with the COLORband PiX™ Mini (shown below), COLORband PiX™, and most linear/strip lights. Basic Assembly To assemble the CBB-6 bracket: Unscrew the bracket adjustment knob on the light you wish to attach to the bracket. -
Page 11: Operation
Program Speed S001-S100 Selects auto program speed Slave Mode Sets Slave Mode Custom Color Green Mixing Blue 3-CH 4-CH 6-CH d001-d512 Selects DMX starting address Personalities 7-CH 9-CH 18-CH COLORband PiX™ Mini User Manual Rev. 5 Page 11 of 20... -
Page 12: Configuration (Dmx)
The COLORband PiX™ Mini has six DMX personalities, from a 3-channel mode for basic control to an 18-channel mode with more advanced control over the lights. Personalities The COLORband PiX™ Mini uses up to 18 DMX channels in its 18-channel DMX mode, and Starting which defines the highest configurable address to 495. -
Page 13: Dmx Channel Assignments And Values
000 ó 255 0~100% Blue Channel Function Value Setting 4-CH 000 ó 255 0~100% 000 ó 255 0~100% Green 000 ó 255 0~100% Blue 000 ó 255 0~100% Dimmer COLORband PiX™ Mini User Manual Rev. 5 Page 13 of 20... -
Page 14: 6-Ch
0~100% 000 ó 255 0~100% 000 ó 255 Green 0~100% 000 ó 255 Blue 0~100% 000 ó 255 0~100% 000 ó 255 Green 0~100% 000 ó 255 Blue 0~100% Page 14 of 20 COLORband PiX™ Mini User Manual Rev. 5... -
Page 15: 18Ch
0~100% 000 ó 255 0~100% 000 ó 255 Green 0~100% 000 ó 255 Blue 0~100% 000 ó 255 0~100% 000 ó 255 Green 0~100% 000 ó 255 Blue 0~100% COLORband PiX™ Mini User Manual Rev. 5 Page 15 of 20... -
Page 16: Configuration (Standalone)
Press <ENTER>. Press <UP> or <DOWN> to choose the intensity of the color (000-100). Repeat the steps to mix additional colors to create the color you need. Press <ENTER>. Page 16 of 20 COLORband PiX™ Mini User Manual Rev. 5... -
Page 17: Master/Slave Mode
A1~A126 (found under SLA in the master unit) will select how many slave units are attached to it. Selecting A A1 or A A2 on the COLORband PiX™ Minis will tell the master unit which side of the strip the Minis are on. The combination of number and direction settings allows lots of variation, including allowing 2 COLORband PiX™... -
Page 18: Maintenance
Carefully wipe any dirt or grime to the outside edge of the transparent surface. · Gently polish the transparent surfaces until they are free of haze and lint. Always dry the transparent surfaces carefully after cleaning them. Page 18 of 20 COLORband PiX™ Mini User Manual Rev. 5... -
Page 19: Contact Us
If you live in the UK or Ireland, contact CHAUVET® Europe Ltd.(see below). · If you live in any other country, DO NOT contact CHAUVET®. Instead, contact your distributor of record. Refer to our website for contact details of distributors outside the U.S., United Kingdom, or Ireland. -
Page 20: Technical Specifications
I/O Connectors Connector Type Channel Range 3-pin and 5-pin XLR Sockets 3, 4, 6, 7, 9, 18 Ordering Product Name Item Code Item Number COLORband PiX™ Mini 03020470 COLORBANDPIXMINI Page 20 of 20 COLORband PiX™ Mini User Manual Rev. 5...
Need help?
Do you have a question about the COLORband PiX and is the answer not in the manual?
Questions and answers