Advertisement
Advertisement

Related Manuals for Sunbeam SCK02SMWBS


Summary of Contents for Sunbeam SCK02SMWBS
- Page 1 User’s Manual Beer Dispenser Model: SCK02SMWBS PTT092106...
-
Page 2: Table Of Contents
TABLE OF CONTENTS IMPORTANT SAFETY INSTRUCTIONS GROUNDING INSTRUCTIONS PRODUCT DIAGRAM INSTALLATION INSTRUCTIONS OPERATION INSTRUCTIONS BEFORE CALLING FOR SERVICE... -
Page 3: Important Safety Instructions
IMPORTANT SAFETY INSTRUCTIONS READ ALL SAFETY INSTRUCTIONS BEFORE USING THIS APPLIANCE When using electrical appliances, basic safety precautions should be followed, including the following: Read all instructions before using the beer dispenser. Plug into a grounded 3-prong outlet; do not remove grounding plug; do not use an adapter; do not use an extension cord. - Page 4 IMPORTANT SAFETY INSTRUCTIONS (continued) GAS CAN BE DANGEROUS cylinders contain high-pressure compressed gas which can be hazardous if not handled properly. Make sure to read this section and understand the following procedures: Always connect the CO cylinder to a regulator. Failure to do so may result in explosion with possible death or injury when the cylinder valve is opened.
-
Page 5: Grounding Instructions
GROUNDING INSTRUCTIONS This beer dispenser must be grounded. In the event of an electrical short circuit, grounding reduces risk of electric shock by providing an escape wire for the electric current. WARNING: Improper use of the grounding plug can result in risk of electric shock. ELECTRICAL REQUIREMENTS •... -
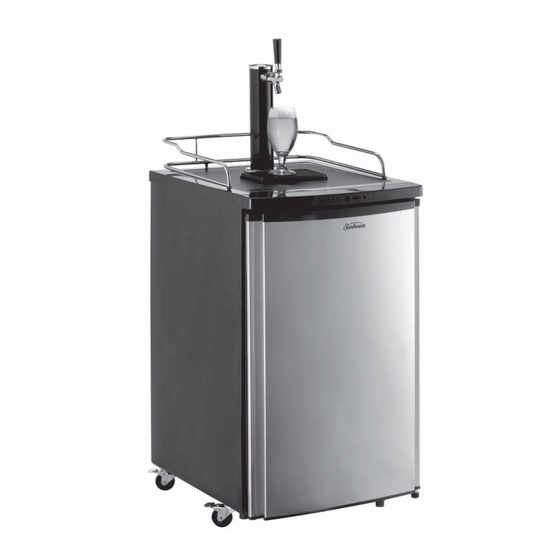
Page 6: Product Diagram
PRODUCT DIAGRAM Beer tower Plastic gasket Safety guard rail Drip tray Adjustable thermostat regulator gas cylinder gas cylinder support Evaporator Reversible door Beer keg (not included) Metal plate Metal gasket (2) Castors with lock (4) -
Page 7: Installation Instructions
INSTALLATION INSTRUCTIONS INSTALLING THE CASTORS • Install the four castors provided into the unit’s bottom. The two metal gaskets are used on the front two castors. INSTALLING THE CO CYLINDER SUPPORT • Install the metal support provided onto the 4 studs located on the exterior back wall. - Page 8 INSTALLATION INSTRUCTIONS (continued) INSTALLING THE CO AIR LINE TO REGULATOR • Attach the open end of the red hose to the hose barb connection on the regulator. • Secure hose by using one of the provided clamps. • Use pliers/screwdriver to tighten clamp and assure no leaks.
- Page 9 INSTALLATION INSTRUCTIONS (continued) INSTALLING THE KEG COUPLER • Insert the provided keg coupler into the locking neck of the beer keg and turn it clockwise to lock into position, making sure the keg coupler is in the closed position. INSTALLING THE CO AIR LINE HOSE •...
-
Page 10: Reversing The Door
INSTALLATION INSTRUCTIONS (continued) INSTALLING THE PLASTIC FAUCET LEVER • Attach the provided black plastic lever (pull handle) on the top of the faucet tightening it by hand clockwise until the end, holding in the silver snug underneath so it does not move. •... -
Page 11: Operation Instructions
OPERATION INSTRUCTIONS INSTALLING THE TEMPERATURE CONTROL • The temperature control ranges from 36°F to 45°F. • When setting up the unit, plug it in and turn the control knob to the maximum setting (6). Let the unit run for 3 hours to get cold. •... -
Page 12: Before Calling For Service
BEFORE CALLING FOR SERVICE Before asking for service, please check each item below: PROBLEM POSSIBLE CAUSE • Not plugged in. Does not operate. • The circuit breaker tripped or a fuse blew. • The room temperature is hotter than normal. •... - Page 13 © 2006 Sunbeam Products, Inc. doing business as Jarden Consumer Solutions. All rights reserved. Sunbeam is a registered trademark of Sunbeam Products, Inc. used under license. ® Distributed by Petters Consumer Brands, LLC. 4400 Baker Road, Minnetonka, MN 55343. For service, support and warranty information, visit www.sunbeammajorappliances.com or in the US call 1-866-866-6283.
Need help?
Do you have a question about the SCK02SMWBS and is the answer not in the manual?
Questions and answers