Advertisement
Available languages
Available languages
Quick Links
Elite 2
INSTRUCTION MANUAL
Before operating the unit, please read this manual thoroughly and retain it for future reference.
GEBRUIKSAANWIJZING
Gelieve deze gebruiksaanwijzing te lezen alvorens het toestel te gebruiken. Bewaar hem voor
later gebruik.
MANUEL D'UTILISATION
Veuillez lire ce manuel d'utilisation avant d'utiliser l'appareil et gardez-le pour consultation
ultérieure.
Advertisement
Chapters

Related Manuals for Salora ELITE 2


Summary of Contents for Salora ELITE 2
-
Page 1: Instruction Manual
Elite 2 INSTRUCTION MANUAL Before operating the unit, please read this manual thoroughly and retain it for future reference. GEBRUIKSAANWIJZING Gelieve deze gebruiksaanwijzing te lezen alvorens het toestel te gebruiken. Bewaar hem voor later gebruik. MANUEL D’UTILISATION Veuillez lire ce manuel d’utilisation avant d’utiliser l’appareil et gardez-le pour consultation... -
Page 2: Table Of Contents
CONTENTS SAFETY AND CAUTION ........................... 2 OVERVIEW ..............................3 POWER SUPPLY ............................5 GENERAL FUNCTIONS ........................7 TIME SETTING ............................8 TUNER MODE ............................9 CD MODE ..............................12 SD CARD AND USB MODE ....................... 15 AUXILIARY INPUT MODE ........................16 ALARM FUNCTION .......................... -
Page 3: Safety And Caution
SAFETY AND CAUTION To ensure that the device provides you with long-term satisfaction and enjoyment, please observe the following instructions. This device is connected to the mains with the AC cord. To completely disconnect the power input, pull out the mains plug of the device from the mains. ... -
Page 4: Overview
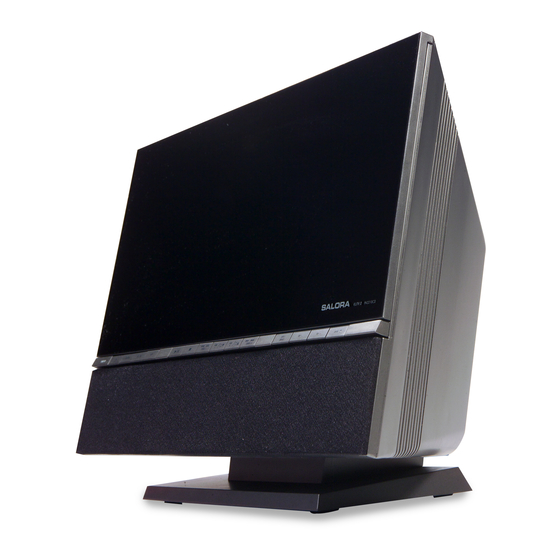
OVERVIEW MAIN UNIT Keys & Controls on the Top Disc window IR sensor Receive signal from the remote control. Display Standby LED indicator Light on when the device is in standby mode. On/Off Switches the unit to and from standby mode. The unit is fully disconnected from the mains after the plug has been pulled out. - Page 5 OVERVIEW MAIN UNIT Keys & Controls on the Front 19. Headphone socket For connecting headphone or earpiece with 3.5mm plug. The loud speakers of the hi-fi system are automatically switched off. 20. USB socket For connecting the USB memory device. 21.
- Page 6 OVERVIEW REMOTE CONTROL Keys & Controls On/Off Switches the unit to and from standby mode. The unit is fully disconnected from the mains after the plug has been pulled out. Function Selects the FM Tuner, MW Tuner, CD, SD CARD, USB and Auxiliary input sources. Activates and deactivates the weekend cancellation function for alarm.
-
Page 7: Power Supply
POWER SUPPLY Mains operation Check if the mains voltage on the type plate (at the bottom of the device) corresponds to your local mains supply. If not, consult your dealer or service organization. Insert the power cord into the AC socket on the side of the device. Plug the mains plug into the mains socket. -
Page 8: General Functions
GENERAL FUNCTIONS Switching the device on and off Press the On/Off button to switch on the device from standby mode. The last function used is automatically selected. Switch the device to standby by pressing the On/Off button. The display shows ”GOOD BYE” Adjusting the brightness of the display Press the Dimmer button to adjust the brightness of display backlight in four levels (bright, medium, low or off). -
Page 9: Time Setting
GENERAL FUNCTIONS Switching the Ultra Bass System on and off This function boosts the bass frequencies. You can follow the below procedure to switch on and off the UBS when the sound setting is CLASSIC, POP, JAZZ or ROCK. Press and hold the DSC/UBS button to switch the Ultra Bass System on and off. Notes: Listening with UBS at high volume may have distortion. -
Page 10: Tuner Mode
TUNER MODE Connecting the antenna Plug the wire antenna supplied or the outdoor antenna cable into the FM Antenna socket. Fully extend the wire antenna for FM reception. Insert the wires of the MW frame antenna supplied into the MW Antenna connector with the same colour. - Page 11 TUNER MODE Storing stations as presets Press the Rewind or Forward button to select the station desired to store. Press the Prog. button to activate the storing function. The preset position and “PROG” flash on the display. Choose the desired preset position by using the Up or Down button. Press the Prog.
- Page 12 TUNER MODE RDS station service RDS (Radio Data System) is an information system which inaudible digital information is transmitted in addition to the normal FM radio programme. When the device is receiving a RDS station and the recep- tion strength is sufficient, the station name and “ ”...
-
Page 13: Cd Mode
CD MODE The device is suitable for music CDs displaying the logo shown here (CD-DA) and for CD-Rs and CD-RWs with audio data or MP3 and WMA formats. In MP3/WMA mode, the terms “album” and “file” are very important. “Album” cor- responds to a folder on a PC, “file”... - Page 14 CD MODE Searching for a passage within a file or track During playback, press and hold down the Rewind or Forward button until you find the passage you want to hear. –Playback starts when you release the button. –The volume is reduced during the search. Repeating a file or track (Repeat One) During playback, press the Repeat button, the display shows the symbol “...
- Page 15 CD MODE Calling up file information (MP3/WMA only) You can call up file information (ID3 tag and ticker text) with this function. During playback, the display switches to show the album and file name. Repeatedly press the Display button to cycle through the information. Creating a track memory You can create a track memory of up to 60 tracks (CD-DA) or up to 60 files from different albums (MP3/ WMA) of the current CD in any order you desired and then play the tracks in that sequence.
-
Page 16: Sd Card And Usb Mode
SD CARD AND USB MODE Secure Digital (SD or SDHC) cards can be used with the device for playback of MP3 or WMA files. SD or SDHC cards up to 16GB are supported. However, there are many different cards variants avail- able and not all cards can be guaranteed to work in the device. -
Page 17: Auxiliary Input Mode
AUXILIARY INPUT MODE The device has an auxiliary input mode for listening audio signal from an external audio device, such as iPod, MP3 player, CD player, etc. Connect a stereo or mono audio source to the Auxiliary Input socket (Ø3.5mm) provided on the side of the device. -
Page 18: Alarm Function
ALARM FUNCTION The device has an alarm function which can be set to wake you to buzzer, radio, CD or SD card input source. The alarm duration is 90 minutes. Setting the alarm time With the device switched off, press and hold the Alarm button until the hour digits flash on the display. -
Page 19: Sleep Function
ALARM FUNCTION Activating and deactivating the alarm To deactivate the alarm, briefly press the Alarm button in standby mode. The alarm symbol disappears on the display. The alarm setting is saved. To activate the alarm, briefly press the Alarm button again in standby mode. The display shows the alarm symbol. -
Page 20: Information
INFORMATION Technical data Power Supply Mains operation AC 230V, 50Hz~ only Battery operation (For remote control only) 2 x 1.5V (R03 / UM4 / AAA size) Maximum Power Operation 32 W Consumption Standby 0.5 W (with display and backlight are switched off) Frequency Coverage FM 87.5 –... - Page 22 INHOUD VEILIGHEID EN WAARSCHUWINGEN ....................2 OVERZICHT ............................. 3 VOEDING ..............................6 ALGEMENE FUNCTIES .......................... 7 TIJDINSTELLING ............................ 8 TUNER ..............................9 CD ................................12 SD KAART EN USB ..........................15 AUX INGANG ............................16 ALARMFUNCTIE ............................ 17 SLEEP FUNCTIE ........................... 18 HERINNERINGSFUNCTIE ........................18 INFORMATIE ............................
-
Page 23: Veiligheid En Waarschuwingen
VEILIGHEID EN VOORZICHTIGHEID Teneinde er voor te zorgen dat u gedurende lange tijd van het toestel kan genieten, is het nodig de volgende instructies op te volgen. • Het toestel wordt via een stroomkabel aan het net aangesloten. Om het toestel volledig van de netstroom los te koppelen dient de stekker uit het stopcontact gehaald te worden. -
Page 24: Overzicht
OVERZICHT TOESTEL Bedieningen op de voorzijde CD venster IR ontvanger Ontvangt de signalen van de afstandsbediening Display Stand-by LED aanduiding Licht op als het toestel in stand-by is Aan/uit Om het toestel van en naar stand-by te brengen. Het toestel is volledig van de stroom afgesloten als de stekker uitgetrokken is. - Page 25 OVERZICHT TOESTEL Bedieningen op de bovenkant en de zijkant 19. Hoofdtelefoonaansluiting Voor aansluiting van een hoofdtelefoon met een 3.5 mm stekker. De luidsprekers worden automatisch uitgeschakeld. 20. USB ingang Om het USB apparaat aan te sluiten 21. SD kaart ingang Om de SD of SDHC kaart in te brengen Bedieningen op de achterzijde 23 24...
- Page 26 OVERZICHT AFSTANDSBEDIENING Toetsen Aan/uit Om het toestel van en naar stand-by te brengen. Het toestel is volledig van de stroom afgesloten als de stekker uitgetrokken is. Functie Om de selecteren tussen FM tuner, MW tuner, CD, SD kaart, USB en Aux ingang Activeert en deactiveert de weekenduitschakeling van het alarm Weergave/pauze/PTY In CD, SD kaart en USB modus: om de weergave te starten en te pauzeren.
-
Page 27: Voeding
VOEDING Netvoeding Controleer of de stroomvereiste van het toestel zoals aangeduid op het plaatje (op de onderkant van het toestel) overeenkomt met uw netstroom. Indien niet, consulteer dan uw dealer. Steek het netsnoer in de AC aansluiting op de zijkant van het toestel. Steek de stekker in het stopcontact. -
Page 28: Algemene Functies
ALGEMENE FUNCTIES Het toestel in- en uitschakelen Druk op de Aan/Uit toets om het toestel vanuit stand-by in te schakelen. De laatst gebruikte functie wordt terug opgeroepen. Breng het toestel terug in stand-by door op de Aan/Uit toets te drukken. Het display toont “GOOD BYE”. -
Page 29: Tijdinstelling
ALGEMENE FUNCTIES Het Ultra Bass Systeem in- en uitschakelen Met deze functie worden de lage tonen extra versterkt. U kan de volgende procedure volgen om het UBS in- of uit te schakelen als u voor KLASSIEK, JAZZ of ROCK gekozen heeft. Hou de DSC/UBS toets ingedrukt om het Ultra Bass Systeem in- of uit te schakelen. -
Page 30: Tuner
TUNER Aansluiten van de antenne Steek de meegeleverde draadantenne of de externe antenne in de FM antenneaansluiting. Trek de draadantenne volledig uit. Sluit de snoeren van de meegeleverde MW loopantenne aan de MW antenneaansluiting. Let op dat de kleuren overeenkomen. Verdraai de positie van de antenne voor een betere ontvangst. - Page 31 TUNER In het geheugen opslaan van de zenders Gebruik de Terugspoelen of Voorwaarts toetsen om de gewenste zender op te zoeken. Druk op de Prog. toets om de geheugenfunctie te activeren. Het geheugennummer en “PROG” knipperen op het display. Kies het gewenste geheugennummer met de Up of Down toetsen. Druk op de Prog.
- Page 32 TUNER RDS zenderservice RDS (Radio Data system) is een informatiesysteem dat als onhoorbare digitale informatie met het FM radioprogramma wordt meegestuurd. Als het toestel een RDS zender ontvangt en het signaal is terk genoeg, verschijnt de zendernaam en “ ” op het display. Het kan eventjes duren alvorens de RDS informatie beschikbaar is.
- Page 33 Het toestel is geschikt voor de weergave van muziek Cd’s met het hiernaast afge- beelde logo (CD-DA) en voor CD-R’s en CD-RW’s waarop het geluid in MP3 of WMA formaat is opgenomen. In MP3/WMA modus zijn de benamingen “album” en “document” zeer belangrijk. “Album”...
- Page 34 Een passage binnen een file of nummer opzoeken Hou tijdens de weergave de Terugspoelen of Voorwaarts toetsen ingedrukt totdat u de passage vindt die u wil horen. - Weergave start vanaf het ogenblik dat u de toets loslaat. - Tijdens het zoeken wordt het geluid verminderd. Herhaling van een file of nummer (Repeat One) Druk tijdens de weergave op de Herhaal toets en het symbool “...
- Page 35 Oproepen van informatie (alleen MP3/WMA) Met deze functie kan u informatie (ID3 tag en ticker text) van de file oproepen. Tijdens de weergave verandert het display om het album en de naam van de file weer te geven. Druk verschillende malen op de Display toets om doorheen de informatie te lopen. Programmeren U kan tot 60 nummers (CD-DA) en tot 60 files uit verschillende albums (MP3/WMA) op de huidige CD in eender welke volgorde programmeren.
-
Page 36: Sd Kaart En Usb
SD KAART OF USB Secure Digital (SD of SDHC) cards kunnen gebruikt worden voor de weergave van MP3/WMA files. SD of SDHC kaarten tot 16GB kunnen gebruikt worden. Er bestaan echter vele verschillende varianten en het is niet gegarandeerd dat alle kaarten met dit toestel gebruikt kunnen worden. Om met dit toestel te kunnen werken moeten de SD of SDHC kaarten met het FAT of FAT32 systeem geformateerd zijn. -
Page 37: Aux Ingang
AUX INGANG Het toestel beschikt over een aux ingang voor het beluisteren van muziek van externe apparaten zoals een iPod, MP3-speler, Cd-speler, enz. Sluit het externe apparaat aan op de Aux ingang (Ø 3.5 mm) op de zijkant van het toestel. Schakel het toestel in en gebruik de Functie toets om AUX te selecteren. -
Page 38: Alarmfunctie
ALARMFUNCTIE Dit toestel is uitgerust met een alarmfunctie om u te wekken met een zoemer, radio, CD of een SD kaart. De duur van het alarm is 90 minuten. De alarmtijd instellen Hou, terwijl het toestel uitgeschakeld is, de Alarm toets ingedrukt totdat de urenindicatie op het display knippert. -
Page 39: Sleep Functie
ALARMFUNCTIE Het alarm in- en uitschakelen Druk in stand-by, op de Alarm toets om het alarm uit te schakelen. Het alarmsymbool verdwijnt van de display. De alarminstelling blijft bewaard. Om het alarm terug in te schakelen, druk opnieuw in stand-by op de Alarm toets. Het alarmsymbool verschijnt op het display. -
Page 40: Informatie
INFORMATIE Technische gegevens Voeding Netstroom AC 230 V, 50 Hz Batterijen (afstandsbediening) 2 x 1.5 V (R03 / UM4 / AAA formaat) Maximum verbruik Tijdens gebruik 32 W Stand-by < 0.5 W (met display uitgeschakeld) Frequentieband 87.5 – 108 MHz 522 –... - Page 42 SOMMAIRE SECURITE ET PRECAUTIONS ........................ 2 COMMANDES ............................3 ALIMENTATION ............................6 FONCTIONS GENERALES ........................7 REGLAGE TEMPS ..........................8 TUNER ..............................9 CD ................................12 CARTE SD ET USB ..........................15 ENTREE AUXILIAIRE ..........................16 FONCTION ALARME ..........................17 FONCTION SLEEP ..........................
-
Page 43: Securite Et Precautions
SECURITE ET PRECAUTIONS Pour assurer une longue satisfaction de votre produit, lisez attentivement les instructions suivantes. • Cet appareil est connecté au courant secteur par un câble courant. Pour déconnecter l’appareil complètement du courant secteur, il faut retirer la prise. •... -
Page 44: Commandes
COMMANDES Appareil Commandes sur le panneau frontal Fenêtre disque Récepteur IR Reçoit les signaux de la télécommande Display Indicateur LED Stand-by S’allume quand l’appareil est en stand-by En/hors fonction Mettre l’appareil en fonction ou en stand-by. Pour déconnecter l’appareil complètement du courant secteur, il faut retirer la prise. - Page 45 COMMANDES Appareil Commandes sur le haut et le côté 19. Prise casque d’écoute Pour connecter le casque d’écoute avec une prise de 3.5 mm. Les haut-parleurs sont automatiquement déconnectés. 20. Prise USB Pour connecter l’unité USB 21. Prise Carte SD Pour insérer les cartes SD ou SDHC Commandes sur le panneau arrière 23 24...
- Page 46 COMMANDES TELECOMMANDE Boutons En/hors fonction Mettre l’appareil en fonction ou en stand-by. Pour déconnecter l’appareil complètement du courant secteur, il faut retirer la prise. Fonction Sélectionner entre Tuner FM, Tuner MW, CD, Carte SD, USB ou entrée auxiliaire Pour activer ou désactiver l’annulation de l’alarme pendant le weekend. Lecture/Pause/PTY Mode CD, Carte SD, USB : démarrer et pauser la lecture.
-
Page 47: Alimentation
ALIMENTATION Courant secteur Vérifiez que le courant nécessaire marque sur la plaquette (sur le bas de l’appareil) correspond avec votre courant secteur. Sinon, consultez votre revendeur. Connectez le câble courant secteur à la prise AC sur le côté de l’appareil. Connectez le câble courant secteur à... -
Page 48: Fonctions Generales
FONCTIONS GENERALES Mettre l’appareil en et hors fonction Poussez le bouton On/Off pour mettre l’appareil en fonction. L’appareil choisit automatiquement la dernière fonction utilisée. Poussez le bouton On/Off pour mettre l’appareil en stand-by. Le display affiche « GOOD BYE ». Régler la luminosité... -
Page 49: Reglage Temps
FONCTIONS GENERALES Mettre en et hors fonction le système Ultra Bass Ce système amplifie les graves. Suivez la procédure suivante pour mettre le système en ou hors fonc- tion quand vous avez choisi pour les modes CLASSIQUE, POP, JAZZ ou ROCK. Enfoncez le bouton DSC/UBS pour mettre le système ultra Bass en ou hors fonction. -
Page 50: Tuner
TUNER Connexion de l’antenne Connectez l’antenne à fil livrée avec l’appareil ou une antenne externe à la prise Antenne FM. Extrairez au maximum l’antenne pour réception FM. Connectez l’antenne loop MW livrée avec l’appareil à la prise Antenne MW en tenant compte des couleurs. - Page 51 TUNER Mémoriser les émetteurs comme présélections Poussez les boutons Rebobinage ou En avant pour sélectionner l’émetteur à mémoriser. Poussez le bouton Prog. pour activer la fonction de mémorisation. Le numéro de présélection actuel et « PROG » clignotent. Choisissez le numéro de la présélection avec les boutons Up ou Down. Poussez le bouton Prog.
- Page 52 TUNER Service RDS RDS (Radio Data System) est un système d’information transmis avec le programme FM, sous forme de signaux digitaux inaudibles. Quand l’appareil reçoit un émetteur RDS et le signal est assez puissant, le nom de l’émetteur et le symbole “ ”...
- Page 53 L’appareil est prévu pour la lecture des CD musique avec le logo affiché à gauche (CD-DA) et les disques CD-R et CD-RW enregistrés avec musique sous format MP3 ou WMA. En mode MP3/WMA les mots « album » et « file » sont très importants. « Album » correspond avec un dossier PC et «...
- Page 54 Chercher un passage dans un file ou numéro Pendant la lecture, enfoncez les boutons Rebobinage ou En avant jusqu’au moment où vous avez trouvé le passage que vous voulez écouter. - La lecture commence dès que vous relâchez le bouton. - Le volume est réduit pendant la recherche.
- Page 55 Appel d’informations (uniquement MP3/WMA) Avec cette fonction vous pouvez afficher des informations de files (ID3 tag et ticker text) Pendant la lecture, le display change pour afficher l’album et le nom du file. Poussez plusieurs fois le bouton Display pour naviguer dans les informations. Programmation Vous pouvez programmer jusqu’à...
-
Page 56: Carte Sd Et Usb
CARTE SD ET USB Les cartes Secure Digital (SD ou SDHC) avec documents MP3 ou WMA peuvent être lues avec cet appareil. Les cartes SD ou SDHC jusqu’à 16GB sont supportées. Néanmoins, il existe beaucoup de différentes cartes et il n’est pas garanti que toutes les cartes puissent être lues. Les cartes SD ou SDHC doivent être formatées avec les systèmes FAT ou FAT32. -
Page 57: Entree Auxiliaire
ENTREE AUXILIAIRE L’appareil est équipé d’une entrée auxiliaire pou y connecter une source audio externe, tels que iPod, lecteur MP3, lecteur CD, etc. Connectez la source stéréo ou mono à la prise Entrée Aux (Ø3.5 mm) sur le côté de l’appareil. Mettez l’appareil en fonction et poussez le bouton Fonction pour sélectionner «... -
Page 58: Fonction Alarme
FONCTION ALARME L’appareil est équipé d’un système alarme pour vous réveiller avec zoomer, radio, CD ou carte SD. La durée totale de l’alarme est 90 minutes. Réglage du temps d’alarme Avec l’appareil hors fonction, enfoncez le bouton Alarme jusqu’au moment où l’indication de l’heure clignote. -
Page 59: Fonction Sleep
FONCTION ALARME Activer et désactiver l’alarme Pour désactiver l’alarme, poussez brièvement le bouton Alarme en mode stand-by. Le symbole alarme disparaît du display. Le temps d’alarme reste en mémoire. Pour réactiver l’alarme, poussez brièvement le bouton Alarme en mode stand-by. Le symbole alarme est affiché... -
Page 60: Information
INFORMATION Spécifications techniques Alimentation Courant secteur AC 230 V, 50 Hz Piles (télécommande) 2 x 1.5 V (R03 / UM4 / format AAA) Consommation En fonction 32 W maximale Stand-by < 0.5 W (avec le display hors fonction) Gamme de fréquences 87.5 –...
Need help?
Do you have a question about the ELITE 2 and is the answer not in the manual?
Questions and answers