DeLonghi EC860 Instructions For Use Manual
Hide thumbs
Also See for EC860:
- Manual (11 pages) ,
- Instructions for use manual (11 pages) ,
- Instructions for use manual (6 pages)
Table of Contents
Advertisement
Advertisement
Table of Contents

Related Manuals for DeLonghi EC860


Summary of Contents for DeLonghi EC860
- Page 1 De’Longhi Appliances via Seitz, 47 31100 Treviso Italia...
-
Page 2: Coffee Maker
Coffee mAker Instructions for use eC860... - Page 3 C2 CLEAN...
- Page 5 17 OZ / 0.5 L...
- Page 6 CLEAN...
-
Page 7: Safety Warnings
Safety warnings Symbols used in these instructions Attention: The important recommendations have these symbols. These Keep the packaging material (plastic bags, expanded warnings must be followed. polystyrene) out of the reach of children. Danger! Attention: Failure to comply can be or is the cause of injury due to life- Do not allow the appliance to be used by persons (including threatening electric shocks. - Page 8 Functioning lights Lights Operation Meaning of lights Turn on from general ON/OFF switch, at The appliance performs a self-test, the back of the appliance. signalled by the sequential flashing of lights. The appliance is on: no accessory is The appliance is heating up to make connected to coupling A2.
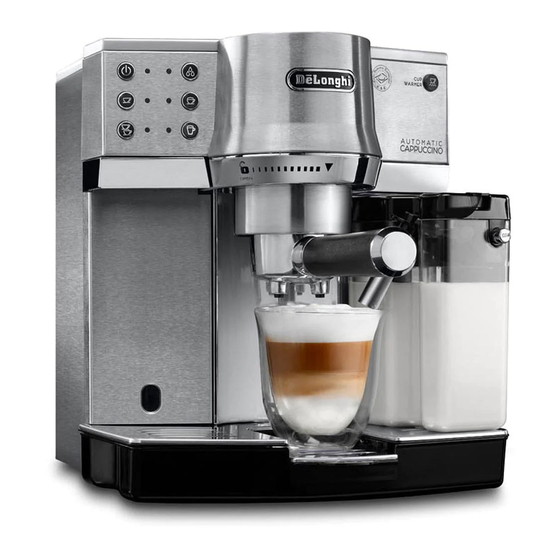
- Page 9 Description Description of appliance D7. Removable water/steam spout (page 3 - A ) D8. Reactive strip to detect water hardness A1. Cup holder/Warming plate (Total hardness test) A2. Water spout/milk container coupling D9. Descaler A3. General ON/OFF switch D10. Water softener filter A4. Power supply cable socket Instructions for use A5. Boiler outlet/Infusion assembly Read these instructions carefully before using the appliance.
-
Page 10: Water Filter/Filling Of Water Tank
Instructions for use Activation of the water filter and filling of the water programming menu, press button again. tank Setting the temperature • Remove the filter from the packaging and rinse it with To modify the temperature (low, medium, high) of the water about 17 OZ / 0.5 L of running water (fig. 2). -
Page 11: On/Off/Stand-By
Instructions for use • To prepare one coffee, fill the filter with one level 2. Completely dip the strip into a glass of water for one measuring spoon of ground coffee, about 0.24 oz./7 gr second. 3. Remove the strip from the water and shake it slightly. (fig. 11). If you wish to prepare two cups of coffee, fill After about one minute 1, 2, 3 or 4 red squares form, the filter with two less-than-level measuring spoons... -
Page 12: Clean Button
Instructions for use • Position the cup under the filter-holder spouts. It is exceeding the maximum of 0.5 l (fig. 18). Remember that advised to heat the cup before making the coffee, rinsing every notch on the side of the container corresponds to it with hot water. 100 ml of milk. •... -
Page 13: Cleaning
Instructions for use 2. Place a cup or other container under the milk spout tube. 2. Keep the button pressed. 3. Keep the “CLEAN” button (fig. 25) pressed: lights 3. When the hot water in the cup reaches the required level, flash. -
Page 14: Replacing The Filter
Instructions for use Descaling Cleaning the drip tray Descale the machine when the light flashes on the Attention! control panel. Proceed as follows: The drip tray is equipped with a floating water level indicator 1. Remove the water filter. Fill the tank with the descaling (red) (A11). As soon as this indicator starts protruding from solution obtained by diluting the descaler with water as the cup tray, empty the tray and clean it, otherwise the water indicated on the descaler pack. -
Page 15: Troubleshooting
Troubleshooting Problem Possible causes Solution The device will not switch on The power supply cable is not inserted Check that the power supply cable correctly connector is fully inserted in the appropriate socket on the back of the device; then check that the plug is correctly connected to the power outlet Espresso coffee does not flow out No water in the tank Fill the water tank... - Page 16 Troubleshooting Problem Possible causes Solution The coffee cream is dark (it flows slowly The ground coffee is too tightly pressed Press the coffee less from the spout) Large amount of ground coffee Decrease the amount of ground coffee The espresso boiler outlet is blocked Perform cleaning as indicated in the section “cleaning the boiler outlet”...
- Page 17 MACINACAFFÉ COFFE GRINDER MOULIN À CAFÉ KAFFEEMÜHLE KOFFIEMOLEN MOLINILLO DE CAFÉ MOINHO DE CAFÉ ªÀ§√ ∞§E™Eø™ T√À ∫∞º∂ Istruzioni per l’uso Instruction for use Mode d’emploi Bedienungsanleitung Gebruiksaanwijzingen Instrucciones para el uso Instruções √¢∏°π∂™ Ã∏™∏™...
-
Page 20: Using The Appliance For The First Time
USING THE APPLIANCE FOR THE FIRST TIME HOW TO USE YOUR COFFEE GRINDER Read the instructions carefully. This is important for • Place the appliance on a flat surface. the correct use, safety and maintenance of the • Pull out the length of cord required. appliance. - Page 21 CHARACTERISTICS OF THE SAFETY MOTOR PROTECTOR Since large quantities of coffee are packed every day some tiny stones may accidentally be found, even among the finest coffee beans. The appliance is equipped with a safety motor protector against stones - or "friction clutch" - to avoid damage to the grinding mechanism.
Need help?
Do you have a question about the EC860 and is the answer not in the manual?
Questions and answers