Table of Contents
Advertisement
Advertisement
Table of Contents

Related Manuals for Parasound Zphono-USB


Summary of Contents for Parasound Zphono-USB
- Page 1 Zphono • Phono Preamplifier & Digital Interface OWNER’S GUIDE...
-
Page 2: Introduction
Thank You for Choosing Parasound Congratulations on your purchase of this precision component and thank you for your selection of Parasound. We are proud to offer you this versatile audio component, knowing that it will bring you many years of enjoyment and dependability. -
Page 3: Table Of Contents
Table of Contents Introduction ..........Zphono•USB Placement and Ventilation Guidelines . -
Page 4: Zphono•Usb Placement And Ventilation Guidelines
While you are unpacking your Zphono•USB, inspect it thoroughly for possible shipping damage and tell your Parasound dealer immediately if you find any. If possible, save and store both the inner and outer cartons and–most especially–the foam packing inserts, to protect the Zphono•USB if you have to move it or ship it. -
Page 5: 115 / 230 Ac Voltage Selector
AC Voltage Selection 115v / 230v AC Voltage Selector Switch This switch is found on the chassis bottom. The 115V position of this switch is correct for North America and Brazil; most other countries require setting it to 230V. If you are in doubt of your local AC voltage (sometimes referred to as “mains”) call your dealer. -
Page 6: Connecting Your Zphono•Usb
Connecting your Zphono•USB Always disconnect the AC cords to your Zphono•USB and power amplifier(s) before making or changing any input, output or trigger wire connections. Inserting or removing an input or output cable while the Zphono•USB or power amplifiers are turned on can result in a blast of sound that can damage your loudspeakers. -
Page 7: Audio Output Connections
Line 1 and Line 2 Input Jacks Connect the audio output jacks of line level sources such as a CD player, tuner or other audio device to one pair of the Zphono•USB Line Input jacks. These are included so you can conveniently record sources other than a turntable to your PC. -
Page 8: Rear Panel Controls
Rear Panel Controls Phono Cartridge Switch The Cartridge switch on the rear panel selects both gain and load impedance. It should be set to match your turntable’s cartridge type. If you are unsure which setting is appropriate for your equipment you can search online for the cartridge specifications or you can contact the cartridge manufacturer. -
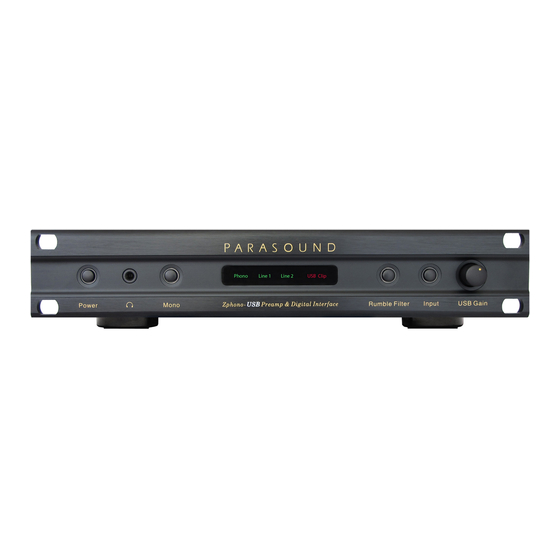
Page 9: Operating Your Zphono•Usb & Front Panel Controls
Operating your Zphono•USB Front Panel Display and Controls Power Button Pressing the Power button turns on the Zphono•USB. Pressing the Power button a second time turns off the Zphono•USB. Headphone) Jack The headphone jack offers an easy way to monitor your source while recording or simply to listen privately. - Page 10 Input Button Press the Input button to select the desired input. There are three inputs, Phono, Line 1 and Line 2. This will change both the analog Line Out and the digital USB Out to the selected input. USB Clip Indicator USB Clip will flash red when the input level to the analog to digital (A-D) converter for the USB is overdriven.
-
Page 11: Setting The Usb Gain Control For Successful Recording
Setting the USB Gain for Successful Recording The Zphono•USB front panel USB Gain control knob adjusts the audio level that is converted by the A-D converter into digital information for the USB connection used for computer recording. In order to make the best recordings, special attention must be paid to this setting just like when you used to record on a blank cassette tape. -
Page 12: Software For Recording To Your Computer
We recommend that you visit each of these web sites to see which software will work best for your particular system and needs. Note: Parasound has no affiliation with any software company and does not offer any warranty for use of any software. Please direct your questions directly to the software company whose product you are using or considering. -
Page 13: Frequently Asked Questions And Troubleshooting
USB audio device. I don’t know how to use the recording software. Where do I go for help? - Please contact the company that made the recording software. Parasound does not offer support for software or computer-related issues. -
Page 14: If You Require Assistance Or Warranty Repair
1. Unit was not purchased from a Parasound Authorized Dealer. 2. You do not have the original bill of sale or sales receipt from a Parasound Authorized Dealer. 3. You are not the original owner. The Parasound warranty is not transferable. -
Page 15: Specifications
Shipping: 8 lbs. (3.6 kg) Rack Mount Accessory: SBS – Side by Side Mounting bracket (May be purchased separately) Blank panel extender (May be purchased separately) Specifications and features subject to change or improvement without notice. Copyright Parasound Products, Inc. 2011 Rev. 1.0... - Page 16 Parasound Products, Inc. 2250 McKinnon Ave, San Francisco, CA 94124 Customer Service: 415-397-7100 www.parasound.com...
Need help?
Do you have a question about the Zphono-USB and is the answer not in the manual?
Questions and answers