IOGear GWAVR User Manual
Wireless mobile and pc to tv
Hide thumbs
Also See for GWAVR:
- Quick start manual (1 page) ,
- User manual (31 pages) ,
- Quick start manual (10 pages)
Table of Contents
Advertisement
Quick Links
Download this manual
See also:
User Manual
Advertisement
Table of Contents

Related Manuals for IOGear GWAVR


Summary of Contents for IOGear GWAVR
- Page 1 User Manual Wireless Mobile and PC to TV GWAVR PART NO. M1228 www.iogear.com...
- Page 2 IOGEAR, the IOGEAR logo, are trademarks or registered trademarks of IOGEAR. Microsoft and Windows are registered trademarks of Microsoft Corporation. All other brand and product names are trademarks or registered trademarks of their respective holders. IOGEAR makes no warranty of any kind with regards to the information presented in this document. All information furnished here is for...
-
Page 3: Table Of Contents
Table of Contents Introduction Package Contents System Requirements Overview Hardware Installation Connect with Intel WiDi Connect with Miracast Connect with non-Miracast device (iOS/all other Android based) Advance Settings Specification Federal Communication Commission Statement (FCC) Statement Limited Warranty... -
Page 4: Introduction
WiDi notebook you can sit back and experience your favorite movies, videos, photos, online shows and more in full HD on your HDTV with great image, clarity and sound. In today's lifestyle of mobility and wireless, the GWAVR is the next step in connectivity for your wireless Audio / Video entertainment. -
Page 5: Package Contents
Package Contents 1 x Wireless A / V Receiver 1 x Power Adapter 1 x Quick Start Guide 1 x Warranty/Registration Card System Requirements PC / Intel® WiDi Technology: – Intel WiDi compatible laptop with 3rd Gen Intel Core i3/i5/i7 2.0 GHz processor (CPU) and above, and Intel WiDi Technology (Version 3.5 and higher) –... -
Page 6: Overview
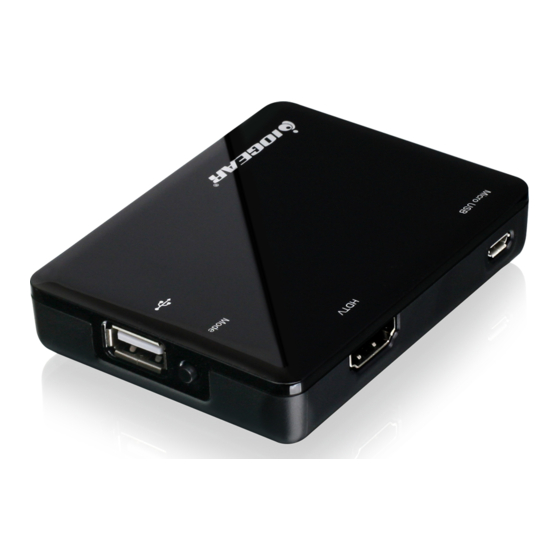
Overview 1. Power LED This LED is lit blue when the power adapter is plugged into the USB Micro-B Port. 2. USB Type – A This port is reserved for service and future upgrades. 3. Mode Button Press this button twice to go from WiDi/Miracast and AirFun modes. 4. -
Page 7: Hardware Installation
Hardware Installation Step 1 Connect the Power Adapter to the GWAVR’s Micro-B Port. Step 2 Connect the display to the GWAVR’s HDMI port using an HDMI cable. Power Cable Adapter HDMI Cable... - Page 8 Contect with Intel WiDi Step 1 Turn on your HDTV and select the correct input source. Plug GWAVR's power adapter into the power outlet and it will boot up in the Intel WiDi/Miracast mode and your TV will show “Ready for Connection.”...
- Page 9 Step 2 With your laptop, launch the Intel WiDi software from your desktop or under the Programs menu.
- Page 10 Step 3 Use the Intel WiDi application to locate and connect to the GWAVR. *To update to latest Intel WiDi version, please visit: http://www.intel.com/support/wireless/wtech/iwd/sb/CS-031109.htm...
-
Page 11: Connect With Intel Widi
Step 4 The fi rst time you wirelessly connect your laptop to the GWAVR, you will need to enter a security code displayed on the TV. Input that code into the Intel WiDi application window on your laptop. Your TV is now displaying your laptop screen... -
Page 12: Connect With Miracast
Connect with Miracast Step 1 Turn on your HDTV and select the correct input source. Plug GWAVR's power adapter into the power outlet and it will boot up in the Intel WiDi/Miracast mode and your TV will show “Ready for Connection.”... - Page 13 Step 2 Find the wireless screen mirroring application on your Wi-Fi certified Miracast tablet or smartphone. The name and location of the application may differ from device to device. *Note: For a list of known Miracast-certified devices, please visit: http://www.wi-fi.org/wi-fi-certified-miracast%E2%84%A2...
- Page 14 Step 3 Launch the wireless screen mirroring device to find and connect to the GWAVR. Example of Samsung Galaxy SIV shown below: Go to Settings, select Select GWAVR. Your device is now Connect to GWAVR. Screen Mirroring, and connected. then turn it on.
- Page 15 Your TV is now displaying your mobile device wirelessly.
-
Page 16: Connect With Non-Miracast Device (Ios/All Other Android Based)
Go to the App store and download free app “iMediaShare Personal. Step 2 Turn on your HDTV and select the correct input source, and apply power to the GWAVR. Then press the Mode button twice until the AirFun screen appears with “Ready for Connection.”... - Page 17 Step 3 Turn on your device’s WiFi and connect to the GWAVR network. (Device number after GWAVR may vary).* *Note: Use the Advanced Settings to set up WiFi connection under Network Setup (page 20). Step 4 Open and launch the iMediaShare Personal application.
- Page 18 Advanced Settings (page 19), you will be able to stream online and live content.* *Note: Your device has to be connected to the same wireless network as the GWAVR in order to stream the online videos and live content on the Flipps app.
-
Page 19: Advance Settings
Advanced Settings: Step 1 To change the advanced settings on the GWAVR, you will need to connect to the GWAVR by using your smartphone/ tablet wireless connection: Step 2 Open your web browser on your smartphone/tablet and key in the address on the TV screen. This is the... - Page 20 • Virtual AP Setup: To configure Virtual Access Point for GWAVR with the following options: - Radio Band: setup GWAVR as 2.4Ghz or 5Ghz band - Wireless Security: Setup wireless security with Open System or WPA Key *Connect to the same wireless network you are using for all your devices.
- Page 21 Hotkey Setting Mode (HSM) Audio setup: • HDMI Output: - HDMI LPCM: Linear pulse-code modulation (LPCM) is a method of encoding audio information digitally. - HDMI RAW: - HDMI Auto: • Surround Sound • Lip Sync (HDMI A/V Sync) Video setup: • Aspect Ratio: setup the aspect ratio for the TV display with the following options - Pan Scan 4:3 - Etter Box 4:3 - 16:9 (default setting) - 16:10...
- Page 22 System: • Language: Change system languages • Factory Default: reset system settings to factory default • Version Info: show system version information • USB Upgrade: Update system firmware by using USB drive...
-
Page 23: Specification
Specification: Mac Keyboard Emulation USB Input Micro-B – Power 5V/1A x 1, USB Input Type-A – Service x 1 HDMI – Type-A – Display x 1 WiFi – 2.4G/5G – Dual Band Blue - Power On Button Mode Switch (WiDi, Miracast, DLNA) Video Resolution HD up to 1080P Length x Width x Height (unit) -
Page 24: Federal Communication Commission Statement (Fcc) Statement
Federal Communication Commission Statement (FCC) Statement This equipment has been tested and found to comply with the limits for a Class B digital device, pursuant to Part 15 of the FCC Rules. These limits are designed to provide reasonable protection against harmful interference in a residential setting. -
Page 25: Limited Warranty
Limited Warranty WE’RE HERE TO HELP YOU! Factory Default Hotkeys Settings NEED ASSISTANCE SETTING UP THIS PRODUCT? Make sure you: 1. Visit www.iogear.com for more product information 2. Visit www.iogear.com/support for live help and product support Warranty Information This product carries a 1 Year Limited Warranty. For the terms and conditions of this warranty, please go to http://www.iogear.com/support/warranty... - Page 26 © 2013 IOGEAR ®...
Need help?
Do you have a question about the GWAVR and is the answer not in the manual?
Questions and answers