Table of Contents
Advertisement
Advertisement
Chapters
Table of Contents

Related Manuals for MOTU UltraLite


Summary of Contents for MOTU UltraLite
- Page 1 UltraLite ™ User’s Guide for Macintosh 1280 Massachusetts Avenue Cambridge, MA 02138 Business voice: (617) 576-2760 Business fax: (617) 576-3609 Technical support: (617) 576-3066 Tech support fax: (617) 354-3068 Tech support email: techsupport@motu.com Web site: www.motu.com...
- Page 2 Return Merchandise That license agreement is a contract, and clicking “Accept” binds you and MOTU to Authorization Number on the outside of the box below the shipping address.
-
Page 3: Table Of Contents
Quick Reference: UltraLite Rear Panel Quick Reference: MOTU Audio Setup About the UltraLite Packing List & Mac System Requirements Installing the UltraLite Hardware Installing the UltraLite Mac OS X Software MOTU Audio Setup UltraLite Front Panel Operation Digital Performer AudioDesk... -
Page 7: Quick Reference: Motu Audio Setup
This setting does not apply to the Check this option if you would like the MOTU UltraLite, which does not have a Audio Setup icon to appear in the application foot switch input. -
Page 9: About The Ultralite
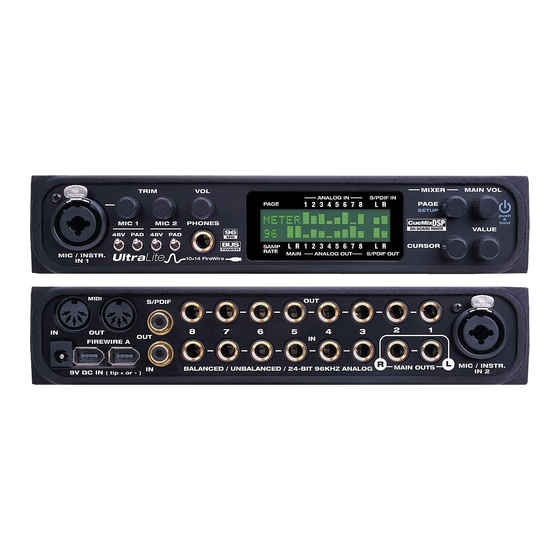
■ Six 24-bit analog TRS inputs ■ 10 inputs and 14 outputs All UltraLite inputs and outputs can be used simul- Ten 24-bit analog TRS outputs ■ taneously, for a total of 10 inputs and 14 outputs: S/PDIF digital I/O ■... - Page 10 24dB Power supply trim, is 60dB. Preamp gain and pad can be If you do not want the UltraLite to draw power controlled from the front panel digital rotary from the computer, and AC power is available, you...
- Page 11 RAM and slower hard drives. Today’s fastest 16-BIT AND 24-BIT RECORDING computers can typically play as many as 72 tracks The UltraLite system handles all data with a 24-bit or more. signal path, regardless of the I/O format. You can record and play back 16-bit or 24-bit audio files at...
- Page 12 A B O U T T H E U L T R A L I T E...
-
Page 13: Packing List & Mac System Requirements
PLEASE REGISTER TODAY! The UltraLite ships with the items listed below. If Please register your UltraLite today. There are two any of these items are not present in your UltraLite ways to register. box when you first open it, please immediately Visit www.motu.com to register online... - Page 14 P A C K I N G L I S T & M A C S Y S T E M R E Q U I R E M E N T S...
-
Page 15: Installing The Ultralite Hardware
A typical UltraLite setup ......20 An example setup for computer-based mixing/FX. -
Page 16: Connect The Ultralite Interface
CONNECT THE ULTRALITE INTERFACE CONNECT AUDIO INPUTS AND OUTPUTS 1 Make sure your computer and the UltraLite are The UltraLite audio interface has the following switched off. audio input and output connectors: 2 Plug one end of the UltraLite FireWire cable 10 balanced quarter-inch analog outputs ■... -
Page 17: Connect Midi Gear
MIDI Device Figure 3-2: Connecting a MIDI device to the UltraLite. I N S T A L L I N G T H E U L T R A L I T E H A R D W A R E... -
Page 18: Power Options
One-way MIDI connections Bus power requirements MIDI devices that do not receive MIDI data, such The UltraLite draws all the power it needs from the as a dedicated keyboard controller, guitar FireWire bus connection to the computer. controller, or drum pad, only need Connection B However, the FireWire connection to the computer shown in Figure 3-2. - Page 19 FireWire. In all other situations, the computer has This scenario is identical to the desktop situation its own power, so it doesn’t matter if the UltraLite is described above: the laptop is powered by AC, the drawing power from FireWire or not.
-
Page 20: A Typical Ultralite Setup
A TYPICAL ULTRALITE SETUP to listen to what you are recording via the main Here is a typical UltraLite studio setup. This rig can outs, headphone outs, or any other output pair. You be operated without an external mixer. All mixing... -
Page 21: Connecting And Syncing S/Pdif Devices
UltraLite) FireWire Figure 3-6: The setup for synchronizing a S/PDIF device with the UltraLite. Sync is achieved via the digital I/O connection itself. In this case, you have to choose S/PDIF as the UltraLite’s clock source when FireWire recording from the other device. - Page 22 Multiple interfaces cannot be bus-powered might drift out of sync with the audio tracks Do not run the UltraLite under bus power when playing back through your 2408mk3 PCI interface. connecting it with other devices to the same Synchronizing them to each other ensures that they FireWire bus.
- Page 23 Adding additional interfaces with a second Audio device, choose the other device from the Clock Source menu in FireWire bus MOTU Audio Setup. In this example, the UltraLite will slave to the Third-party FireWire bus expansion products in Traveler. the form of a cardbus (“PC card”) adaptor or PCI...
- Page 24 I N S T A L L I N G T H E U L T R A L I T E H A R D W A R E...
- Page 25 Mac OS X that provides all of MOTU CueMix Console ......27 its standardized audio features.
-
Page 26: Installing The Ultralite Mac Os X Software
Audio MIDI Setup is a utility included with Mac OS X that allows you to configure your Figure 4-1: The UltraLite interface as it appears in the MIDI tab of Audio MIDI Setup. UltraLite interface for use with all CoreMIDI compatible applications. - Page 27 UltraLite that lets you record, edit, mix, process, bounce and master multi-track Figure 4-3: Connecting devices to the UltraLite. In this example, a controller keyboard is connected to the UltraLite’s MIDI IN, and a digital audio recording projects. Advanced features sound module is connected to the UltraLite MIDI OUT.
- Page 28 I N S T A L L I N G T H E U L T R A L I T E M A C O S X S O F T W A R E...
-
Page 29: Motu Audio Setup
Performer™, choose Setup menu>Configure Audio ‘UltraLite’ tab Settings ....... 30 System>Configure Hardware Driver (Note: this... -
Page 30: Ultralite' Tab Settings
“Connecting and syncing S/PDIF devices” on page 21. Figure 5-1: MOTU Audio Setup gives you access to all of the settings in the UltraLite hardware. M O T U A U D I O S E T U P... -
Page 31: Default Stereo Input/Output
Other audio devices (drivers) The MOTU FireWire Audio Driver has the ability Figure 5-2: The Mac OS X sound preferences let you use the UltraLite for general stereo audio input and output for your Mac. to resolve to other Core Audio drivers. Doing so... -
Page 32: Main Outs Volume
For example, when you click on a menu that displays the UltraLite inputs (or Figure 5-4: UltraLite channel names as they appear in Digital outputs), you will see the names you specify in this Performer. -
Page 33: Push-Button Rotary Encoders
2x16 button digital rotary encoders. In many cases, you backlit LCD display. All UltraLite settings can be can either push the knob or turn it to make a accessed via these front-panel controls. -
Page 34: Ultralite Front Panel Operation
In mixer mode, the LCD displays the settings for Push the MAIN VOL knob to switch on the the current UltraLite mix being shown in the UltraLite. Push in and hold the MAIN VOL knob display, as demonstrated in Figure 6-1 on page 33. to turn it off. - Page 35 If the UltraLite is not currently connected to the Main Volume Assign The Main Volume Assign setting lets you choose computer, there are four sample rates available for what to control with the MAIN VOL knob. The the Internal clock setting (in kHz): Internal 44.1 choices are: Main Outs, 5.1 (Analog 1-6), 7.1...
-
Page 36: Mixer
Turn the CURSOR knob. all inputs (or any subset of your choosing) down to character one UltraLite output pair of your choosing. For To jump to capital letters, lower Turn the VALUE knob. example, you could assign MIX1 to the main outs,... -
Page 37: Cursor / Value
ALL mixes. Push the VALUE settings, are saved in the UltraLite’s memory, and knob to toggle a stereo input pair they remain in effect even when the UltraLite is not between separate mono inputs (blank) or a stereo pair (“[ ]”). Or connected to a computer. - Page 38 U L T R A L I T E F R O N T P A N E L O P E R A T I O N...
-
Page 39: Digital Performer
Setting up your system ......39 The UltraLite settings ....... . 39 Be sure you have enough voices . -
Page 40: Be Sure You Have Enough Voices
UltraLite will follow. If you have a S/PDIF digital audio device 2 Choose the desired UltraLite mic input for the connected to the UltraLite, or if you are not sure track. about the clock source of your setup, be sure to read “Connecting and syncing S/PDIF devices”... -
Page 41: 24-Bit Operation
“Software installation for Mac OS X” on page 25, MIX1 monitor mix back into Digital Performer (for reference and archiving purposes). Further, if the UltraLite MIDI ports will appear as a input you are sending audio from Digital Performer to source and output destination in Digital Performer’s MIDI I/O menus. - Page 42 D I G I T A L P E R F O R M E R...
-
Page 43: Audiodesk
Setting up your system ......43 The UltraLite settings ....... . 43 Be sure you have enough voices . - Page 44 2 Choose the desired UltraLite mic input for the follow. If you have a S/PDIF digital audio device track. connected to the UltraLite, or if you are not sure about the clock source of your setup, be sure to 3 Open the Audio Monitor window.
- Page 45 DO NOT assign this input to a application, allowing you to run a sequencer at the track that shares the same UltraLite output pair as same time in the foreground. However, there is no way to continuously synchronize — or resolve — a MIX1.
- Page 46 A U D I O D E S K...
-
Page 47: Installing The Ultralite Mac Os X Drivers
Preparing MIDI input and output ....47 Run MOTU Audio Setup ......47 Choosing the MOTU FireWire Core Audio driver . -
Page 48: Other Mac Os X Software
UltraLite via S/PDIF, or if you are not sure Logic Pro and Logic Express In Logic Pro and Logic Express, go to the about the clock source of your setup, be sure to Preferences window, click the Audio tab, click the read “Connecting and syncing S/PDIF devices”... - Page 49 In Ableton Live, access the preferences window and click the Recording tab and choose MOTU click the Audio tab. Choose CoreAudio from the UltraLite from the Input and Monitor menu as Driver Type menu. Choose the MOTU UltraLite shown below in Figure 9-3.
-
Page 50: Audio Input And Output Names
Nuendo as usual. For information about the Audio Buffer Size setting, see “Adjusting the audio I/O buffer” on page 55. Figure 9-7: Enabling the UltraLite audio driver in Cubase SX. Other audio software Figure 9-6: Enabling the UltraLite in Reason. -
Page 51: Number Of Channels
65. ☛ Warning: the Mix1 input can cause feedback Figure 9-8: Some applications number the UltraLite inputs and loops! DO NOT assign this input to a track that outputs, but don’t display which outputs they refer to. shares the same UltraLite output pair as MIX1. - Page 52 O T H E R M A C O S X S O F T W A R E...
- Page 53 This delay is caused by the amount of time it takes Using MOTU CueMix Console ......57 for audio to make the entire round trip through Controlling CueMix DSP from your audio software .
-
Page 54: Reducing Monitoring Latency
Figure 10-1: There are two ways to monitor live audio inputs with an UltraLite: 1) through the computer or 2) via CueMix™ DSP hardware monitoring. This diagram shows method 1 (through the computer). When using this method, use your host software’s buffer setting to reduce the slight delay you hear when monitoring the live input, but don’t lower it too much, or your computer might get sluggish. - Page 55 A buffer is a small amount of computer memory used to hold data. For audio interfaces like the UltraLite, buffers are used for the process of transferring audio data in and out of the computer. The size of the buffers determines how much delay...
- Page 56 How responsive the transport controls are in ■ AudioDesk, Digital Performer or other audio software The buffer setting presents you with a trade-off between the processing power of your computer and the delay of live audio as it is being patched through your software.
- Page 57 Console). In most cases, this support consists of outputs in the UltraLite itself and are mixed with patching an UltraLite input directly to an output disk tracks playing back from your audio software.
- Page 58 Controlling CueMix DSP from within AudioDesk track’s input is routed directly to its output (via or Digital Performer CueMix DSP in the UltraLite hardware). For To turn on CueMix DSP in AudioDesk and Digital example, if you record-enable a track called guitar...
- Page 59 Solo indicator Input mute/solo Master mute (enable/disable) Input pan Mix output Input volume Master fader Output level Mix tabs Grow box Input section Figure 11-1: CueMix Console is a virtual mixer that gives you control over the UltraLite’s on-board mixing features.
-
Page 60: Motu Cuemix Console
CueMix routing can operate without the Each mix has its own settings. Settings in one mix ■ computer, allowing the UltraLite to operate as a will not affect another. For example, if an input is portable, stand-alone mixer. used in one mix, it will still be available in other mixes. -
Page 61: Shortcuts
The channel strips to the left of the master fader 1 Select the source mix (Figure 11-1) and choose represent each input in your UltraLite. Use the Copy from the file menu (or press command-C). input scroll bar to view additional inputs. -
Page 62: Saving And Loading Presets
As explained earlier in “Save/Name Preset” on the four on-board no-latency monitor mixes in the page 35, the UltraLite can store up to 16 presets in 828mkII) back to your computer. This input its on-board memory. A preset includes of all... -
Page 63: Edit Channel Names
Talkback and Listenback. For Talkback, set up a dedicated mic in your control room and connect it to a mic input on your MOTU Audio interface. For Listenback, set up a dedicated listenback mic in the live room for the musicians and connect it to another mic input. -
Page 64: Peak Hold Time
(-Inf). PEAK HOLD TIME Talk / Listen signal routing The input level meters in the UltraLite LCD display As shown in Figure 11-3, check the boxes next to support peak/hold metering, where the meter the outputs on which you’d like to hear the segment for the highest level recently measured on Talkback mic and/or Listenback mic. -
Page 65: Mix1 Return Includes Computer
CueMix Console File menu refers to the Mix1 bus automated control surface such as the Mackie that the UltraLite driver provides as an input to Control™. Use the commands in the Control Surfaces menu to enable and configure this feature. - Page 66 Mackie Control Surfaces Other HUI-compatible control surfaces CueMix Console includes support for the following Any control surface that has the ability to emulate a control surface products: HUI should be compatible with CueMix Console. Just add a Mackie HUI to Audio MIDI Setup and Mackie Control™...
-
Page 67: Troubleshooting
Things seems like they are working fine, but the Monitoring - How to monitor inputs? UltraLite then just drops off line, and the computer Please refer to the documentation for the audio can’t see it anymore on the FireWire bus. - Page 68 The serial number of the UltraLite system. This ■ is printed on a sticker placed on the bottom of the UltraLite rack unit. You must be able to supply this number to receive technical support. A brief explanation of the problem, including the ■...
- Page 69 Application follows control surface 6-pin FireWire 7, 63 7.1 (Analog 1-8) Edit Channel Names 5, 11 Headphone jack Input Trim Headphones connecting to UltraLite Listenback explained connecting 896HD listenback settings controlling output 7, 31 connecting to UltraLite Mackie control surfaces...
- Page 70 Digital Performer Phones menu Tip positive/negative Mac OS X audio software Polarity Traveler 62, 65 Mix1 return includes computer Power supply connecting to UltraLite Monitoring jack 16, 37, 62 Trim 5, 19, 34 thru main outs Power switch Troubleshooting MOTU...
Need help?
Do you have a question about the UltraLite and is the answer not in the manual?
Questions and answers