
Subscribe to Our Youtube Channel
Related Manuals for MOTU M Series


Summary of Contents for MOTU M Series
- Page 1 M2 | ™ ™ User Guide 1280 Massachusetts Avenue Cambridge, MA 02138 Business voice: (617) 576-2760 Business fax: (617) 576-3609 Title Page Web site: www.motu.com Tech support: www.motu.com/support...
- Page 2 21. Safety Check - Upon completion of any service or repairs to this MOTU product, ask the service technician to perform safety checks to determine that the product is in safe operating conditions.
-
Page 3: Table Of Contents
Contents Contents Quick Start Guide M2 Quick Reference M4 Quick Reference Packing List and System Requirements Software Installation Hardware Installation Working with Host Audio Software Troubleshooting Audio Specifications Index... - Page 4 MOTU warrants to the original licensee that the disk(s) on which the program is recorded be free from defects in materials and workmanship under normal use for a period of ninety (90) days from the date of purchase as evidenced by a copy of your receipt. If failure of the disk has resulted from accident, abuse or misapplication of the product, then MOTU shall have no responsibility to replace the disk(s) under this Limited Warranty.
-
Page 5: Quick Start Guide
M2 or M4 so you can hear your computer’s audio output. For speakers, connect them to the outputs on the back panel. 6 You are now ready to start using your M series interface. 7 Visit motu.com/m2-start or motu.com/m4-start to register your product, download the included 4 Go to Step 5 below. - Page 6 Thank you for taking the time to register your new MOTU product! FINDING YOUR SERIAL NUMBER You can find your M series product serial number on the bottom of the unit and the side of the box.
-
Page 7: M2 Quick Reference
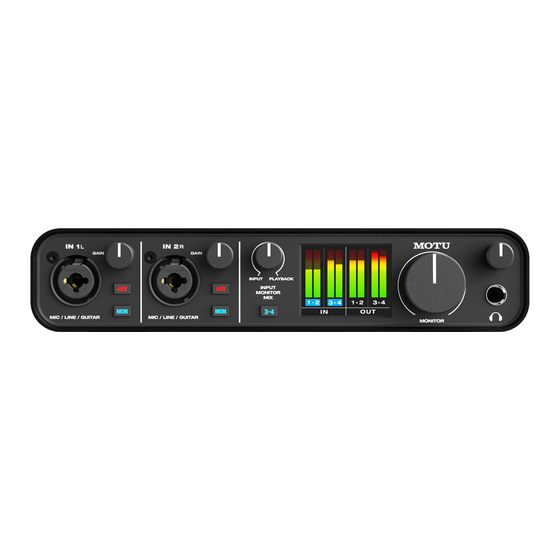
M2 Quick Reference 1. These two XLR/TRS combo jacks accept a mic cable or a 6. Connect your headphones here. This signal matches the 11. These unbalanced RCA analog outputs mirror the signal on quarter-inch cable, balanced or unbalanced, from a guitar signal on the MONITOR outputs on the rear panel, but the quarter-inch outputs (12). -
Page 8: M4 Quick Reference
M4 Quick Reference 1. These two XLR/TRS combo jacks accept a mic cable or a 7. Connect your headphones here. This signal matches the 13. These unbalanced RCA analog outputs mirror the signal on quarter-inch cable, balanced or unbalanced, from a guitar signal on the MONITOR outputs on the rear panel, but their corresponding quarter-inch outputs (14). -
Page 9: Packing List And System Requirements
FINDING YOUR SERIAL NUMBER ■ (or compatible). Faster CPUs are recommended You can find your M series product serial number for best performance. on the bottom of the unit and the side of the box. 2 GB RAM; 4 GB or more recommended. - Page 10 P A C K I N G L I S T A N D S Y S T E M R E Q U I R E M E N T S...
-
Page 11: Software Installation
Driver installation ........11 required (sold separately). M series Control Panel (Windows only)....12 DRIVER INSTALLATION MIDI I/O on Windows . -
Page 12: M Series Control Panel (Windows Only)
Make sure your host software matches the sample rate you choose here. Figure 2-1: Choosing the M Series ASIO driver in Performer Lite on Windows (Setup menu > Configure Audio System > Configure Hardware Driver). -
Page 13: Midi I/O On Windows
Launching Audio MIDI Setup 1 Make sure your M Series interface is connected Figure 2-4: Connecting devices to an M Series interface. In this example, (a USB connection is required) and turned on. a controller keyboard is connected to the M4 MIDI IN, and a sound module is connected to the M4 MIDI OUT. -
Page 14: Working With Host Audio Software
Core MIDI-compatible software. WORKING WITH HOST AUDIO SOFTWARE For further information about using your M Series interface with host audio software, see chapter 4, “Working with Host Audio Software” (page 19). S O F T W A R E I N S T A L L A T I O N... -
Page 15: Hardware Installation
Hardware Installation CHAPTER A TYPICAL M2 SETUP guitar guitar Headphones MIDI controller or synthesizer Mac or PC Speakers MIDI synth DJ system Figure 3-1: A typical M2 studio setup. - Page 16 A TYPICAL M4 SETUP Guitar Guitar Headphones MIDI controller MIDI controller Mac or PC B speakers or synthesizer or synthesizer MIDI synth DJ system A speakers Figure 3-2: A typical M4 studio setup. H A R D W A R E I N S T A L L A T I O N...
- Page 17 48V phantom power switch. Preamp gain The M series preamps provides 60 dB of gain. Use the front panel trim knobs to adjust gain as needed M2, M4 or AC power powered USB hub for each input.
- Page 18 Connection A Connection B MIDI MIDI MIDI Device Figure 3-4: Connecting a MIDI device to an M Series interface. H A R D W A R E I N S T A L L A T I O N...
-
Page 19: Working With Host Audio Software
Preparation..........19 Choosing the M Series driver......19 Reducing monitoring latency. - Page 20 Location for choosing the M2 or M4 feature and instead engage the MON (monitor) Digital Performer Setup menu > Configure Audio System > switch on the front panel of your M Series and Performer Lite Configure Hardware Driver interface. Visit motu.com/m2-start (or /m4-start) Pro Tools 9 or later Setup menu >...
- Page 21 Lower latency versus higher CPU overhead Use the Loopback input channels provided by the Buffer size has a large impact on the following: M Series audio driver to capture audio output Monitoring latency from your computer. These channels return the ■...
- Page 22 Master fader Live input track The first track (yellow) is the master fader going to The third track (purple) is the live mic input from the M2 Main Out L-R. This is the main output the M2. The track’s input is set to In 1 and the from Performer Lite that you will hear on the M2 output is Main Out L-R.
-
Page 23: Troubleshooting
Troubleshooting APPENDIX My MOTU interface isn’t showing up in Audio MIDI Wait a brief moment. When the normal level Setup on my Mac. meter screen appears, this indicates that the Due to the updated architecture of the new macOS factory reset is complete. - Page 24 The pages in the manual that refer to the ■ If you have features or ideas you would like to see features or operation of your MOTU Device or implemented, we’d like to hear from you. Please Performer Lite with which you are having trouble.
-
Page 25: Audio Specifications
Audio Specifications APPENDIX MIC in Connector Type Combo-style, XLR / TRS Pin 2 hot, tip hot Impedance load 2.65 k Ω Phantom power +48 v, switchable per channel DIN 45596 / IEC 61938-P48 -129.5 dBu At maximum gain, 150Ω, A-weighted Dynamic Range 115 dB <... - Page 26 Line Out Connector Type 1/4” Female, TRS Balanced, tip hot Output Impedance 100 ohm Per leg Dynamic Range 120 dB A-weighted THD+N -110 dB < 0.00032% @ -1 dBFS, Unweighted, 1 kHz Frequency Response +0, -0.1 dB, 20 Hz/20 kHz Ref.
-
Page 27: Index
Logic Pro Pro Tools Software installer Logic Pro/Express SONAR Loopback Sound module Balanced analog connecting Buffer Size Stage monitors M Series connecting Control Panel Steinberg Cubase Class compliance setup example Nuendo Cockos Reaper Studio setup (example) Condenser mic input USB connection... - Page 28 I N D E X...
Need help?
Do you have a question about the M Series and is the answer not in the manual?
Questions and answers