Table of Contents
Advertisement
Advertisement
Table of Contents

Subscribe to Our Youtube Channel
Related Manuals for Grundig UMS 100


Summary of Contents for Grundig UMS 100
- Page 1 HIFI STEREO MICRO SYSTEM UMS 100 ENGLISH...
-
Page 2: Table Of Contents
Playing back tracks in selected order – creating a track memory Cassette mode General information about the cassette mode Playback Fast forward/rewinding the cassette Recording Timer mode Information Cleaning the tape drive, cleaning the CD unit Technical data, rectifying minor problems GRUNDIG Service... -
Page 3: Set-Up And Safety
Do not open the stereo system under any circumstances. The manufacturer PHONES accepts no liability for damage resulting from improper handling. FM ANTENNA FM 75 DISPLAY VOLUME TUNER/BAND TUNING UMS 100 G.LK 07 MEMORY TIMER MONO/ TAPE/AUX STEREO AC: 230V~ 50/60Hz AM ANTENNA... -
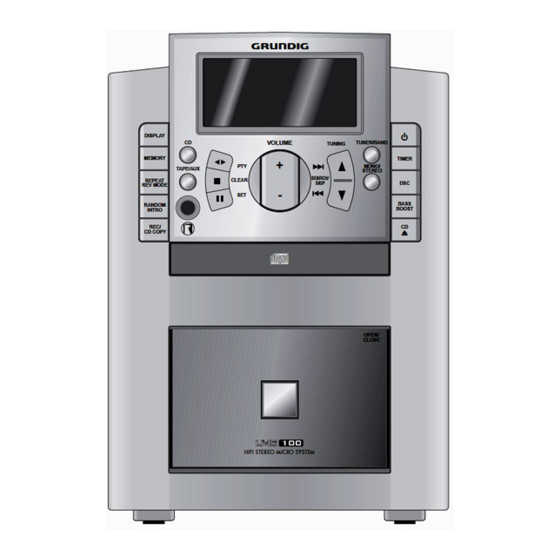
Page 4: Overview
OVERVIEW _______________________________________________________________________ Operating elements of the stereo system General PHONES PHONES Headphone jack, for connecting a stereo headphone set with a jack plug (ø 3,5 mm). The loudspeakers of the stereo system are automatically switched off. Switches the stereo system on and off. TIMER For setting the switch-on timer and the recor- DISPLAY... - Page 5 OVERVIEW __________________________________________________________________________________ Radio mode TUNER/ Selects the » TUNER« input source. BAND selects the frequency band » FM« and » MW«. TUNING/ Hold down to start the station search; press briefly to change the frequency in small steps. /PTY Searches channel positions for the selected Program type.
-
Page 6: Aux Operation
OVERVIEW __________________________________________________________________________________ RANDOM / Selects plays back titles in random INTRO order (Random); plays a brief extract of all tracks on the CD (Intro). Opens and closes the CD compartment. Cassette mode DISPLAY VOLUME TUNER/BAND TUNING TAPE/AUX Selects the »TAPE« input source. MEMORY TIMER MONO/... -
Page 7: The Back Of The Stereo System
Aerial terminals for the wire antenna supplied. OPTICAL OUT Digital audio signal output for copy- FM ANTENNA FM 75 UMS 100 ing a CD onto a digital recording G.LK 07 AM ANTENNA AC: 230V~ 50/60Hz device. CLASS 1 LASER PRODUCT APPAREIL À... -
Page 8: The Remote Control
OVERVIEW __________________________________________________________________________________ The remote control Switches the stereo system on and off. 5 a s 6 In Radio mode: selects the presets; in CD mode: for selecting a title; keeping it pressed down enables you to search for a particular pas- sage;... -
Page 9: Connection And Preparation
Insert the loudspeaker cables into the terminals » R L + R L – « on the stereo system. Speaker UMS 100 Speaker UMS 100 Connect the cable with white markings to » +«. Nominal Power Handling Capacity 15 W... -
Page 10: Connecting Headphones
CONNECTION AND PREPARATION _______________________________________ Connecting a digital recording device Use an OPTICAL cable to connect the » CD OPTICAL OUT« jack on the ste- APPAREIL À LASER DE CLASSE 1 PRODUCTO LASER DE CLASE 1 reo system to the appropriate jack on the external device (e.g., MD or CDR). –... - Page 11 CONNECTION AND PREPARATION _______________________________________ Important notes for users in the U.K. Mains plug This apparatus is fitted with an approved moulded 13 Amp plug. To change a fuse in this type of plug proceed as follows: Remove fuse cover and fuse. Fix new fuse which should be a BS1362 5 Amp, A.S.T.A.
-
Page 12: Inserting The Batteries In The Remote Control
CONNECTION AND PREPARATION _______________________________________ Inserting the batteries in the remote control Open the battery compartment by pushing down the lid of the battery com- partment. When inserting the batteries (micro type, for example, AAA R 03, 2 x 1,5 V) observe the polarity marked on the base of the battery compartment. -
Page 13: Custom Settings
CUSTOM SETTINGS __________________________________________________ Setting the time When the stereo is connected to the mains supply and the time has not been set, the time and weekday flash in the display. In stand-by mode press » MEMORY«. – The weekday flashes in the display, for example »FR« (for Friday). I 0 :25 The weekday can be set with »... -
Page 14: Tuning To Radio Stations
CUSTOM SETTINGS ___________________________________________________________________ Tuning to radio stations You can store up to 36 radio stations (FM and MW) up to a maximum of 30 for ¶ ¶ TUNER each frequency band. Switch on stereo system with »TUNER /BAND« on the stereo or 87 .50 »TUNER «... -
Page 15: General Functions
GENERAL FUNCTIONS _________________________________________ Switching on and off Switch on the stereo using the » « button. – The last input source used is automatically selected. ¶ ¶ TUNER STEREO Note: BA Y ERN 3 The following keys on the stereo system can also be used to switch on the ste- reo: »TUNER /BAND«... -
Page 16: Adjusting The Volume
GENERAL FUNCTIONS _____________________________________________________________ Adjusting the volume Adjust the volume with » – VOLUME + «. ¶ ¶ TUNER – Display: briefly » V O L « from » M I N «, » 0 « to » 49 «, » M A X «. STEREO VOL 2 4 Note:... -
Page 17: Tuner Mode
TUNER MODE ________________________________________________________________ Selecting the Tuner as the source Select the input source using the » TUNER « button. – Display: » TUNER« and the radio station most recently selected. TUNER Selecting the channel position Select the frequency band (FM or MW) with »TUNER /BAND«... - Page 18 TUNER MODE _____________________________________________________________________________ RDS Station service and program types (PTY) RDS (Radio Data System) is an information system for which is transmitted addi- tionally by most VHF stations. If the stereo is currently receiving an RDS station, it displays the station name for example »...
- Page 19 TUNER MODE _____________________________________________________________________________ Radiotext Some RDS stations transmit information known as Radiotext. This is additional information about the station and its programmes. Radiotext appears as ticker text in the display. As this information is transmitted character by character, it may take some time before the text is received in full. Select the desired RDS station with »...
-
Page 20: Cd Mode
CD MODE ___________________________________________________________________________ Basic CD mode functions The stereo system is suitable for music CDs displaying the logo shown here or for CD-Rs and CD-RWs with audio data. Always keep the CD compartment closed to prevent dust from collecting on the laser optics. -
Page 21: Selecting A Different Track
CD MODE ____________________________________________________________________________________ CD playback Press » « to start playback. – Playback begins with the first track. – Display: » « the current track number and the elapsed playing time of I T r 0 :00 the track. Playback stops at the end of the CD. To pause playback, press »... -
Page 22: Special Cd Mode Features
CD MODE ____________________________________________________________________________________ Special CD mode features Searching for a passage within a track During playback, press » « or » « and hold it down until you find the desired passage. Playback begins as soon as you let go of the » «... -
Page 23: Playing Back Tracks In Selected Order - Creating A Track Memory
CD MODE ____________________________________________________________________________________ Repeating a track (Repeat one) Select the desired track with » « or » «. Select the repeat function by pressing »REPEAT REV MODE« on the ste- reo once. REPEAT – Display: »REPEAT ONE«. 5T r 0 :00 Press »... - Page 24 CD MODE ____________________________________________________________________________________ Select the function by pressing » MEMORY« on the stereo. – Display: » MEMORY«, » - - - - « and » 0 : 0 0 «. MEMORY 0 :00 -- -- Select the desired track using »1.
-
Page 25: Cassette Mode
CASSETTE MODE _________________________________________________________ General information about the cassette mode Protect your cassettes from humidity, dust, heat and cold. Do not store your cassettes near devices with strong magnetic fields such as tele- vision sets or stereo speakers. After using a cassette, put it back in its protective case. Selecting the Tape input source Select the input source with »... -
Page 26: Playback
CASSETTE MODE ________________________________________________________________________ Playback Replay of one cassette side Press » « to start playback. TAPE – Playback ends at the end of the side of the cassette. – Display: » « and » ) « or » ( « for the playing direction of the tape. TAPE ›... -
Page 27: Recording
CASSETTE MODE ________________________________________________________________________ Recording Erase protection Every new recording overwrites the existing recording on the tape. You can protect your own cassettes against accidental erasure by breaking the safety tabs on the top of the cassette. Pre-recorded commercial music cassettes are already protected against accidental erasure. -
Page 28: Playback
CASSETTE MODE ________________________________________________________________________ Start the recording in the normal direction by pressing » TUNING « on the device or » « on the remote control. Start the recording in the reverse direction by pressing » TUNING « on the device or » «... -
Page 29: Timer Mode
TIMER MODE __________________________________________________________________ Your stereo system has three timer modes: – The switch-on timer – switches the stereo system on and off at a preset time. – The recording timer can be set for a certain time to record a radio program onto cassette. -
Page 30: Setting The Recording Timer
TIMER MODE ______________________________________________________________________________ Setting the recording timer Notes: The time must be set on the stereo system. Only recording from the »TUNER« input source is possible. Switch the stereo on, select the desired preset and switch the stereo off again. Insert a tape into the compartment. -
Page 31: Sleep Timer
TIMER MODE ______________________________________________________________________________ Deactivating the switch-on timer and recording timer modes To deactivate the switch-on timer and recording timer modes press »TIMER« repeatedly until » TIMER OFF« appears in the display. T I MER OFF Sleep timer ¶ ¶ TUNER SLEEP STEREO Press »SLEEP«... -
Page 32: Information
INFORMATION _____________________________________________________________ Cleaning the tape drive To guarantee good recording and playback quality, the parts shown (1, 2, 3) should be cleaned after every 50 hours of use, or once a month. Open the tape compartment and moisten a cotton swab with alcohol or a special head- cleaning fluid. -
Page 33: Rectifying Minor Problems
INFORMATION __________________________________________________________________________ Rectifying minor problems Not every kind of sound interference is caused by a defect in your HiFi system. Impairment can also be caused by leads having been accidentally pulled out, damaged CDs and worn out batteries in the remote control. If the following measures do not bring about satisfac- tory results, consult an authorised dealer. -
Page 34: Grundig Service
D-13509 Berlin +49/40-7 33 31-0 +49/22 34-95 81-2 51 +49/6 21-33-76-70 +49/9 11-7 03-0 +49/30-4 38 03-21 GRUNDIG BELUX N.V. GRUNDIG IRELAND LTD. GRUNDIG PORTUGUESA GRUNDIG DANMARK A/S GRUNDIG AUSTRIA Ges.m.b.H. Deltapark, Weihoek 3, Unit 3G 2 Waverley Office Park, Old Comércio de Artigos Electróni-... - Page 35 Grundig AG Beuthener Str. 41 D-90471 Nürnberg http://www.grundig.com • • •...
Need help?
Do you have a question about the UMS 100 and is the answer not in the manual?
Questions and answers