Table of Contents
Advertisement
Available languages
Available languages
Advertisement
Chapters
Table of Contents

Related Manuals for Brandt SPOUTNiK


Summary of Contents for Brandt SPOUTNiK
- Page 1 - 1 -...
- Page 2 - 2 -...
-
Page 3: Table Of Contents
1/ A L’ATTENTION DE L’UTILISATEUR Consignes de sécurité Principe de fonctionnement Protection de l’environnement 2/ INSTALLATION DE VOTRE APPAREIL Avant le branchement Le raccordement électrique Ustensiles Description de votre appareil 3/ UTILISATION DE VOTRE APPAREIL Instructions de fonctionnement 4/ ENTRETIEN ET NETTOYAGE DE VOTRE APPAREIL 5/ EN CAS D’ANOMALIES DE FONCTIONNEMENT 6/ SERVICE APRES-VENTE ET RELATIONS CONSOMMATEURS Interventions... -
Page 4: 1/A L'attention De L'utilisateur
les consignes de la partie 4 « Entretien Important : et nettoyage de votre appareil ». Conservez cette notice d’utilisation avec votre MISE EN GARDE : Si la porte ou le appareil. Si l’appareil devait être joint de porte est endommagé, le four vendu cédé... - Page 5 MISE EN GARDE : N’autorisez les ébullition, aussi précautions enfants à utiliser four sans doivent être prises lors surveillance que si des instructions manipulation du récipient. appropriées leur ont été données permettant à l’enfant d’utiliser le four Dans le cas de petites quantités (une de façon sûre et de comprendre les saucisse, un croissant, etc.) posez un dangers d’une utilisation incorrecte.
- Page 6 à altérant ainsi irréversiblement la durée des vapeurs corrosives. de vie de l’appareil et provoquant des situations dangereuses. Modèle SPOUTNIK Tension nominale 230V~50Hz Fréquence en fonctionnement 2450MHz Puissance d’entrée nominale (micro ondes) 1200W...
-
Page 7: Principe De Fonctionnement
PROTECTION DE PRINCIPE DE L’ENVIRONNEMENT FONCTIONNEMENT Il faut savoir que les micro-ondes Les micro-ondes utilisées pour la provoquent à l’intérieur de l’aliment un cuisson sont ondes électro- simple phénomène thermique magnétiques. Elles existent couram- qu’elles ne sont pas nocives pour la ment dans notre... -
Page 8: 2/ Installation De Votre Appareil
2/INSTALLATION DE VOTRE APPAREIL FR conducteurs de 1,5 mm² (1 ph + 1N + AVANT LE BRANCHEMENT terre) qui doivent être raccordés sur le réseau 220-240 V ~ monophasé par Attention : l’intermédiaire d’une prise de courant 1 Vérifier que votre appareil n’ait ph + 1N + terre normalisée CEI 60083 subi aucune avarie lors du transport conformément... -
Page 9: Ustensiles
USTENSILES Veuillez consulter les instructions « Matériels utilisables dans votre four à micro- ondes et matériels à éviter ». Certains ustensiles non métalliques peuvent également ne pas être utilisables au micro-ondes. En cas de doute, testez l’ustensile en question en suivant la procédure suivante. Test avec ustensile : AVERTISSEMENT 1. -
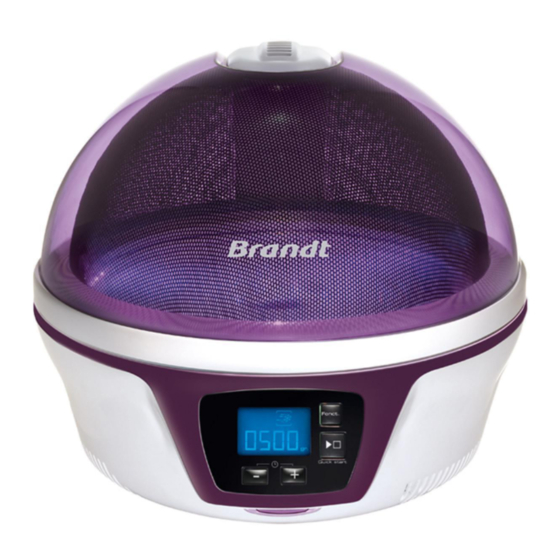
Page 10: Description De Votre Appareil
1. Système de verrouillage de sécurité 2. Support du plateau tournant 3. Système de guidage d’ondes 4. Poignée d’ouverture de porte 5. Bandeau de commande 6. Lampes colorées 7. Entraineur 8. Plateau en verre - 10 -... - Page 11 INSTALLATION Enlevez les emballages et mettez les accessoires de côté. Vérifiez que le four n’est pas abîmé, par exemple en présentant des traces de chocs ou un couvercle cassé. N’installez pas le four s’il est abîmé. INSTALLATION SUR UN PLAN DE TRAVAIL Choisissez surface plane...
-
Page 12: Instructions De Fonctionnement
Afficheur LCD Affiche l’heure, le temps de cuisson, le poids et la fonction Bouton ( - ) 1. Appuyer pour ajuster le temps ou le poids Bouton (+) 2. Régler l’heure Appuyer pour sélectionner l’une des fonctions réchauffage, Bouton fonct. cuisson, décongélation Bouton 1. - Page 13 Instructions générales : Au branchement de l’appareil, une mélodie de bienvenue vous accueille. Le dôme doit être ouvert puis refermé une fois avant utilisation. Pendant la cuisson, une lumière rouge est émise. Si l’appareil est mis en pause en cours de cuisson, la lumière rouge clignote jusqu’à...
- Page 14 Fonctions Appuyez sur Poids le bouton FONCTIONS Présélection Temps de cuisson Puissance Min-max Réchauffage 1 fois 03 : 00 500W Cuisson Forte 2 fois 700W 00:00 00:00 ~ 60:00 Cuisson Douce 3 fois 500W 00:00 Décongélation 4 fois 100 gr. 100g~1500g Réchauffage 1.
- Page 15 Cuisson Cuisson Forte (700W) 1. Placez la nourriture dans le four, refermez le dôme. 2. Appuyez sur le bouton fonction 2 fois de suite, « 00:00 »clignote. 3. Appuyez sur pour ajuster le temps de cuisson désiré. Appuyez sur Start/Stop pour confirmer.
- Page 16 LEGUMES/FRUITS : Lavez et nettoyez correctement les légumes et les fruits. Les aliments de même grosseur cuisent plus régulièrement : ne pas hésiter à les couper, pour obtenir des morceaux de taille homogène. Emincez : carotte, poireaux, chou, céleri fenouil avant de les cuire. Coupez en cubes : céleri-rave, navets, courgettes et potiron.
- Page 17 Décongélation 1. Placez la nourriture dans le four, refermez le dôme. 2. Appuyez 4 fois sur le bouton fonction , le poids préenregistré « 100g » clignote. 3. Appuyez sur pour ajuster le poids de décongélation désiré. 4. Appuyez sur Start/Stop pour confirmer.
- Page 18 Activation/Désactivation des sons Pour désactiver les sons : en mode veille, appuyez sur Start/Stop pendant 5s. « S OFF » apparaît à l’écran. Pour activer les sons : en mode veille, appuyez sur Start/Stop pendant 5s. « S ON » apparaît à l’écran. - 18 -...
-
Page 19: 4/ Entretien Et Nettoyage De Votre Appareil
et nettoyez les parois avec un peu de liquide Il est recommandé de nettoyer le four vaisselle. régulièrement d’enlever tout dépôt Le plateau peut être retiré pour faciliter le alimentaire à l’intérieur et à l’extérieur de nettoyage. Pour ce faire, prenez-le par les l’appareil. -
Page 20: 5/ En Cas D'anomalies De Fonctionnement
Vérifiez le branchement de votre appareil. Vérifiez que le couvercle de votre appareil soit bien fermé Vérifiez Vous constatez de la buée sur le dôme Faire appel à un professionnel qualifié dépositaire de la marque pour changer la LED Une des LED ne fonctionne plus - 20 -... -
Page 21: Interventions
sous l’appareil. - 21 -... -
Page 22: 7/ Recommandations Pour Mesure De La Performance
ESSAIS D’APTITUDE A LA FONCTION Essais d’aptitude à la fonction selon les normes CEI / EN / NF EN 60705. La commission Electrotechnique Internationale SC 59 K a établi une norme relative à des essais de performance comparatifs effectués sur différents fours à micro-ondes. Nous recommandons ce qui suit pour cet appareil. -
Page 23: En Instruction Manual
- 23 -... - Page 24 - 24 -...
- Page 25 1/ NOTICES TO THE USER Safety recommendations Operating principle Protecting the environment 2/ INSTALLING YOUR APPLIANCE Before hook-up Electrical connection Utensils Description of your appliance 3/ USING YOUR APPLIANCE Operation 4/ CARING FOR AND CLEANING YOUR APPLIANCE 5/ TROUBLESHOOTING 6/ AFTER-SALES SERVICE AND CUSTOMER RELATIONS Service calls Customer relations 7/ INSTRUCTIONS TO EVALUATE PERFORMANCE...
-
Page 26: Safety Recommendations
Important : WARNINGS: If the door or door seals Keep this user guide with your are damaged, the oven must not be appliance. If the appliance is ever operated until it has been repaired by a sold transferred another competent person. person, ensure that the new owner receives the user guide. - Page 27 therefore care must be taken when WARNINGS: Liquids and other foods handling the container. must heated sealed containers since they are liable to In the case of small quantities (a explode. sausage, a croissant, etc.) place a glass of water next to the food. Failure to maintain the oven in a clean Excessive cooking times may dry out condition could lead to deterioration of...
- Page 28 It is not designed for the surface that could adversely affect industrial or laboratory use. the life of the appliance and possibly result hazardous situation. Specifications Reference SPOUTNIK Power Consumption 230V~50Hz Rated microwave power input 1200W Rated microwave power output: 700W Operation Frequency: 2450MHz...
-
Page 29: Operating Principle
OPERATING PRINCIPLE PROTECTING THE ENVIRONMENT The micro-waves used for cooking are electro-magnetic waves. They This appliance’s packing materials are commonly found in our environment in recyclable. Recycle them and play a the form of radio-electric waves, light role in protecting the environment by or infrared rays. -
Page 30: Before Hook-Up
1.5 mm2 conductors (1 ph + 1 N + BEFORE HOOK-UP ground) that must be connected to a monophase 220-240 V network via a Warning: CEI 60083 standardised receptacle (1 Ensure that your appliance has ph + 1 N + ground lead) or in not suffered any damage during accordance with installation rules. -
Page 31: Utensils
UTENSILS See the instructions on “Materials you can use in microwave oven or to be avoided in microwave oven.” There may be certain non-metallic utensils that are not safe to use for microwaving. If in doubt, you can test the utensil in question following the procedure below. -
Page 32: Description Of Your Appliance
1. Door Safety Lock System 2. Turntable ring assembly 3. Wave Guide 4. Door Release Button 5. Control Panel 6. Color Light 7. Turntable shaft 8. Glass Tray - 32 -... - Page 33 COUNTERTOP INSTALLATION Remove all packing material and accessories. Examine the oven for any damage such as dents or broken lid. Do not install if oven is damaged. INSTALLATION 1. Select a level surface that provide with a ground terminal, connected in enough open space for the intake accordance with...
-
Page 34: Operation
Clock, Cooking time, weight and function indicators are Display Screen displayed here. 1. Press to adjust time or weight of food. Button ( + ) Button ( - ) 2. Set the clock. Press to select one of functions including Reheat, Cook, Funct. -
Page 35: Clock Setting
Related Statements: When the oven plugged in initially, there is a short stage of melody. The oven dome needs to be open and then close once before using. During cooking, red light will show in the oven. When programs are forced to pause, the red light will flash until press Start/Stop button again. -
Page 36: Reheat Setting
Menus PRESS WEIGHT FUNCTIONS PRESET COOKING TIME POWER Min-max Reheat Once 03 : 00 500W Twice 00:00 700W 00:00 ~ 60:00 Cooking Slow 3 times 500W 00:00 Cooking Defrost 4 times 100 gr. 100g~1500g Reheat Setting Place the food into the oven, close the lid. Press button once, preset time figures flash. -
Page 37: Cooking Advice
Cook Setting Hot cooking (700W) : Place the food into the oven, close the lid. Press button twice, preset time “00:00” figures flash. Press button to adjust desired cooking Press Start/Stop button to confirm. Cooking starts. N.B: While cooking, you can increase or decrease time by pressing Slow cooking (500W) : Place the food into the oven, close the lid. - Page 38 VEGETABLE/FRUITS : Clean well vegetables and fruits. Same-thickness aliments get an homogeneous cooking. Don’t hesitate in cut them in regular pieces. Slice thinly carrots, leeks, cabbages, celery, fennel before cooking them. Cut in cube: celeriac, turnips, courgettes and pumpkins. Cut coliflower and broccoli in small clusters. Prick food that gets skin: potatoes, chestnuts…...
- Page 39 Defrost Setting Place the food into the oven, close the lid. Press button 4 times, preset weight “100 g “figures flash. If you want to reset the weight of food instead of preset weight, press Press Start/Stop button to confirm. Defrost starts. Cooking advice: Defrosting time depends on form, size, starting temperature and quality of the food.
-
Page 40: 4/ Caring For And Cleaning Your Appliance
If the dome or the - 40 -... -
Page 41: 5/ Troubleshooting
- 41 -... -
Page 42: Service Calls
under Insert picture of nameplate - 42 -... -
Page 43: 7/ Instructions To Evaluate Performance
Operating proficiency testing according to CE/EN/NF EN 60705 standards. The international Electrotechnical Commission, SC.59K, has established a standard relative to comparative performance tests conducted on various microwaves. We recommend the following for this appliance: Containers/ TEST Load Approx time Power Recommandations Eggs Custard 750 g...
Need help?
Do you have a question about the SPOUTNiK and is the answer not in the manual?
Questions and answers