Table of Contents
Advertisement
Coffee has been used to factory test the appliance and it is therefore completely normal for there to be
traces of coffee in the mill. This appliance is, however , guaranteed to be new.
INDEX
IMPORTANT SAFEGUARDS . . . . . . . . . . . . . . . . . . . . . . . . . . . . . . . . . . . . . . . . . . . . . . . . . . . . . . . . . . . . . . . . .
1
DESCRIPTION (see page 3) . . . . . . . . . . . . . . . . . . . . . . . . . . . . . . . . . . . . . . . . . . . . . . . . . . . . . . . . . . . . . . . . .
2
SAFETY WARNINGS . . . . . . . . . . . . . . . . . . . . . . . . . . . . . . . . . . . . . . . . . . . . . . . . . . . . . . . . . . . . . . . . . . . . . . .
3
INSTALLATION . . . . . . . . . . . . . . . . . . . . . . . . . . . . . . . . . . . . . . . . . . . . . . . . . . . . . . . . . . . . . . . . . . . . . . . . . . . .
4
USING FOR THE FIRST TIME . . . . . . . . . . . . . . . . . . . . . . . . . . . . . . . . . . . . . . . . . . . . . . . . . . . . . . . . . . . . . . . .
5
TURNING ON AND PREHEATING . . . . . . . . . . . . . . . . . . . . . . . . . . . . . . . . . . . . . . . . . . . . . . . . . . . . . . . . . . . .
6
PREPARING COFFEE (USING COFFEE BEANS) AND USEFUL TIPS . . . . . . . . . . . . . . . . . . . . . . . . . . . . . . . .
7
CHANGING THE QUANTITY OF COFFEE IN THE CUP . . . . . . . . . . . . . . . . . . . . . . . . . . . . . . . . . . . . . . . . . . .
8
REGULATING THE COFFEE MILL . . . . . . . . . . . . . . . . . . . . . . . . . . . . . . . . . . . . . . . . . . . . . . . . . . . . . . . . . . . .
9
PREPARING ESPRESSO COFFEE USING GROUND COFFEE (INSTEAD OF BEANS) . . . . . . . . . . . . . . . . . .
10 PRODUCING HOT WATER . . . . . . . . . . . . . . . . . . . . . . . . . . . . . . . . . . . . . . . . . . . . . . . . . . . . . . . . . . . . . . . . . . .
11 CHANGING THE QUANTITY OF HOT WATER . . . . . . . . . . . . . . . . . . . . . . . . . . . . . . . . . . . . . . . . . . . . . . . . . .
12 PREPARING CAPPUCCINO (FROTHED MILK AND COFFEE) . . . . . . . . . . . . . . . . . . . . . . . . . . . . . . . . . . . . .
13 PREPARING LATTE OR ITALIAN MACCHIATO . . . . . . . . . . . . . . . . . . . . . . . . . . . . . . . . . . . . . . . . . . . . . . . . . .
14 PREPARING FROTHED OR STEAMED MILK (WITHOUT COFFEE) . . . . . . . . . . . . . . . . . . . . . . . . . . . . . . . .
LATTE/ CAPPUCCINO / ITALIAN MACCHIATO . . . . . . . . . . . . . . . . . . . . . . . . . . . . . . . . . . . . . . . . . . . . . . . . .
16 CLEANING AND MAINTENANCE . . . . . . . . . . . . . . . . . . . . . . . . . . . . . . . . . . . . . . . . . . . . . . . . . . . . . . . . . . . .
16.1 CLEANING THE COFFEE MAKER . . . . . . . . . . . . . . . . . . . . . . . . . . . . . . . . . . . . . . . . . . . . . . . . . . . . . . . .
16.2 CLEANING THE INFUSER . . . . . . . . . . . . . . . . . . . . . . . . . . . . . . . . . . . . . . . . . . . . . . . . . . . . . . . . . . . . . . .
16.3 CLEANING THE MILK CONTAINER . . . . . . . . . . . . . . . . . . . . . . . . . . . . . . . . . . . . . . . . . . . . . . . . . . . . . . .
17 CHANGING AND SETTING THE MENU PARAMETERS . . . . . . . . . . . . . . . . . . . . . . . . . . . . . . . . . . . . . . . . . .
17.1 SETTING THE CLOCK . . . . . . . . . . . . . . . . . . . . . . . . . . . . . . . . . . . . . . . . . . . . . . . . . . . . . . . . . . . . . . . . . .
17.2 SETTING AUTO-START TIME . . . . . . . . . . . . . . . . . . . . . . . . . . . . . . . . . . . . . . . . . . . . . . . . . . . . . . . . . . . .
17.3 DESCALING . . . . . . . . . . . . . . . . . . . . . . . . . . . . . . . . . . . . . . . . . . . . . . . . . . . . . . . . . . . . . . . . . . . . . . . . . .
17.4 CHANGING THE COFFEE TEMPERATURE . . . . . . . . . . . . . . . . . . . . . . . . . . . . . . . . . . . . . . . . . . . . . . . . .
17.5 CHANGING THE LENGTH OF TIME THE APPLIANCE REMAINS ON . . . . . . . . . . . . . . . . . . . . . . . . . .
17.6 SETTING WATER HARDNESS . . . . . . . . . . . . . . . . . . . . . . . . . . . . . . . . . . . . . . . . . . . . . . . . . . . . . . . . . . .
17.7 RESETTING FACTORY DEFAULT SETTINGS . . . . . . . . . . . . . . . . . . . . . . . . . . . . . . . . . . . . . . . . . . . . . . .
17.8 BEEP ON/OFF . . . . . . . . . . . . . . . . . . . . . . . . . . . . . . . . . . . . . . . . . . . . . . . . . . . . . . . . . . . . . . . . . . . . . . . . .
18 CHANGING THE LANGUAGE . . . . . . . . . . . . . . . . . . . . . . . . . . . . . . . . . . . . . . . . . . . . . . . . . . . . . . . . . . . . . . . .
19 TROUBLESHOOTING . . . . . . . . . . . . . . . . . . . . . . . . . . . . . . . . . . . . . . . . . . . . . . . . . . . . . . . . . . . . . . . . . . . . . . .
20 PROBLEMS TO BE RESOLVED BEFORE CALLING THE SERVICE CENTER . . . . . . . . . . . . . . . . . . . . . . . . . .
LIMITED WARRANTY . . . . . . . . . . . . . . . . . . . . . . . . . . . . . . . . . . . . . . . . . . . . . . . . . . . . . . . . . . . . . . . . . . . . . . .
6
C o l l e c t i o n
7
8
8
9
9
10
10
12
12
12
13
13
13
14
14
15
15
15
15
17
17
17
17
18
19
19
19
19
20
20
21
22
24
Advertisement
Table of Contents

Related Manuals for DeLonghi ESAM6600


Summary of Contents for DeLonghi ESAM6600
-
Page 1: Table Of Contents
Coffee has been used to factory test the appliance and it is therefore completely normal for there to be traces of coffee in the mill. This appliance is, however , guaranteed to be new. INDEX IMPORTANT SAFEGUARDS ..............DESCRIPTION (see page 3) . -
Page 2: Important Safeguards
I M P O R T A N T S A F E G U A R D S When using electrical appliances, basic safety precautions should always be followed, including the following. • Read all instructions carefully. • Make sure the voltage of your electrical system corresponds to the voltage shown on the bottom of the machine. -
Page 3: Description
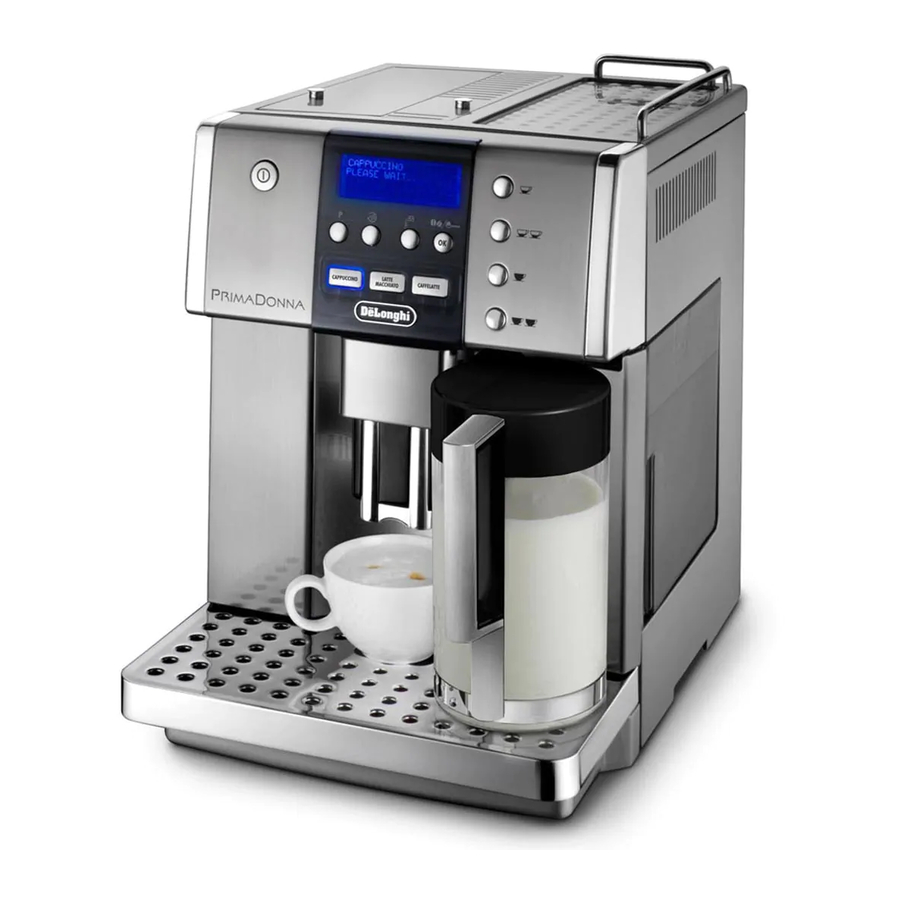
1 DESCRIPTION (SEE PAGE 3) A. Grinding coarseness regulator Control panel B. Coffee bean container Some of the buttons on the panel have a dual function.This is indicated in parentheses in the description. C. Bean container lid 1. Appliance ON/OFF button D. -
Page 4: Installation
3 INSTALLATION • After removing the packaging, make sure the product is complete and undamaged. If in doubt, do not use the appliance and contact a qualified professional. • Packing elements (plastic bags, polystyrene etc.) must not be left within reach of children as they may rep- resent a hazard. -
Page 5: Turning On And Preheating
5 TURNING ON AND PREHEATING 1. Press the button (fig. 6). The appliance displays: HEATING UP PLEASE WAIT... to indicate preheating is underway. 2. Once preheating is completed, the appliance displays RINSING PLEASE WAIT... and performs an automatic rinse cycle (a little hot water runs from the spouts and is collected in the drip tray below). - Page 6 If this is not the case, or for further explanations, contact customer service by calling the number listed in the warranty or visit www.delonghi.com for a list of service centers near you. (U.S. and Canada only) C o l l e c t i o n...
-
Page 7: Changing The Quantity Of Coffee In The Cup
7 CHANGING THE QUANTITY OF COFFEE IN THE CUP The appliance is factory preset to automatically deliver the following quantities of coffee: one short coffee (when the button is pressed); one long coffee (when the button is pressed); two short coffees (when the button is pressed);... -
Page 8: Producing Hot Water
NOTE 4: Use ground coffee for espresso coffee makers only. Do not use coffee beans, freeze-dried coffee or other materials that could damage the appliance. NOTE 5: If you add more than one measure of ground coffee and the funnel blocks, use a knife to push the cof- fee down (fig. -
Page 9: Preparing Latte Or Italian Macchiato
NOTE 1: While preparing the cappuccino, milk or coffee delivery can be interrupted by pressing the CAP- PUCCINO button. NOTE 2: If you run out of milk while delivering frothed milk, remove the container and refill it. Then put it back in place and press the CAPPUCCINO button to request a cappuccino again. -
Page 10: Changing The Quantity Of Coffee And Milk For Latte/ Cappuccino / Italian Macchiato
15 CHANGING THE QUANTITY OF COFFEE AND MILK FOR LATTE / CAPPUCCINO / ITALIAN MACCHIATO The appliance is factory preset to automatically deliver standard quantities of coffee or milk. To change these quantities, proceed as follows: • Fill the container with milk up to the maximum level indicated on the container. •... - Page 11 Infuser Push the PUSH symbol fully in until it clicks into place. After having heard the click, check that the red buttons have snapped out. Support Bottom pipe on the infuser. The pin must be inserted into the bottom pipe on the infuser. Check that the two red buttons have snapped out, otherwise the door cannot be closed.
-
Page 12: Cleaning The Milk Container
16.3 Cleaning the milk container Proceed as follows: • Remove the milk spout (1) and intake tube (2). • Remove the froth regulator (3) by pulling it outwards (see figure) • Wash all the components thoroughly with hot soapy water. Make sure there is no milk residue inside the two holes in the lid of the milk con- tainer,indicated by the arrows in the figure,or in the groove (4) of the froth regulator. -
Page 13: Descaling
• Press the OK button to activate auto-start. • Press the P button (corresponding to the ESC symbol flashing on the display) to exit programming mode to change other parameters. NOTE: When auto-start time is set, the symbol appears alongside the time on the display. 17.3 Descaling Over time, the continuous heating up of the water used to make the coffee leads to lime scale building up in the inner circuits of the appliance. -
Page 14: Changing The Coffee Temperature
NOTE: If the descaling cycle is interrupted before completion, the appliance continues to display the descale message and the program must be started again from the beginning. Empty the water tank, rinse, fill with clean water and run off a cup of hot water. IMPORTANT: FAILURE TO DESCALE THE APPLIANCE REGULARLY INVALIDATES THE WARRANTY. -
Page 15: Beep On/Off
• Press the OK button to reset the factory default values. • Press the P button (corresponding to the ESC symbol flashing on the display) to exit programming mode to change other parameters. • The appliance is now reset to the factory default settings and the READY message is displayed. 17.8 Beep ON/OFF (activates and deactivates the beep) •... -
Page 16: Troubleshooting
19 TROUBLESHOOTING MESSAGE MEANING WHAT TO DO • The water tank is empty or is positioned • Fill the water tank as described in sec- incorrectly. tion 4, and insert it fully. FILL TANK • The tank is dirty or encrusted with lime •... -
Page 17: Problems To Be Resolved Before Calling The Service Center
20 PROBLEMS TO BE RESOLVED BEFORE CALLING THE SERVICE CENTER If the appliance is not working, the causes of the malfunction can be identified and resolved by referring to sec- tion 19. If, on the other hand, a general alarm is on, run the following checks before calling the service center. PROBLEM CAUSE SOLUTION... - Page 18 • The holes in the spouts are clogged • Scrape the holes with a needle (see section 16.1, fig. 29). The coffee does not with dry coffee. come out of the spouts, • The mobile drawer inside the service • Thoroughly clean the mobile drawer, particularly near the door is blocked and cannot swing.
-
Page 19: Limited Warranty
Residents of Canada: Please contact our toll free hotline at #1-866-Latte-Best or 1-866-528-8323 (Hours of Operation: Monday - Friday 8:30am - 8pm, Saturday & Sunday 9:00am - 5:30pm) or log onto our website at www.delonghi.com. Residents of Mexico: Please refer to the Limited Warranty statement for Mexico (see page ).
Need help?
Do you have a question about the ESAM6600 and is the answer not in the manual?
Questions and answers