Weslo Cadence 5.0 Treadmill User Manual
Class h fitness product
Hide thumbs
Also See for Cadence 5.0 Treadmill:
- Gebruiksaanwijzing (23 pages) ,
- Bedienungsanleitung (23 pages) ,
- Manuel de l'utilisateur (23 pages)
Advertisement
Class H Fitness Product
Model No. WETL10131
Serial No.
Serial Number Decal
QUESTIONS?
As a manufacturer, we are com-
mitted to providing complete
customer satisfaction. If you
have questions, or if there are
missing or damaged parts,
please call:
08457 089 009
Or write:
ICON Health & Fitness, Ltd.
Unit 4
Revie Road Industrial Estate
Revie Road, Beeston
Leeds, LS11 8JG
UK
csuk@iconeurope.com
CAUTION
Read all precautions and instruc-
tions in this manual before using
this equipment. Save this manual
for future reference.
USER'S MANUAL
Visit our website at
www.iconeurope.com
Advertisement

Related Manuals for Weslo Cadence 5.0 Treadmill


Summary of Contents for Weslo Cadence 5.0 Treadmill
- Page 1 Class H Fitness Product Model No. WETL10131 USER’S MANUAL Serial No. Serial Number Decal QUESTIONS? As a manufacturer, we are com- mitted to providing complete customer satisfaction. If you have questions, or if there are missing or damaged parts, please call: 08457 089 009 Or write: ICON Health &...
-
Page 2: Table Of Contents
ORDERING REPLACEMENT PARTS ..........Back Cover Note: An EXPLODED DRAWING and a PART LIST are attached in the centre of this manual. WESLO is a registered trademark of ICON Health & Fitness, Inc. -
Page 3: Important Precautions
IMPORTANT PRECAUTIONS WARNING: To reduce the risk of burns, fire, electric shock, or injury to persons, read the following important precautions and information before operating the treadmill. 1. It is the responsibility of the owner to ensure 11. If an extension cord is needed, use only a 3- that all users of this treadmill are adequately conductor, 1mm (14-gauge) cord that is no... - Page 4 DANGER: other than the procedures in this manual Always unplug the power should be performed by an authorised service cord immediately after use, before cleaning representative only. the treadmill, and before performing the main- tenance and adjustment procedures de- 23. This treadmill is intended for in-home use scribed in this manual.
-
Page 5: Before You Begin
BEFORE YOU BEGIN Thank you for selecting the WESLO CADENCE ® ing this manual, please call our Customer Service Department at 08457 089 009. To help us assist you, treadmill. The CADENCE 50 treadmill combines ad- vanced technology with innovative design to let you... -
Page 6: Assembly
ASSEMBLY Assembly requires two persons. Set the treadmill in a cleared area and remove all packing materials; do not dispose of the packing materials until assembly is completed. Assembly requires the included hex key and your own phillips screwdriver and adjustable spanners For help identifying the assembly hardware, refer to the drawings below. - Page 7 2. Open part bag B. Press the Right Frame Spacer (13) and the Left Frame Spacer (not shown) onto the sides of the Wide Frame (55) as shown. Make sure that the high side of side each Spacer is facing forward as shown. With the help of a second person, carefully lift the Frame and hold the Spacers between the plates on the Uprights (89).
- Page 8 5. Open part bag D. Place the Console Base (100) on the Right Handrail (6) and the Left Handrail (not shown). Attach the Console Base with four 3/4” Screws (90) (only two Screws are shown). Do not tighten the Screws yet. Insert the Wire Harness (22) through the two indicated plastic ties on the Console Base (100).
- Page 9 8. Set the Console (1) on the Console Base (100). Insert the excess Wire Harness (22) into the large hole in the side of the Right Handrail (6). Securely tighten the plastic ties Ties on the bottom of the Console Base to prevent the Wire Harness from slipping.
-
Page 10: Operation And Adjustment
OPERATION AND ADJUSTMENT THE PERFORMANT LUBE WALKING BELT , a high-performance lubricant. IMPOR- Your treadmill features a walking belt coated with PERFORMANT LUBE TANT: Never apply silicone spray or other substances to the walking belt or the walking platform. Such substances will deteriorate the walking belt and cause excessive wear. - Page 11 CONSOLE DIAGRAM Displays Note: If there is a thin sheet of plastic on the console, remove it. Clip Insert the key fully into the console. After a moment, CAUTION: the displays will light. Test the clip by carefully tak- Before operating the ing a few steps backward until the key is pulled console, read the following precautions.
- Page 12 To stop the walking belt, press the Stop button. move the key, and then reinsert the key. The elapsed time will begin to flash in the Time display. When you are finished exercising, remove the key. Note: During the first few minutes that the tread- mill is used, inspect the alignment of the walking Step onto the foot rails, press the Stop button, and belt, and align it if necessary (see page 16).
-
Page 13: How To Fold And Move The Treadmill
HOW TO FOLD AND MOVE THE TREADMILL HOW TO FOLD THE TREADMILL FOR STORAGE Unplug the power cord. CAUTION: You must be able to safely lift 20 kg (45 lbs.) to raise, lower, or move the treadmill. 1. Hold the treadmill with your hands in the locations shown at the right. - Page 14 HOW TO LOWER THE TREADMILL FOR USE 1. Hold the upper end of the treadmill with your right hand as shown. Using your left hand, pull the latch knob to the left and hold it. Pivot the treadmill down until the frame is past the latch pin.
-
Page 15: Maintenance And Troubleshooting
MAINTENANCE AND TROUBLESHOOTING Most treadmill problems can be solved by following the steps below. Find the symptom that applies, and follow the steps listed. If further assistance is needed, please call our Customer Service Department. PROBLEM: The power does not turn on SOLUTION: a. - Page 16 PROBLEM: The walking belt slows when walked on SOLUTION: a. If an extension cord is needed, use only a 3-conductor, 1mm (14-gauge) cord that is no longer than 1.5 m (5 ft.). b. If the walking belt is overtightened, treadmill perfor- mance may decrease and the walking belt may be- 5–7 cm come damaged.
-
Page 17: Conditioning Guidelines
CONDITIONING GUIDELINES Aerobic Exercise WARNING: Before beginning If your goal is to strengthen your cardiovascular sys- this or any exercise program, consult your tem, your exercise must be “aerobic.” Aerobic exercise physician. This is especially important for in- is activity that requires large amounts of oxygen for dividuals over the age of 35 or individuals prolonged periods of time. - Page 18 EXERCISE FREQUENCY tween workouts. After a few months, you may com- plete up to five workouts each week if desired. The key To maintain or improve your condition, complete three to success is to make exercise a regular and enjoyable workouts each week, with at least one day of rest be- part of your everyday life.
- Page 19 NOTES...
-
Page 20: Ordering Replacement Parts
Fax: 0 (444) 113 387 7125 When ordering parts, please be prepared to give the following information: • the MODEL NUMBER of the product (WETL10131) • the NAME of the product (WESLO ® CADENCE 50 treadmill) • the SERIAL NUMBER of the product (see the front cover of this manual) •... - Page 21 REMOVE THIS PART LIST/EXPLODED REMOVE THIS EXPLODED DRAWING AND PART LIST DRAWING FROM THE MANUAL! FROM THE MANUAL. Save this page for future reference. Note: Specifications are subject to change without notice. For information about ordering replacement parts, see the back cover of the User’s Manual.
- Page 22 PART LIST—Model No. WETL10131 R1003A Key No. Qty. Description Key No. Qty. Description Console Ferrite Box 3” Bolt Incline Leg Key/Clip Incline Leg Housing Left Frame Spacer Incline Leg Screw Electronics Screw Roller Adj. Washer Right Handrail Frame Endcap Left Handrail Endcap Screw Battery Cover Crossbar Screw...
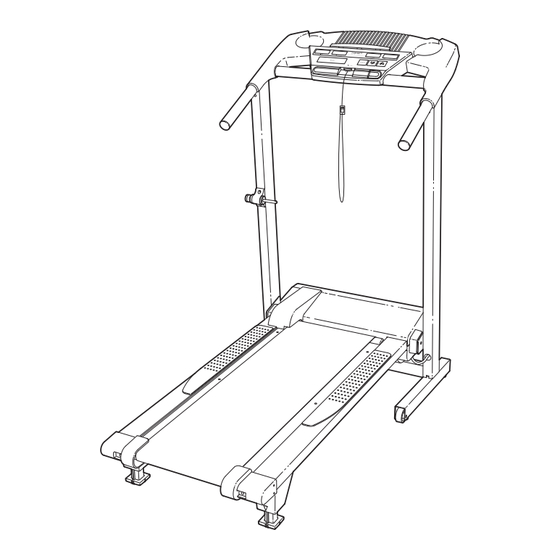
- Page 23 EXPLODED DRAWING—Model No. WETL10131 R1003A...
Need help?
Do you have a question about the Cadence 5.0 Treadmill and is the answer not in the manual?
Questions and answers