Table of Contents
Advertisement
Available languages
Available languages
Quick Links
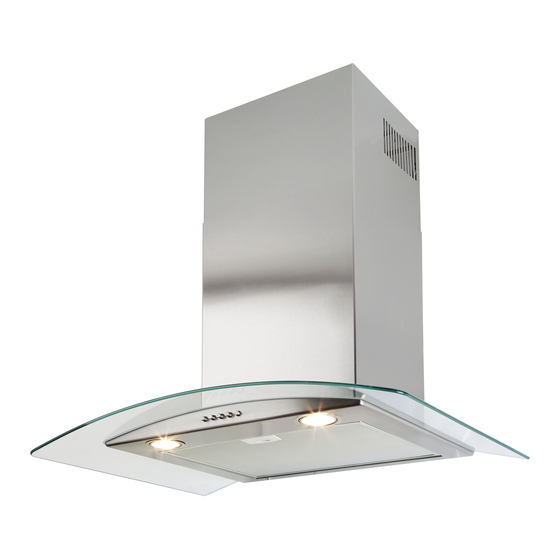
70cm Glass Chimney Hood
CAPPA ASPIRANTE - Istruzioni per l'uso
I
DUNSTABZUGSHAUBE - Gebrauchsanweisung
D
CAMPANA EXTRACTORA - Manual de utilización
E
HOTTE DE CUISINE - Notice d'utilisation
F
COOKER HOOD - User instructions
GB
AFZUIGKAP - Gebruiksaanwijzing
NL
COIFA ASPIRANTE - Manual do usuário
P
Model: HBG70X
Advertisement
Table of Contents

Related Manuals for Beko HBG70X


Summary of Contents for Beko HBG70X
- Page 1 70cm Glass Chimney Hood Model: HBG70X CAPPA ASPIRANTE - Istruzioni per l’uso DUNSTABZUGSHAUBE - Gebrauchsanweisung CAMPANA EXTRACTORA - Manual de utilización HOTTE DE CUISINE - Notice d’utilisation COOKER HOOD - User instructions AFZUIGKAP - Gebruiksaanwijzing COIFA ASPIRANTE - Manual do usuário...
- Page 3 ��������� Fig.1 � � ��� � Fig.2 Fig.3 � � � � � � Fig.4 - 3 -...
- Page 4 � � � � � � � Fig.6 Fig.5 Fig.8 Fig.7 � � � � � � � � � � Fig.9 Fig.11 � � � � � � Fig.10 - 4 -...
-
Page 5: Avvertenze Per La Sicurezza
smaltito in modo corretto, l’utente contribuisce a prevenire le ITALIANO potenziali conseguenze negative per l’ambiente e la salute. Il simbolo sul prodotto o sulla documentazione di accompagnamento indica che questo prodotto non deve GENERALITÀ essere trattato come rifiuto domestico ma deve essere consegnato presso l’idoneo punto di raccolta per il riciclaggio Leggere attentamente il contenuto del presente libretto in di apparecchiature elettriche ed elettroniche. -
Page 6: Uso E Manutenzione
essere usato un tubo di connessione composto di due o I filtri devono essere applicati al gruppo aspirante posto più parti, la parte superiore deve essere all’esterno di quella all’interno della cappa centrandoli ad esso e ruotandoli di 90 inferiore. Non collegare lo scarico della cappa ad un condotto gradi fino allo scatto d’arresto (Fig.8). - Page 7 INTENSIVA, tenere premuto per 2 secondi circa il tasto E e • Saturazione filtri Antigrasso/Carbone attivo questa verrà attivata per 10 minuti dopo di che ritornerà alla - Quando il display C lampeggia alternando la velocità d’esercizio con la lettera F (es.1 e F) i filtri antigrasso devono velocità...
- Page 8 D) Offene Flammen sind unbedingt zu vermeiden, da Isolierklasse I diese die Filter beschädigen und einen Brand verursachen Bei dem Gerät handelt es sich um ein Gerät der Klasse I, und können. muss demnach an einen Erdleiter angeschlossen werden. E) Beim Frittieren sind die Speisen ständig zu kontrollieren, Der Elektroanschluss ist wie folgt vorzunehmen: um eine Entzündung von überhitztem Öl zu verhindern.
-
Page 9: Benutzung Und Wartung
• Befestigung der teleskopischen, schmückenden an- der Aktivkohle hängt von der mehr oder minder langen schlusstücke Benutzungsdauer der Dunstabzugshaube, von der Art der Ac ht u n g ! Fa l l s I h r G e r ä t e m o d e l l e i n e n u n t e re n zubereiteten Speisen und von der mehr oder weniger häufigen Verbindungsflansch mit Zunge hat, müssen Sie, bevor Sie mit Reinigung des Fettfilters ab. -
Page 10: Sugerencias Para La Seguridad
zum Zeitpunkt der Einschaltung dieser Funktion gewählten ESPAÑOL Betriebsgeschwindigkeit weiterläuft. • Sättigung der Fett- und Aktivkohlefilter: GENERALIDADES - Leuchtet die taste A alle 2 Sek. auf, müssen die Fettfilter gereinigt werden. Lea atentamente el contenido del presente libro de instruccio- - Leuchtet die taste A alle 0,5 Sek. auf, müssen die Kohlefilter nes pues contiene indicaciones importantes para la seguridad ausgetauscht werden. -
Page 11: Instrucciones Para La Instalación
eliminado de modo correcto, el usuario contribuye a prevenir recipientes de cocción en el dispositivo de cocción y la parte consecuencias negativas para el ambiente y la salud. más baja de la campana de cocina debe de al menos 65 cm. Si debe usarse un tubo de conexión compuesto de dos o más El símbolo en el producto o en la documentación adjunta,... -
Page 12: Uso Y Mantenimiento
en dotación, pídalo a su vendedor como accesorio. Los filtros para activar esta función por 10 minutos, pasado este tiempo deben ser aplicados al grupo aspirante dentro de la campa- regresará a la velocidad precedentemente programada. na, centrándolos y rotándolos 90 grados hasta el disparo de Cuando la función es activa el LED relampagea. -
Page 13: Conseils Pour La Sécurité
oprima el botón E. l’éclairage. C) Il est absolument interdit de flamber sous la hotte. • Saturación de los filtros antigrasa/carbón activo D) Évitez de laisser des flammes libres, elles sont Cuando el display C centellea alternando la velocidad de dangereuses pour les filtres et pour les risques funcionamiento con la letra F (por ej.: 1 y F), deben lavarse d’incendie. -
Page 14: Emploi Et Entretien
Classe d’isolation I pince comme illustré à la figure 5 phase 1. Cet appareil est fabriqué en classe I, il faut par conséquent le Prévoir l’alimentation électrique à l’intérieur de l’encombrement raccorder à une prise de terre. du raccord de décoration. Si votre appareil doit être installé Procédez au raccordement électrique comme suit: dans le modèle aspirant ou doté... -
Page 15: Safety Precaution
• Remplacement des lampes halogènes (Fig.6) nécessaire de tenir la touche appuyée pour éteintre. Diminue Pour changer les lampes halogènes B retirez le verre C en la vitesse du moteur. faisant levier dans les fentes prévues. Display C = indique la vitesse du moteur sélectionnée et Remplacez-les par des lampes de même type. -
Page 16: Installation Instructions
applicable for external air evacuation. - If the symbol DOES NOt appear on the plate, follow the instructions concerning insulation class I. Before connecting the model to the electricity network: - Control the data plate (positioned inside the appliance) Insulation class II to ascertain that the voltage and power correspond to the the appliance has been manufactured as a class II, therefore network and the socket is suitable. -
Page 17: Use And Maintenance
the 4 sleeves C and 4 screws D as indicated. cooking performed and the regularity with which the anti- grease filters are cleaned. • Fixing to the wall • Clean the cooker hood frequently, both inside and outside, Drill the holes A respecting the distances indicated (Fig.2). using a cloth which has been dampened with denatured alcohol or neutral, non-abrasive liquid detergents. - Page 18 • Commands: (Fig.11) Push-button A = on/off lights switch. Push-button B = on/off cooker hood switch. the appliance switches on at speed level 1, If the cooker hood is on depress the push-button for 2 sec. to switch off the cooker hood. If the cooker hood is at speed level 1 it will not be necessary to depress the push-button to switch the cooker hood off.
-
Page 19: Important Notes
Guarantee and Service Your Beko product is guaranteed against the cost of breackdown repairs for twelve months from the date of the original purchase. What is covered? • All repairs necessary as a result of faulty materials, defective components or manufacturing defect. - Page 20 If you have purchased an extended guarantee please refer to the instructions contained within the extended guarantee agreement document. Otherwise please call the above numbers where service can be obtained at a charge. Should you experience any difficulty in obtaining service please call the Beko Customer Help-Line on 0845 600 4911 Beko House, Caxton Way, Watford, Herts, WD18 8UF, Tel: 0845 600 4911...
-
Page 21: Installatie Instructies
er brand uitbreekt. NEDERLANDS Dit apparaat is voorzien van het keurmerk Waste Electrical and Electronic Equipment (WEEE), zoals vastgesteld door ALGEMEEN de Europese Norm 2002/96/EC. Door te zorgen dat de afvalverwijdering van dit product correct wordt uitgevoerd, De inhoud van dit boekje grondig doorlezen, daar het be- werkt de gebruiker mee aan het voorkomen van potentiële langrijke informatie bevat voor veilige installatie, gebruik en negatieve consequenties voor omgeving en gezondheid. -
Page 22: Gebruik En Onderhoud
aardsymbool vindt die door de decoratieve verbinding in beslag genomen wordt. Indien de afzuigversie of de versie met externe motor Waarschuwing: geïnstalleerd moet worden, dan maakt u een gat voor de Bij het aansluiten op het elektrische net moet u zich ervan luchtafvoer. -
Page 23: Advertências Para A Segurança
• Kontroller: (Afb.11) vermindert de levensduur van de lampen aanzienlijk. Knop A = voor het aan- en uitschakelen van de lichten. • Vervanging van de halogeenlampen (Afb.6) Knop B = voor het aan- en uitschakelen van de wasemkap. Om de halogeenlampen B te vervangen moet men het glaasje Het apparaat wordt aangeschakeld op de 1ste snelheid. - Page 24 tes do ar ambiente e alimentados por uma energia que não a • Conexão elétrica: elétrica, já que a coifa, aspirando, tira do ambiente o ar que o Observação! Controle a placa dos dados colocada dentro queimador ou o fogão necesitam para a combustão. A pressão do aparelho: negativa no local não deve ser superior a 4 Pa (4x10⁻⁵ bar).
-
Page 25: Uso E Manutenção
1- retirar da embalagem quer o corpo do exaustor B quer o louça. vidro A posicionando-os horizontalmente em cima de uma - Após algumas lavagens, podem verificar-se alterações da superfície segura. cor. Este fato não dá direito a reclamações para a eventual 2 - Pegar no vidro A posicionando-o em cima do corpo do substituição dos mesmos. - Page 26 nando a tecla B a função desativa-se). (*) A função “TIMER PARADA AUTOMáTICA” retarda a parada da coifa, que continuará a funcionar à velocidade de exercício em curso no momento em que foi atuada esta função, de 15 minutos. • Saturação dos filtros anti-gordura carvão activo: - Quando a tecla A piscar com uma frequência de 2 seg.
- Page 28 3LIK0836...
Need help?
Do you have a question about the HBG70X and is the answer not in the manual?
Questions and answers