
Related Manuals for Miele M 8260-2


Summary of Contents for Miele M 8260-2
-
Page 1: Operating Instructions
Operating instructions Microwave oven M 8260-2 en - AU, NZ To avoid the risk of accidents or damage to the appliance, it is essential to read these instructions before it is installed and used for the first time. M.-Nr. 07 679 380... -
Page 2: Table Of Contents
Contents Description of the appliance ......... 4 Oven interior and accessories . - Page 3 Contents System lock ............24 Minute minder .
-
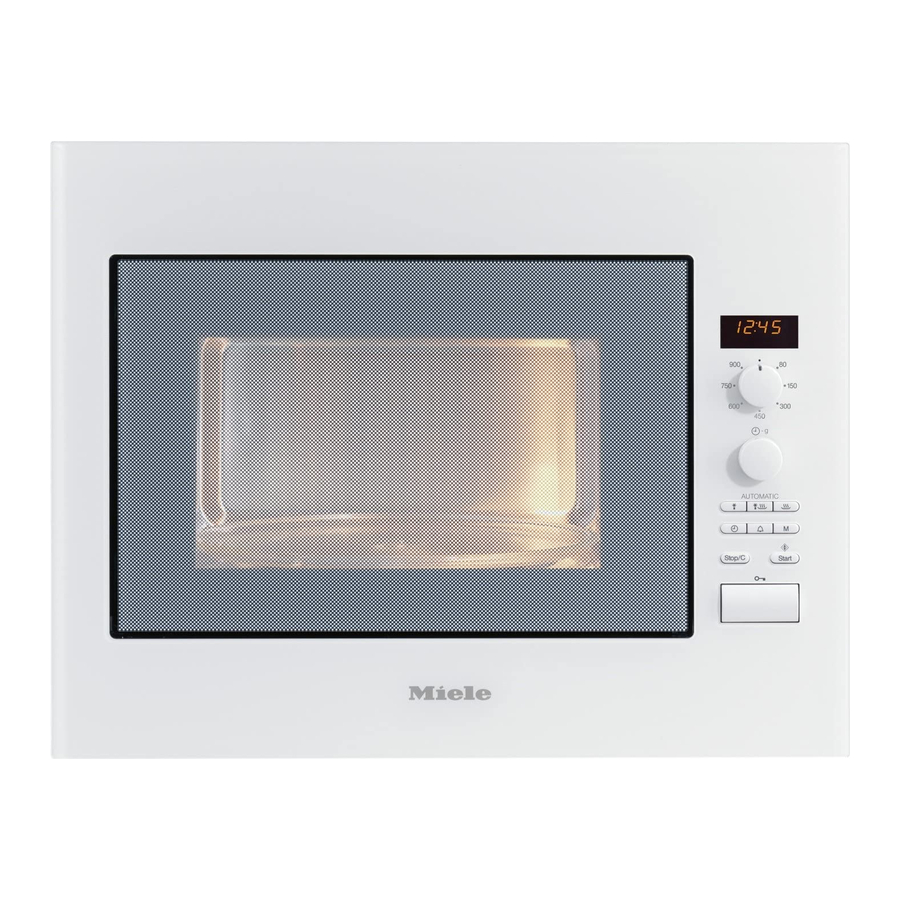
Page 4: Description Of The Appliance
Description of the appliance Oven interior and accessories a Oven door d Turntable b Door lock mechanism e Cover c Control panel f Boiling rod... -
Page 5: Control Panel
Description of the appliance Control panel g Electronic timer and clock display h Microwave power selector i Selector to enter time and weight j Automatic programme buttons k Time of day button m l Minute minder button l m Memory button (to save a 1-3 stage programme sequence) n Stop/cancel button o Start button / Add a minute button /... -
Page 6: Caring For The Environment
Caring for the environment Disposal of the packing Disposal of your old appliance material Electrical and electronic appliances often contain materials which, if The transport and protective packing handled or disposed of incorrectly, has been selected from materials which could be potentially hazardous to are environmentally friendly for human health and to the environment. -
Page 7: Warning And Safety Instructions
The manufacturer cannot be held liable If the supply cord is damaged, it for damage resulting from incorrect or must be replaced by a Miele approved improper use or operation. service technician to avoid a hazard. This appliance is not intended for... - Page 8 (e.g. danger of overheating). Faulty components must only be replaced by genuine Miele original The electrical safety of this spare parts. The manufacturer can only appliance can only be guaranteed guarantee the safety of the appliance...
- Page 9 Warning and safety instructions Appliances which are built-in behind long standing time, which should be a furniture door must only be operated added to the time needed for cooking, when the door is open. Do not close the reheating or defrosting. furniture door when the appliance is in Always remember that times for operation.
- Page 10 Warning and safety instructions Never cook or reheat food or liquids When heating liquids, the boiling rod in sealed containers, jars or bottles. provided should always be placed into With baby bottles, the screw top and the container. teat must be loosened. Otherwise pressure builds up which can cause the bottle or container to explode, posing a severe risk of injury.
- Page 11 Warning and safety instructions To avoid fuelling any flames, do not Do not leave the oven unattended open the oven door if smoke occurs in when reheating or cooking food in the oven interior. disposable containers made of plastic, Interrupt the process by pressing the paper or other inflammable materials.
- Page 12 Warning and safety instructions Always ensure that food, the The following applies to stainless gourmet plate or a browning dish has steel surfaces: been placed in the microwave, and that Do not adhere stickers, adhesive the turntable is in place, before tape or any other adhesive materials to switching on.
-
Page 13: How The Microwave Oven Works
How the microwave oven works In a microwave oven there is a As heat is produced directly in the high-frequency tube called a food, magnetron. This converts electrical – food can generally be cooked energy into microwaves. These without adding much liquid or microwaves are distributed evenly cooking oil. -
Page 14: Modes Of Operation
Modes of operation What can a microwave oven In what ways can a microwave oven be used? In the microwave oven, food is cooked, Microwave Solo mode reheated or defrosted quickly. Suitable for defrosting, reheating and You can use the microwave in the cooking. -
Page 15: Suitable Containers For Microwave Ovens
Suitable containers for microwave ovens Microwaves Containers and lids with hollow handles or knobs in which moisture can collect are unsuitable, unless the hollowed areas are adequately vented. Without vent holes pressure can build up, causing the container to crack or shatter with the danger of injury. - Page 16 Suitable containers for microwave ovens – Pieces of aluminium foil Earthenware For even defrosting and to avoid Decorated earthenware is only suitable overcooking unevenly shaped cuts of if the decoration is beneath an all-over meat, poultry or fish, small pieces of glaze.
-
Page 17: Testing Dishes For Their Suitability
Suitable containers for microwave ovens Testing dishes for their Disposable containers, such as trays made from polystyrene, can only be suitability used for very short, timed warming and If in doubt as to whether glass, reheating of food. earthenware or porcelain plates or dishes are suitable for use in a Plastic boiling bags can be used for microwave oven, a simple test can be... -
Page 18: The Cover
Suitable containers for microwave ovens The cover Do not use a lid or cover if – prevents too much steam escaping, – food coated with breadcrumbs is especially when cooking foods which being cooked. need longer to cook, such as –... -
Page 19: Before Using For The First Time
Before using for the first time ^ Check the appliance for any Important: damage. After unpacking, let the appliance stand for approx. 2 hours at room Do not use the microwave if temperature after transporting it to – the door is warped. –... -
Page 20: Time Of Day Display
Time of day display ^ Press the m button to confirm, or wait Setting the time of day a few seconds. ^ Connect the appliance to the mains The m symbol will flash, and the electricity supply. current minutes will light up for a few 12:00 and the m symbol will flash in seconds. -
Page 21: Operation
Operation To open the door To close the door ^ Press the a button to open the ^ Push the door firmly shut. door. Press the Start button again to resume If the microwave oven is being used, an interrupted cooking programme. opening the door will interrupt the The appliance will not start again if cooking programme. -
Page 22: Door" Message
Operation When heating up food which cannot be – the frequency of stirring or turning stirred or turned during cooking, as with the food. a plated meal, it is best to use a lower Frequent stirring or turning heats the microwave power level. -
Page 23: Interrupting Or Re-Starting A Programme
Operation Interrupting or re-starting a To cancel a programme programme ^ Press the Stop/C button twice. At any time you can ..At the end of a programme . . . interrupt a programme An audible tone will sound when the ^ Press the Stop/C button, or open the cooking programme is complete. -
Page 24: Quick Start (Programmable)
Operation Quick start (programmable) System lock Pressing the Start/c button is sufficient The system lock prevents the appliance to set the appliance operating on being used by children, for example. maximum power. Three set times are stored in the To activate the system lock memory: ^ Press and hold the Stop/C button in ^ 30 s: Press Start c once... -
Page 25: Minute Minder
Operation Minute minder Minute minder + cooking function The minute minder can be used to time The minute minder can be used at the any activity in the kitchen, e.g. boiling same time as a cooking function, and eggs. The time set counts down in one counts down in the background. -
Page 26: Operation - Automatic Programmes
Operation - Automatic programmes Automatic cooking All of the automatic programmes are weight dependent. There are three programmes for frozen After selecting a programme, enter the and fresh food. The standing time for weight of the food. The microwave each programme is approx. 2 minutes. automatically calculates the time Cooking food from frozen N °... - Page 27 Operation - Automatic programmes ^ Press the Start button. The cooking duration, which is dependent on the weight, will begin to count down, and the Microwave symbol h will light up. An audible tone will sound halfway through the cooking time. ^ Interrupt the programme to turn or stir the food, and then continue the programme.
-
Page 28: Recipes - Automatic Programmes
Recipes - Automatic programmes ° Below are some recipe suggestions for Carrots in a chervil cream sauce the Automatic programmes using the (serves 2) "Cooking fresh food" function °". Cook time: 25 - 35 minutes These can be adapted to suit your requirements. - Page 29 Recipes - Automatic programmes ° AC 2 E Potatoes AC 3 _ Fish Caribbean fish This programme can be used to cook (serves 4) new potatoes and boiled potatoes. Enter the weight for the potatoes and Cook time: 35 - 45 minutes the cooking liquid.
-
Page 30: Saving Your Favourite Programme
Saving your favourite programme One favourite programme can be saved in memory. This programme can be used for your most frequently cooked recipe. This programme can have up to 3 stages (e.g.: 2 minutes at 600 W, followed by 10 minutes at 450 W, and finally 3 minutes at 300 W). - Page 31 Saving your favourite programme To call up your favourite programme ^ Turn the programme selector to the 12 o'clock position. ^ Press the M button. ^ Press the Start button. In the event of a power cut, the favourite programme is no longer saved and must be re-entered.
-
Page 32: Changing The Settings
Changing the settings You can change the standard default The other settings can be changed in settings by altering the "status" of the the same way. setting. ^ When you have finished making the Please consult the chart for the different changes you require, press the options. - Page 33 Changing the settings Setting Settings available (* factory default) Night time switch-off S 0* Night time switch-off is deactivated. Night time switch-off is activated. The time of day display is switched off from 11 pm to 4 am. P 2 Automatic warming S I* The automatic warming function is activated.
-
Page 34: Reheating
Reheating Select the following microwave power Food taken straight from the refrigerator levels to reheat food: takes longer to cook than food which has been kept at room temperature. Drinks ..... 900 W The time required depends on the Food . -
Page 35: Cooking
Cooking Place the food in a microwave-proof Food with a thick skin or peel, such dish and cover it. as tomatoes, sausages, jacket potatoes and aubergines, should be pierced or When cooking, it is a good idea to the skin cut in several places before select a power level of 900 W to start cooking to allow steam to escape and with and then when the food is hot... -
Page 36: Defrosting/Defrosting And Reheating Or Cooking
Defrosting/Defrosting and reheating or cooking Defrosting followed by Do not refreeze food once it has reheating or cooking thawed. Defrosted food should be Deep-frozen food can be defrosted and used up as quickly as possible as immediately reheated or cooked. food soon loses it nutritional value and goes off. -
Page 37: Preserving
Preserving You can preserve small portions of fruit Duration until bubbles evenly dispersed and vegetable into preserving jars with in all jars: your microwave. Prepare the jars in the 1 glass jar ..approx. 3 minutes usual way. -
Page 38: Some Suggested Uses
Some suggested uses Food Quantity Micro- Time Notes wave power minutes) level (in watts) Melting butter 100 g 1:00 – 1:10 Do not cover. and margarine Melting 100 g 3:00 – 3:30 Do not cover. chocolate Stir halfway through melting. Dissolving 1 packet + 0:10 –... -
Page 39: Cleaning And Care
For more heavy soiling, heat a glass of branded cleaning and conditioning water for 2 to 3 minutes until the water products, as well as the Original Miele begins to boil. The steam will collect on all-purpose microfibre cloth, which is the walls and soften the soiling. -
Page 40: Appliance Front
Miele authorised and trained service technician. Remove any soiling immediately. To clean the interior: If not, it might become impossible to remove and could cause the surface to alter or discolour. -
Page 41: Accessories Supplied
Cleaning and care Accessories supplied To avoid damaging the outer surfaces of your appliance, do not use: Boiling rod The boiling rod can be washed in a – cleaning agents containing soda, ammonia, acids or chlorides, dishwasher. – cleaning agents containing Cover descaling agents, Wash and dry the cover after each use. -
Page 42: Problem Solving Guide
The lower the power level, the longer appliance is faulty (disconnect the the duration required. appliance from the mains supply and ^ Check whether the programme has call a qualified electrician or Miele. See "After sales service".). been interrupted and not restarted. - Page 43 ^ You can then operate the appliance as normal, but not the lighting..the microwave switches itself off Contact Miele if you need to replace during a cooking, reheating or the lighting. defrosting programme.
-
Page 44: After Sales Service
When contacting your Chartered Agent or Miele, please quote the model and serial number of your appliance. This information is given on the data plate, which is located on the inside of the appliance front. -
Page 45: Electrical Connection
If the supply cord is damaged, it must The appliance is supplied with a mains be replaced by a Miele approved ser- cable and moulded plug ready for vice technician to avoid a hazard. connection to an AC single phase 220-240 V 50 Hz supply. -
Page 46: Installation
Installation When building in the appliance, To transport the appliance, make ensure that the vents at the front of sure that you lift it by the appliance the appliance are not hindered. housing and not by the frame. The Make sure that there is a gap of at frame is not sturdy enough to bear least 2.5 mm between the sides of the weight of the appliance when it... - Page 47 Installation Installation Tall unit The appliance must be built in before it can be used. Otherwise it poses an electric shock hazard. There are three spacers in the accessory pack: one for the right-hand side (R) and two for the left-hand side (L), depending on whether the housing unit wall is 16 or 19 mm thick.
- Page 48 Installation ^ Secure the appliance at the front by ^ To secure the spacers and hooks, lifting it over the hooks and lowering it place a screw in one of the front two into position. holes and another in the middle of the long hole at the back.
- Page 52 Alteration rights reserved/ 5011 M.-Nr. 07 679 380 / 02 M 8260-2...
Need help?
Do you have a question about the M 8260-2 and is the answer not in the manual?
Questions and answers