Table of Contents
Advertisement
Quick Links
EN
BL00969-200
DIGITAL VIEWER
Before You Begin
First Steps
Owner's Manual
Viewing Pictures
Thank you for your purchase of this product. This
More Menu Options
manual describes how to use your FUJIFILM FinePix
REAL 3D V1 digital viewer and the supplied software.
Connections
Be sure that you have read and understood its con-
tents before using the viewer.
Troubleshooting
Appendix
For information on related products, visit our website at
http://www.fujifilm.com/products/index.html
Advertisement
Table of Contents

Subscribe to Our Youtube Channel
Related Manuals for FujiFilm Finepix Real 3D V1

Summary of Contents for FujiFilm Finepix Real 3D V1
- Page 1 Viewing Pictures Thank you for your purchase of this product. This More Menu Options manual describes how to use your FUJIFILM FinePix REAL 3D V1 digital viewer and the supplied software. Connections Be sure that you have read and understood its con- tents before using the viewer.
-
Page 2: For Your Safety
For Your Safety IMPORTANT SAFETY INSTRUCTIONS • Read Instructions: All the safety and to protect it from overheat- Antennas Antennas when it is left unattended and and operating instructions unused for long periods of ing, and these openings must Outdoor Antenna Grounding: If an should be read before the ap- time, unplug it from the wall not be blocked or covered. -
Page 3: Safety Notes
CAUTION CAUTION Unplug from state can cause a fi re or electric shock. Contact your FUJIFILM power socket dealer. Do not use this device in locations aff ected by oil fumes, steam, humidity or Do not allow water or foreign objects to enter the device. -
Page 4: Notices
You are cautioned that any changes or modifi cations not expressly approved in this manual could void the user’s authority to oper- ate the equipment. Notes on the Grant To comply with Part 15 of the FCC Rules, this product must be used with a FUJIFILM-specifi ed ferrite-core A/V cable, USB cable, and DC supply cord. For Customers in Canada For Customers in Canada CAUTION: This Class B digital apparatus complies with Canadian ICES-003. - Page 5 Trademark Information Trademark Information xD-Picture Card is a trademark of FUJIFILM Corporation. Microsoft, Windows, the Windows logo, Windows Vista and the Windows Vista logo are trademarks or registered trademarks of Microsoft Corporation in the United States and/or other countries. “Windows”...
-
Page 6: Viewer Q & A
Viewer Q & A Find items by task. Viewing Pictures Viewing Pictures Question Question Key phrase Key phrase See page See page How do I view C pictures? Viewing C images How do I adjust parallax? How do I view a lot of pictures at once? Multi-frame playback Multi-frame playback How do I fi nd pictures? -
Page 7: Table Of Contents
Table of Contents For Your Safety ..............................ii IMPORTANT SAFETY INSTRUCTIONS ......................ii Safety Notes ................................iii NOTICES ................................iv Viewer Q & A .................................vi Viewing Pictures .............................vi Other Operations ............................vi Before You Begin Before You Begin Viewing 3D Images ............................1 Getting Started ..............................2 Symbols and Conventions ..........................2 Package Contents ..............................2 Parts of the Viewer and Remote Control ....................3... - Page 8 Table of Contents Appendix Appendix Glossary .................................28 Memory Cards ..............................29 Specifi cations ..............................30 FUJIFILM Worldwide Network ........................31 viii...
-
Page 9: Viewing 3D Images
60 cm (2 ft.). C Display The FinePix REAL 3D V1 uses a parallax barrier consisting of a series of slits placed over a pair of images with diff erent par- allax displayed in a series of alternating strips, allowing each eye to see a diff erent image and creating the illusion of depth when the screen is viewed at the proper angle and distance. -
Page 10: Getting Started
Getting Started Before using the FinePix REAL 3D V1 digital viewer, read the warnings on pages ii–v and take a few minutes to familiarize yourself with the terms and conventions used in this manual. For information on specifi c topics, consult the sources below. -
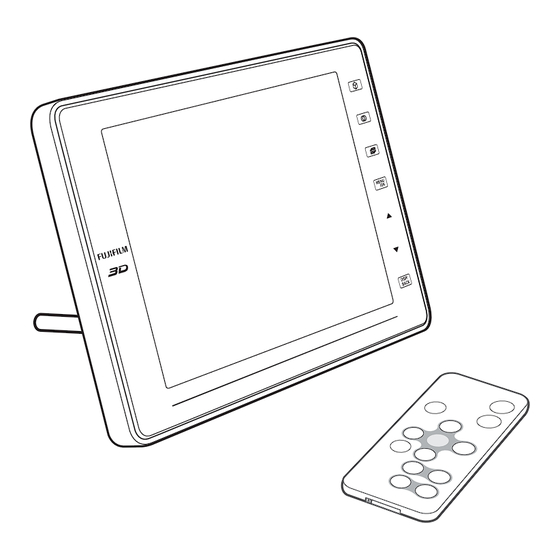
Page 11: Parts Of The Viewer And Remote Control
Introduction Parts of the Viewer and Remote Control Parts of the Viewer and Remote Control The same numbers are used for controls that appear both on the viewer and the re- mote. Unless otherwise noted, the controls on the remote perform the same functions as those on the viewer;... - Page 12 Introduction Viewer (back view) Viewer (back view) Page Page Memory card slot cover Stereo speakers — T (power) button Tripod mount Hole for stand USB host connector — Connector for AC power adapter Mini-B USB connector Memory card slot...
-
Page 13: Readying The Remote Control
Readying the Remote Control A battery is inserted in the remote control at shipment. Before using the remote control, remove the plastic insu- lating sheet from the battery chamber. 1 Note The battery supplied with the remote control is intended for trial use only. -
Page 14: Replacing The Battery
Readying the Remote Control Replacing the Battery Replacing the Battery If the remote control does not function as expected, replace the battery with a fresh CR2025 battery (available separately from third-party suppliers). Turn the remote control over and remove the battery holder. Remove battery holder, keeping latch pressed to right... -
Page 15: Attaching The Stand
Attaching the Stand Attach the stand to the frame. Place a towel or other soft cloth on a level surface such as a table and place the viewer face down on the cloth. Gently screw the stand into the hole on the back of the viewer as shown. Stand the viewer as shown. -
Page 16: Inserting Memory Cards
Inserting Memory Cards The viewer can be used with the memory cards listed on page 29 (for information on supported fi le formats, see page 30). Before inserting memory cards into the viewer, be sure to copy any important fi les to a computer. To insert a memory card: Open the card slot cover. -
Page 17: Turning The Viewer On
Turning the Viewer On Connect the supplied AC power adapter and turn the viewer on. Connect the AC power adapter to the viewer as shown and then plug the adapter into a power outlet. 3 Caution Use only the supplied AC power adapter. Do not use the viewer with other power adapters. Press the power button to turn the viewer on. -
Page 18: Basic Setup
Basic Setup Before using the viewer for the fi rst time, choose a language and set the clock. Setting the clock to the correct time and date makes it possible to use the clock calendar display (pg. 19). Press MENU/OK to display the main menu. SLIDE SHOW The Main Menu SINGLE IMAGE... - Page 19 Basic Setup 2 Tip: Viewing the Time and Date The current date and time are displayed in the viewer when an option other than OFF is selected for CLOCK in the CLOCK/CALENDAR menu (pg. 19). 1 Note The clock will be reset if the viewer is without power for an extended period.
-
Page 20: Slide Shows
Slide Shows A slide show will begin automatically when the viewer is turned on (pg. 9). If no memory card is inserted, the pictures in internal memory will be displayed (a demo slide show will be displayed if internal memory contains no other pictures); if a memory card is inserted, the pictures on the memory card will be displayed. - Page 21 Slide Shows Choosing a Background Track The viewer ships with a selection of pre-recorded music tracks in internal memory and can also play MP3 fi les stored on memory cards. To play custom tracks while viewing a slide show of the pictures on a memory card, copy MP3 fi les to the card before inserting the card in the viewer.
-
Page 22: Displaying Selected Images
Displaying Selected Images To use the viewer as a picture frame displaying one or more selected images in place of a slide show, select SINGLE IMAGE in the main menu. You can enlarge images and choose the area displayed (pg. 15) or display several pictures at once (pg. 16). Press MENU/OK to display the main menu. -
Page 23: Playback Zoom
Displaying Selected Images Playback Zoom Playback Zoom Press 6 to zoom in on the picture currently displayed in the viewer; press 7 to zoom out. Press 6 to Press 7 to zoom in zoom out Zoom indicator ZOOM MOVE ZOOM MOVE To view areas of the image not currently visible in the dis- play, press DISP/BACK and use the 6, 7, 8, and 9 buttons... -
Page 24: Multi-Frame Playback
Displaying Selected Images Multi-Frame Playback Multi-Frame Playback Press DISP/BACK to choose the number of images displayed. The number of images changes each time the DISP/BACK button is pressed. Single frame Current, previous, and next frames One hundred frames Nine frames Use the 6, 7, 8, and 9 buttons to highlight images and press MENU/OK to view the highlighted image full frame. -
Page 25: Viewing C Images
• The C eff ect is only visible from certain angles (pg. 1). Too much parallax may make it impos- sible to perceive the C eff ect. 1 Note C display is available with pictures taken with FUJIFILM 3D cameras only. 3D images created with other devices will be displayed in D. -
Page 26: Image Search
IMAGE SEARCH Search for pictures by date, subject, scene, folder, or fi le type. This option can be used to help fi nd a specifi c picture for picture frame display or to create slide shows consisting only of pictures that match your search conditions. Press MENU/OK to display the main menu. -
Page 27: Clock/Calendar
CLOCK/CALENDAR Choose the type of clock or calendar displayed in the viewer during slide shows or in single-frame playback. Note that the clock calendar can not be rotated for display when the viewer is in tall (vertical) orientation. Press MENU/OK to display the main menu. Press 6 or 7 to highlight CLOCK/CALENDAR and press MENU/OK. -
Page 28: Erase
ERASE To delete pictures from internal memory or a memory card, select EDIT in the main menu. Note that deleted pictures can not be recovered. Copy important pictures to a computer or other storage device before proceeding. Press MENU/OK to display the main menu. Press 6 or 7 to highlight EDIT and press MENU/OK. -
Page 29: Set-Up
SET-UP Adjust a variety of viewer settings. Press MENU/OK to display the main menu. Press 6 or 7 to highlight SET-UP and press MENU/OK. Press 6 or 7 to highlight an item and press MENU/OK to VOLUME select. SLIDESHOW TIME/FRAME DATE/TIME 3D CAUTION DISP 3D LEVEL... -
Page 30: Setup Menu Options
SET-UP Setup Menu Options Setup Menu Options Menu item Menu item Description Description Default Default VOLUME Adjust volume. 7 / i SLIDESHOW TIME/FRAME Choose how long each slide is displayed during a slide show. 3 SEC DATE/TIME Set the clock (pg. 10). —... -
Page 31: Copying Pictures Via Infrared
Copying Pictures via Infrared Pictures can be copied to internal memory from compatible devices when the viewer is in single-image display mode. The viewer will automatically receive pictures transferred from the device; no other operation is required. Place the viewer about 5 to 20 cm (2 to 8 in.) from the other device with the infrared ports pointing directly at each other. -
Page 32: Connecting To A Computer
Built-in USB port recommended. Operation is not guaranteed with other USB ports. 3 Caution For information about Windows 7, visit http://www.fujifilm.com/support/download/camera/ software/. Other versions of Windows are not supported. Operation is not guaranteed on home-built computers or computers that have been upgraded from earlier versions of Win- dows. -
Page 33: Copying Pictures To The Viewer
Connecting to a Computer Copying Pictures to the Viewer Copying Pictures to the Viewer Turn the viewer off and connect the supplied USB cable as shown, making sure the connectors are fully inserted (the orientation and location of the computer connector may diff er from that shown;... -
Page 34: Troubleshooting
Troubleshooting ■ ■ Power Power Problem Problem Possible cause Possible cause Solution Solution Page Page The viewer does The AC power adapter is not correctly Check the connection. not turn on. connected. The viewer turns off The memory card slot cover is open. Close the memory card slot cover. - Page 35 Troubleshooting ■ ■ Miscellaneous Miscellaneous Problem Problem Possible cause Possible cause Solution Solution Page Page Remote control The battery is exhausted. Insert a fresh battery. has no eff ect. Clock has been Power has been interrupted for an ex- Connect the AC power adapter and 9, 10 reset.
-
Page 36: Glossary
Glossary Exif: A digital camera image fi le format that stores information on the time of recording, resolu- tion, camera orientation, and the type of device used to record the image. The data recorded also include the thumbnails displayed in the viewer during multi-frame playback. JPEG (Joint Photographic Experts Group): A compressed fi le format for color images. -
Page 37: Memory Cards
Memory Cards The following memory cards had been tested and approved for use with this viewer: Type Type Capacity Capacity xD-Picture Card Up to 2 GB SD card Secure Digital (SD) SDHC card Up to 32 GB 3 Cautions • Operation is not guaranteed with all makes of the above memory cards. •... -
Page 38: Specifi Cations
Approx. 630 g/22.2 oz. (including stand) Notices • Specifi cations subject to change without notice. FUJIFILM shall not be held liable for damages resulting from errors in this manual. • Although the display is manufactured using advanced high-precision technology, a small num- ber of pixels (less than 0.01%) may always be lit or may not light. -
Page 39: Fujifilm Worldwide Network
Importaciones Espacri Technical support TEL +593 783 5526 portiz@fujifilm.com.ec Cia. Ltda. & repairs Mexico Fujifi lm de Mexico, S.A. Technical support TEL (52-55) 5263-55000 eizquierdo@fujifilm.com.mx de C.V. Repair service TEL (52-55) 5366-5150/56/57 cpalma@fujifilm.com.mx Paraguay Errece S.R.L. Technical support TEL +595 21 444256 jmarbulo@fujifilm.com.py &... - Page 40 Для звонков из других стран набирайте +7 800 200 3854 http://www.fujifilm-digital.ru/ info@fujifilm-digital.ru Slovakia Fujifi lm Slovakia s.r.o. Technical support TEL 00421 2 33 595 107 fujifilm@fujifilm.sk Repair service TEL 00421 2 33 595 119 servis@fujifilm.sk Spain Fujifi lm España S.A.
- Page 41 Tehran Fuka Co. Technical support TEL (+98-21)2254810-19 fuka@neda.net & repairs Israel Shimone Group Ltd. Technical support TEL (+ ) 972 3 9250666 digital@fujifilm.co.il Repair service TEL (+ ) 972 3 9250666 khaim@shimone.com Jordan Grand Stores Al- Abdali, Technical support TEL 009626-4646387 gstores@go.com.jo Amman / Jordan &...
- Page 42 Sewon) Taiwan Hung Chong Corp. Technical support TEL 886-2-6602-8988 dah@mail.hungchong.com.tw & repairs Thailand FUJIFILM (Thailand) Ltd. Technical support TEL +662-2706000 ext. 751,752 Dusit_Suriyong@fujifilm.co.th yaowarat@fujifilm.co.th Repair service TEL +662-2706000 ext.761,762 warin@fujifilm.co.th Vietnam International Minh Viet Technical support TEL +84-8-4135740 ext. 322 diep.phanthithanh@imv.
- Page 43 Memo...
- Page 44 7-3, AKASAKA 9-CHOME, MINATO-KU, TOKYO 107-0052, JAPAN http://www.fujifilm.com/products/digital_cameras/index.html...
Need help?
Do you have a question about the Finepix Real 3D V1 and is the answer not in the manual?
Questions and answers