
Related Manuals for Stealth Cam STC-U840IR


Summary of Contents for Stealth Cam STC-U840IR
- Page 1 INSTRUCTION M ANUAL Model # : S TC-‐U840IR Toll F ree 1 -‐877-‐269-‐8490 W WW.STEALTHCAM.NET Version ...
- Page 2 ** I MPORTANT N OTE * * First, c ongratulations o n p urchasing o ne o f t he f inest s couting c ameras o n the ...
-
Page 3: Table Of Contents
TABLE O F C ONTENTS Camera o verview 4 Camera K it c ontents 7 General I nformation ... -
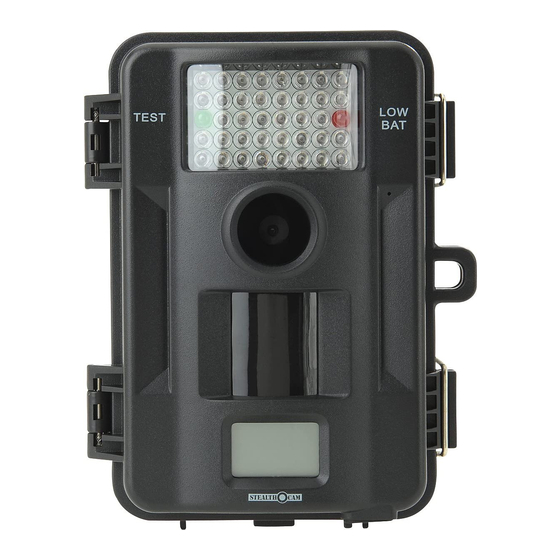
Page 4: Camera O Verview
CAMERA O VERVIEW Front WWW.STEALTHCAM.NET Toll Free 877-269-8490... - Page 5 Inside Side v iew w ith m ajor p arts i ndicated WWW.STEALTHCAM.NET Toll Free 877-269-8490...
- Page 6 Side & B ottom v iew WWW.STEALTHCAM.NET Toll Free 877-269-8490...
-
Page 7: Camera K It C Ontents
CAMERA K IT C ONTENT Model S TC-‐U840IR D igital S couting C amera • User m anual • USB c able • Strap • ... -
Page 8: General I Nformation
GENERAL I NFORMATION Storing c onditions Operating E nvironment: 1 4 t o 1 04 d eg F ( -‐10 t o 4 0 d eg C ). 2 0-‐85% •... -
Page 9: Quick S Tart G Uide
QUICK S TART G UIDE This guide is designed to get you up and running in a matter of moments. To get the most out of this advanced scouting tools, please read the manual thoroughly ... -
Page 10: Battery A Nd M Emory I Nstallation
BATTERY A ND M EMORY I NSTALLATION WARNING: Do not use different Voltage lead acid battery other than the one specified in this section. Doing so will damage the camera and will void the warranty. WARNING: ALWAYS have the camera in the OFF position when ... - Page 11 Insert t he e xternal b attery b arrel p lug i nto t he D C 1 2V j ack o n t he • bottom o f c amera h ousing. Turn ...
- Page 12 Inserting S D m emory c ard NOTE: Make sure camera is in the OFF position whenever adding or removing m emory. Insert SD memory card in to the SD card slot completely and in •...
-
Page 13: Setup A Nd P Rogramming
SETUP A ND P ROGRAMMING When t he c amera i s f irst t urned o n, t he i nternal L CD s creen d isplays the ... - Page 14 Ø 1 S tar ( 1.3Mp): S elect t his o ption t o c apture a 1 .3M p ixels image. ( Base i mage q uality) ( Default) Resolution ...
- Page 15 Programming t he S tealth C am Switch the camera to the ON position. LCD screen will display the camera status screen. Press the MENU button within 30 seconds to enter ...
- Page 16 Setting t he C apturing S equence: Your S tealth C am c an b e p rogrammed t o s hoot 1 -‐9 p ictures p er triggering. ...
- Page 17 Setting t he V ideo M ode: Your S tealth C am c an b e p rogrammed t o r ecord 1 0-‐180 s econds o f video ...
- Page 18 Set t he D igital Z oom: Your S tealth C am c an b e p rogrammed t o h ave 3 d ifferent z oom l evels. Switch ...
- Page 19 Setting t he T ime O ut M ode: Your S tealth C am c an b e p rogrammed t o s et t he a mount o f t ime i n minutes ...
- Page 20 Setting t he T ime a nd D ate: Your S tealth C am u ses t he 2 4hr m ilitary t ime f ormat. Switch ...
- Page 21 The D AY d igits w ill b e b linking. • Press [ UP] o r [ DN] t o i ncrease o r d ecrease t he y ear v alue. •...
-
Page 22: Using T He C Amera
USING T HE C AMERA Once a ll p rogram s ettings h ave b een s etup p roperly, y our S tealth C am is ... - Page 23 (Example: M ounting) (Example: T rail S etup) WWW.STEALTHCAM.NET Toll Free 877-269-8490...
- Page 24 Using t he c amera i n P IR d etection m ode Mount the camera to the tree or other sturdy object using either • a t ree s crew ( optional a ccessory) o r s upplied m ounting s trap. Open the front housing and move the switch to the ON position. ...
- Page 25 30 seconds after you’ve made your adjustments, the camera’s • green LED light will begin blinking and enter count down mode. This ...
-
Page 26: Viewing & D Eleting F Iles
VIEWING A ND D ELETING F ILES Viewing I mages & V ideos Your Stealth Cam Digital Scouting Camera is a plug and play USB storage ... - Page 27 At t his p oint y ou h ave s everal o ptions: • Ø To view your images or play your videos: Click on the Removable Storage device and then drill down to the file you ...
- Page 28 Deleting f iles i n t he f ield Switch t he c amera t o t he O N p osition. • Ø LCD s creen w ill d isplay t he c amera s tatus s creen. Press ...
-
Page 29: Memory C Ompatibility C Hart
MEMORY C OMPATIBILITY C HART The f ollowing c ards h ave b een t ested a nd a pproved f or u se w ith t he STC-‐U840IR ... -
Page 30: Technical S Pecifications
TECHNICAL S PECIFICATIONS System R equirements a nd C ompatibility Windows M e/2000/XP/Vista/Windows 7 • Pentium 4 , 2 GHz o r a bove • 1GB ... - Page 31 Camera F eatures a nd S pecification High p recision m ulti-‐layer g lass l ens w ith c oating. • Built i n 1 .85” B &W L CD d isplay. •...
-
Page 32: Image C Apacity C Hart
IMAGE C APACITY C HART High High Base Base SD card Color B&W Color B&W Color B&W Color B&W Based on 70MB 30MB 2.0MB 0.5MB File size of (30sec.) (30sec.) 1024 1024 2048 1024 2048 2048 4096 1360 2048 4096... -
Page 33: Moon P Hase C Hart
SD C ard C apacity a nd C ompatibility Due to the rapidly changing memory card market please consult www.stealthcam.net for the most up to date information regarding memory ... -
Page 34: Frequently A Sked Q Uestions ( Faqs)
FREQUENTLY A SKED Q UESTIONS Q: W hat d oes i t m ean w hen I h ave a ll 8 ’s o n m y L CD s creen? A: ... - Page 35 Q: W hat a re m y o ptions i f m y c amera i s p ast i t w arranty? A: W e h ave a n o ut o f w arranty p rogram i n w hich y ou m ay p urchase a refurbished/reconditioned ...
-
Page 36: Fcc C Ompliance
WARNING: Modification not approved by the party responsible for compliance could void user’s authority to operate. FCC C ompliance This e quipment h as b een t ested a nd f ound t o c omply w ith t he l imits for ...
Need help?
Do you have a question about the STC-U840IR and is the answer not in the manual?
Questions and answers