Table of Contents
Advertisement
INSTRUCTION MANUAL
Model #: STC-AC540IR
Toll Free 1-877-269-8490
Version 2.0
TABLE OF CONTENTS
Camera overview
Moon Phase chart
Frequently Asked Questions (FAQs)
www.stealthcam.com
Toll Free 877-269-8490
www.stealthcam.com
06/11
4
7
8
9
10
13
27
31
38
39
41
42
43
45
First, congratulations on purchasing one of the finest scouting cameras on
the market today. We appreciate your business and want to prove to you we
are committed to providing you the best product and support in the field.
By giving our customers a new state of the art web interface, which provides
you with video tutorials and instruction on how to use the product in the
TECHNICAL SUPPORT
EMAIL: stealthcam@gsmorg.com
Please allow 48hrs for response.
Stealth Cam, LLC
P.O. Box 539504
Grand Prairie, TX 75053-9504
Your Stealth Cam scouting camera is covered by a One Year Limited Warranty on parts
and labor from the date of original purchase, and purchases must be made through an
authorized dealer. The warranty covers defects in workmanship and materials. The
warranty does not apply to units, which have been damaged or abused intentionally or
unintentionally. A purchase from individuals or unauthorized Internet sites such as eBay
voids the warranty.
Tampering with or altering the unit will void the warranty. Any unauthorized service will
void warranty. A copy of your original sales receipt must be produced for any warranty
service and a Return Authorization (RA) number must be obtained from customer
service at 877-269-8490 prior to returning product.
www.stealthcam.com
Toll Free 877-269-8490
CAMERA OVERVIEW
www.stealthcam.com
3
Toll Free 877-269-8490
** IMPORTANT NOTE **
most effective way.
CUSTOMER SERVICE
CONTACT & HOURS
Toll Free: 1-877-269-8490
Call Center Hours:
Mon - Fri / 8 AM - 6 PM (CST)
www.stealthcam.com
Stealth Cam Limited Warranty
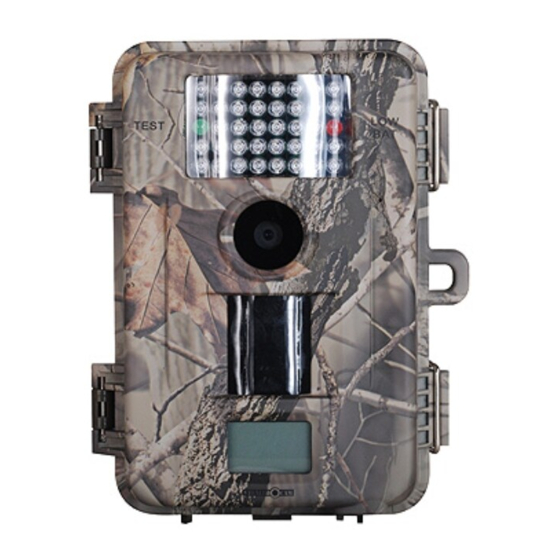
Front
2
4
Advertisement
Table of Contents

Related Manuals for Stealth Cam STC-AC540IR


Summary of Contents for Stealth Cam STC-AC540IR
-
Page 1: Table Of Contents
** IMPORTANT NOTE ** First, congratulations on purchasing one of the finest scouting cameras on the market today. We appreciate your business and want to prove to you we are committed to providing you the best product and support in the field. By giving our customers a new state of the art web interface, which provides you with video tutorials and instruction on how to use the product in the most effective way. TECHNICAL SUPPORT CUSTOMER SERVICE EMAIL: stealthcam@gsmorg.com CONTACT & HOURS Please allow 48hrs for response. Toll Free: 1‐877‐269‐8490 Stealth Cam, LLC Call Center Hours: P.O. Box 539504 Mon ‐ Fri / 8 AM – 6 PM (CST) Grand Prairie, TX 75053‐9504 www.stealthcam.com Stealth Cam Limited Warranty Your Stealth Cam scouting camera is covered by a One Year Limited Warranty on parts and labor from the date of original purchase, and purchases must be made through an authorized dealer. The warranty covers defects in workmanship and materials. The warranty does not apply to units, which have been damaged or abused intentionally or ... -
Page 2: Camera Kit Contents
Inside View Side & Bottom View www.stealthcam.com www.stealthcam.com Toll Free 877-269-8490 Toll Free 877-269-8490 CAMERA KIT CONTENT GENERAL INFORMATION Storing conditions • Model STC‐AC540IR Digital Scouting Camera • Operating Environment: 14 to 104 deg F (‐10 to 40 deg C). 20‐85% • User manual relative humidity, non‐condensing. • Strap Special care instructions!! • The camera is designed to be weather resistant. Never attempt to immerse the unit in water or any other liquid. This will damage the unit and void the warranty. •... -
Page 3: Quick Start Guide
QUICK START GUIDE BATTERY AND MEMORY INSTALLATION This guide is designed to get you up and running in a matter of moments. To get the most out of this advanced scouting tools, please read the manual thoroughly before WARNING: Do not use different Voltage lead acid battery other than operating ... -
Page 4: Setup And Programming
2 Stars (5Mp): Select this option to capture a 5.0M pixels SETUP AND PROGRAMMING image. (Low image quality) When the camera is first turned on, the internal LCD screen displays 1 Star (3Mp ‐ Default): Select this option to the camera status. The following information is present on this screen. capture a 3.0M pixels image. (Base image (POSSE MODE) ( CUSTOM – PIR MODE) (CUSTOM – TIME LAPSE MODE) quality) • Resolution for Video: Color Daytime / Black & White Nighttime VGA: 640x480 *ONLY resolution* • Time out: To set the amount of time in minutes & seconds the camera will sleep between PIR triggering. If no buttons are pressed after 30 seconds the LCD screen will power • Moon phase: Displays the moon phases. down to conserve battery life and enter 1 minute count down to enter • Temp stamp: Temperature stamp will display on still images and PIR detection mode. To re‐power the display screen, press and hold first frame only on video files. the UP or DOWN button until you see the status screen. • Definition Zoom: Digital enhancement to different zoom level. • Day and Time: Displays the date and time that you have set. 1X: Normal – the word “ZOOM” will not display. 2X: Two times zoom – the word “ZOOM” will display. • Operation mode: ... - Page 5 Setting the Camera’s Resolution in PIR operation mode: Setting the Capturing Sequence in PIR operation mode: Your Stealth Cam can be programmed to 3 different resolutions, Your Stealth Cam can be programmed to shoot 1‐9 pictures per High (3 Stars‐8Mp), Low (2 Stars–5Mp), Base (1 Star–3Mp). triggering. • • Switch the camera to the ON position. Switch the camera to the ON position. LCD screen will display the camera status screen. LCD screen will display the camera status screen. • • Press the [MENU] button once within 30 seconds to enter the Press the [MENU] button once within 30 seconds to enter the programming mode. programming mode. • • The word PIR will be blinking, press OK to confirm the camera The word PIR will be blinking, press OK to confirm the camera operation by PIR detection. operation by PIR detection. • • The word CAMERA and the STARS will be blinking. Press the [UP] button ONE time to enter the Capturing Sequence setting mode. • Press the [OK] button ONCE to choose the selection. • The word CAMERA will be blinking. • Press the [UP] or [DN] button to select the desired resolution. • • Press [OK] button and the current number of burst mode images Press [OK] to save your selection. will blink. •...
- Page 6 Setting the Time Out Mode in PIR operation mode: Setting the Time and Date in PIR operation mode: Your Stealth Cam can be programmed to set the amount of time in Your Stealth Cam uses the 24hr military time format. seconds or minutes the camera will sleep between PIR triggers. • Switch the camera to the ON position. • Switch the camera to the ON position. LCD screen will display the camera status screen. LCD screen will display the camera status screen. • Press the [MENU] button within 30 seconds to enter the • Press the [MENU] button once within 30 seconds to enter the programming mode. programming mode. • The word PIR will be blinking, press OK to confirm the camera • The word PIR will be blinking, press [OK] to confirm the camera operation by PIR detection. operation by PIR detection. • Press [DOWN] button TWO times to enter Time and Date mode. • Press [UP] button FOUR times to enter Time Out setting mode. • The word TIME will be blinking. • The word TIME OUT will be blinking. • Press [OK] to enter Minute setting first. • Press [OK] button and the SECONDS digits will be blinking. • The MINUTE digits will be blinking. • Press [UP] or [DN] button to increase or decrease the time value • Press [UP] or [DN] to increase or decrease the minute value ...
-
Page 7: Using The Camera
• Press [UP] or [DN] to increase or decrease the minute value 8AM to 8:30PM. Out of the time lapse time, said 20:30 to 08:00, the camera will sleep no matter of activity level. NO capture at all. (00 – 59). • Press [OK] to save your selection and enter Hour setting. If a user selected the Time lapse mode, and set the start time from • The HOUR digits will be blinking. 00:00 and end time at 00:00, and then selected the timeout to be •... -
Page 8: Viewing & Deleting Files
Using the camera in PIR detection mode with customized Press the [OK] button TWO times. setting. Press the [MENU] button once to exit. • Mount the camera to the tree or other sturdy object using either a tree screw (optional accessory) or supplied mounting strap. • 30 seconds after you’ve made your adjustments, the camera’s • Open the front housing and move the switch to the ON position green LED light will begin blinking and enter count down mode. and ... - Page 9 • Press the [DN] button to set the camera’s TV OUT to PAL. Viewing Video Clips on handheld LCD monitor or home • TV monitor The word “ tu – ” will now be blinking. • • Follow the cable attaching instruction listed in previous section. Press the [OK] to confirm this setting. • • You will see a series of thumbnail images on your monitor. The word “ tu ‐ “ will be blinking and then stops. • • Press the [UP] or [DN] button to choose the video clip you want to Once the blinking stops, power off the camera. Wait for 5 seconds watch. and then power up your camera again. • Press the [OK] button to play the video clip. • You may pause the video clip by pressing the [OK] button during Thumbnail Images the playback. Press [OK] button to resume playing. • You will see a series of thumbnail images on your monitor. • At the end of the video clip, press the [UP] or [DN] button to • Press the [UP] or [DN] button to navigate though your thumbnail proceed to the next video or image. If it is a video clip file, then it images. will automatically start to play. If it is still image file then it will • On the upper left hand corner of your TV monitor, it will either show the image in full screen. ...
-
Page 10: Memory Compatibility Chart
Deleting files in the field MEMORY COMPATIBILITY CHART • Switch the camera to the ON position. The following cards have been tested and approved for use with the LCD screen will display the camera status screen. STC‐AC540IR model. • Press the [MENU] button within 30 seconds to enter the programming mode. Kingmax 2G • Press the [DN] button ONCE to enter the delete mode. • Sandisk 2G, 4G, 8G, 16G You’ll see the word ‐ dEL ‐ blinking. • Toshiba 2G Press [OK] button to enter the DELETE & FORMAT menu. • Press [UP] or [DN] button to select the desired function. PNY 2G, 4G, 8G, 16G NO‐dL (No Delete) ‐ No images get deleted. Kingston 2G, 4G, 8G, 16G d‐ONE (Delete One) ‐ Only the last file will get deleted. First Champion 1G, 2G, 4G, 8G, 16G d‐ALL (Delete ALL) ‐ Deletes ALL images on the SD card. Digilux 1G, 2G Ft (Format) ‐ Deletes all files and reformats the SD card. Lexar 4G, 8G, 16G DANE‐ELEC ... -
Page 11: Image Capacity Chart
SD Card Capacity and Compatibility IMAGE CAPACITY CHART Due to the rapidly changing memory card market please consult High High Base Base www.stealthcam.com for the most up to date information regarding SD card Color B&W Color B&W Color B&W Color B&W memory cards. Based on 70MB 30MB 2.0MB 0.5MB ... -
Page 12: Fcc Compliance
WARNING: Modification not approved by the party responsible for compliance could void user’s authority to operate. FCC Compliance This equipment has been tested and found to comply with the limits for Class B digital device, pursuant to part 15 of the FCC Rules. These limits are designed to provide reasonable protection against harmful interference in a residential installation. This equipment generates uses and can radiate radio frequency energy and, if not installed and ...
Need help?
Do you have a question about the STC-AC540IR and is the answer not in the manual?
Questions and answers