Table of Contents
Advertisement
Available languages
Available languages
BUILT IN ELECTRIC FIREPLACE
CONSUMER SAFETY INFORMATION
PLEASE READ THIS MANUAL BEFORE USING THIS APPLIANCE
IF THE INFORMATION IN THIS MANUAL IS NOT FOLLOWED. AN ELECTRIC
SHOCK OR FIRE MAY RESULT CAUSING PROPERTY
DAMAGE, PERSONAL INJURY OR LOSS OF LIFE.
DO NOT STORE OR USE GASOLINE OR OTHER FLAMABLE VAPORS AND
Thank you and congratulations on your purchase of a Classic Flame fireplace.
Please read the installation instructions before installing and operating this
appliance.
IMPORTANT: Read all instructions and warnings carefully before using.
Failure to follow these instructions may result in a possible electric shock, fire hazzard
and/ or injury and will void the warranty.
For Customer Service:
E-Mail: parts@twinstarhome.com
In English Call: 866-661-1218
En Français Call: 866-374-9203
En Español Call: 866-661-1218
USER'S GUIDE
MODEL NUMBERS:
33EB304GRS
39EB364GRS
45EB424GRS
WARNING
LIQUIDS IN THE VICINITY OF THIS OR ANY
OTHER APPLIANCE.
E-1
Twin-Star International, Inc.
Delray Beach, FL 33483
Made in China
Printed in China
Advertisement
Table of Contents

Related Manuals for ClassicFlame 45EB424GRS


Summary of Contents for ClassicFlame 45EB424GRS
- Page 1 BUILT IN ELECTRIC FIREPLACE USER’S GUIDE MODEL NUMBERS: 33EB304GRS 39EB364GRS 45EB424GRS CONSUMER SAFETY INFORMATION PLEASE READ THIS MANUAL BEFORE USING THIS APPLIANCE WARNING IF THE INFORMATION IN THIS MANUAL IS NOT FOLLOWED. AN ELECTRIC SHOCK OR FIRE MAY RESULT CAUSING PROPERTY DAMAGE, PERSONAL INJURY OR LOSS OF LIFE.
-
Page 2: Section 1: Beginning
SECTION 1: BEGINNING 3) If your heater does not emit heat, verify the wall QUICK START GUIDE thermostat (not included) is set above the current 1) Prior to first use verify that the circuit breakers are room temperature. If this does not work, switch the main Power Button off for 5 minutes and try again. -
Page 3: Section 2: Preparing Fireplace For Use
SECTION 2: PREPARING FIREPLACE FOR USE Pre-Installation Diagram: Figure 1 REMOTE CONTROL MESH CURTAIN IN PLASTIC BAGS ZIP TIE If the protective clear plastic film covering the front of a smaller bag which contains a box. This the eclectic fireplace has not been removed, please box contains the remote control carefully remove it at this time. -
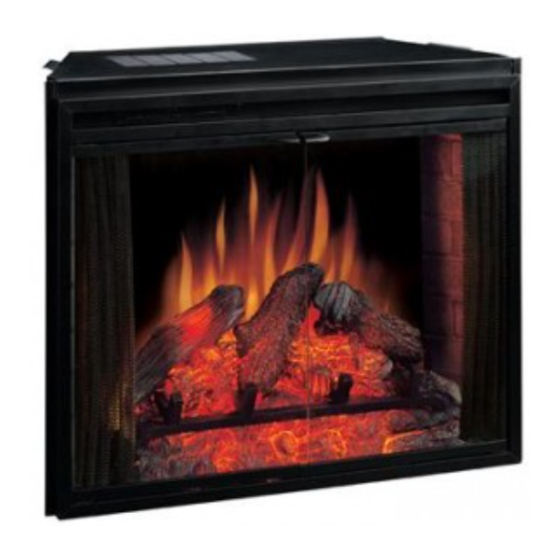
Page 4: Section 3: Product Orientation
SECTION 3: PRODUCT ORIENTATION Figure 2 LOGS AND EMBERBED CONTROL PANEL MESH CURTAINS GLASS DOORS Some of the following illustrations are shown without the glass doors and mesh curtain. This is only to help the illustrations print more clearly. -
Page 5: Section 4: Operation
SECTION 4: OPERATION CONTROL PANEL FUNCTIONS Figure 3 TO ACCESS CONTROL PANEL- Open the front glass doors, then slide the mesh curtains to the sides. Lift the hinged door that covers the control panel (figure 3). CONTROL PANEL MAIN POWER- The MAIN POWER button supplies power to all of the functions of the fireplace. -
Page 6: Section 5: Service
SECTION 5: SERVICE LIGHT BULBS Figure 6 This electric fireplace uses (4) clear120V, 40 watt, E12 socket base light bulbs (candelabra base, B bulb). The 33EB304GRS only requires (3) clear 120V, 40 watt chandelier candle type bulb. For your convenience, if a bulb burns out, it is a good idea to replace all the bulbs at the same time. -
Page 7: Section 6: Down Light
(Figure 10). DOWN LIGHT DIFFUSER There are 2 screws in the 33EB304GRS and 3 screws in the 39EB364GRS and 45EB424GRS. 4) Set the screws and the diffuser in a safe place as the diffuser needs to be reinstalled after changing the light bulb. -
Page 8: Section 7: Maintenance
SECTION 7: MAINTENANCE The motors used on the fan and the flame gen- The area around the controls should also be kept erator assembly are pre-lubricated for extended clean. Make sure the unit is turned OFF whenever bearing life and require no further lubrication. you are cleaning the heater or fireplace. -
Page 9: Two Year Limited Warranty
Avenue, Delray Beach, FL 33483, USA. Please have the original purchaser of a new professionally installed proof of purchase, catalogue/model, manufacturer’s and/or built in ClassicFlame Electric Fireplace Insert date code and serial numbers available when calling. (the “Fireplace Insert”) is free from manufacturing defects... - Page 10 ON HOW LONG AN IMPLIED WARRANTY LASTS OR IN NO EVENT WILL THE COMPANY, OR ANY OF ITS THE EXCLUSION OR LIMITATION OF INCIDENTAL OR DIRECTORS, OFFICERS OR AGENTS, BE LIABLE TO ANY CONSEQUENTIAL DAMAGES, SO THE ABOVE PURCHASER, OWNER, OR USER OF THE FIREPLACE INSERT, LIMITATIONS OR EXCLUSIONS MAY NOT APPLY TO OR TO ANY THIRD PARTY, WHETHER IN CONTRACT, IN YOU.
-
Page 11: Guide De L'utilisateur
FOYER ÉLECTRIQUE ENCASTRÉ GUIDE DE L’UTILISATEUR NUMÉRO DE MODÈLES: 33EB304GRS 39EB364GRS 45EB424GRS RENSEIGNEMENTS SUR LA SÉCURITÉ VEUILLEZ LIRE CE GUIDE AVANT D’UTILISER L’APPAREIL AVERTISSEMENT NE PAS SUIVRE LES RENSEIGNEMENTS INDIQUÉS DANS CE GUIDE POURRAIT ENTRAÎNER UN CHOC ÉLECTRIQUE, UN INCENDIE, DES BLESSURES OU LE DÉCÈS. -
Page 12: Section 1: Pour Commencer
SECTION 1: POUR COMMENCER 3) Si l’appareil de chauffage n’émet aucune chaleur, GUIDE DE DÉMARRAGE RAPIDE assurez-vous que le thermostat mural (non inclus) est fixé à une 1) Avant d’utiliser le foyer la première fois, assurez-vous que les température supérieure à la température actuelle de la pièce. disjoncteurs sont en position de fonctionnement. - Page 13 SECTION 2: PRÉPARER LE FOYER AVANT DE L’UTILISER Figure 1 TÉLÉCOMMANDE RIDEAUX DE MAILLE DANS DES SACS DE PLASTIQUE ATTACHE Si le film protecteur transparent qui recouvre l’avant 4) Du côté gauche, à l’intérieur du sac contenant les du foyer électrique n’a pas été retiré, veuillez le re- rideaux, se trouve un petit sac contenant une tirer maintenant avec précaution.
- Page 14 SECTION 3 : ORIENTATION VERS LE PRODUIT Figure 2 BÛCHES ET LIT POUR TISONS PANNEAU DE CONTRÔLE RIDEAUX DE MAILLE PORTES DE VERRE Certaines des illustrations suivantes n’incluent pas les portes de verre et le rideau de mailles. Cela ne vise qu’à favoriser une meilleure impression des illustrations.
-
Page 15: Section 4: Fonctionnement
SECTION 4: FONCTIONNEMENT FONCTIONS DU PANNEAU DE CONTRÔLE Figure 3 POUR ACCÉDER AU PANNEAU DE CONTRÔLE - Ouvrez les portes de verre à l’avant puis glissez le rideau de mailles sur les côtés. Soulevez la porte avec charnières recouvrant le panneau de contrôle (figure 3). PANNEAU DE CONTRÔLE MAIN POWER - Le commutateur principal alimente toutes les fonctions du foyer. -
Page 16: Section 5 : Entretien
SECTION 5 : ENTRETIEN AMPOULES Figure 6 Ce foyer électrique utilise (4) ampoules claires 120 volts, 40 watts de type E12 (culot de type candélabre de type B). Le foyer encastrable de modéle 33EB304GRS n’utilise que (3) ampoules claires 120 volts, 40 watts de type chandelier.Nous vous conseillons de toujours remplacer toutes les ampoules en même temps lorsque l’une d’elles brûle. - Page 17 (figure 10). Il y a 2 vis pour le modèle de foyer 33EB304GRS et 3 vis pour le modèle 39EB364GRS et 45EB424GRS. 4) Déposez les vis et le diffuseur dans un endroit sécuritaire car vous devez réinstaller le diffuseur Figure 10 après avoir remplacé...
- Page 18 SECTION 7: ENTRETIEN Les moteurs utilisés par le ventilateur et la génératrice chaleur devrait être nettoyé de façon périodique. La de flammes sont prélubrifiés pour une durée de vie zone autour des boutons de commande devrait aussi prolongée et n’exigent aucune autre lubrification. demeurer propre.
-
Page 19: Garantie Limitée De Deux Ans
Twin-Star qualifié et autorisé aux É.-U. ou au Canada, l’acheteur d’origine d’un poêle encastrable électrique et n’est pas transférable. ClassicFlame installé professionnellement et/ou intégré III. Marche à suivre pour bénéficier des services (le « Poêle Encastrable ») que celui-ci est exempt de défaut offerts par cette garantie limitée... - Page 20 SOIT DANS LE CADRE DU CONTRAT, EN CAS DE V. EXONÉRATION DES GARANTIES ET PRÉJUDICE, OU EN TOUTE AUTRE CIRCONSTANCE, LIMITATIONS DE RESPONSABILITÉ DE TOUT DOMMAGE, DÉPENSE OU PERTE DIRECTS, INDIRECTS, SPÉCIAUX, PUNITIFS, EXEMPLAIRES OU LA COMPAGNIE NE DONNE AUCUNE GARANTIE CONSÉCUTIFS DUS OU ASSOCIÉS À...
-
Page 21: Model Numbers
CHIMENEA ELÉCTRICA EMPOTRADA GUÍA DEL USUARIO MODEL NUMBERS: 33EB304GRS 39EB364GRS 45EB424GRS INFORMACIÓN DE SEGURIDAD PARA EL CONSUMIDOR. LEA ESTE MANUAL ANTES DE UTILIZAR ESTE APARATO ¡ADVERTENCIA! AL NO SEGUIR LAS INSTRUCCIONES INDICADAS EN ESTE MANUAL, PUEDE CAUSAR CHOQUES ELÉCTRICOS O UN INCENDIO, PROVOCANDO DAÑOS MATERIALES, LESIONES O UNA PÉRDIDA DE VIDA. - Page 22 SECCIÓN 1: COMIENZO 3) 3) Si el calefactor no emite calor, verifique que el termostato GUÍA DE INICIO RÁPIDO de pared (no incluido) se encuentre configurado por encima de la temperatura ambiente actual. Si esto no 1) 1) Antes de utilizar la chimenea por primera vez comprue- funciona, apague el aparato durante 5 minutos presion- be que los cortacircuitos estén encendidos.
- Page 23 SECCIÓN 2: PREPARACIÓN DE LA CHIMENEA PARA LA UTILIZACIÓN Diagrama de instalación previa: Figura 1 CONTROL A DISTANCIA CORTINAS DE MALLA DENTRO DE BOLSAS DE PLÁSTICO FIJACIÓN Si la película de protección de plástico que cubre la 4) Dentro de la bolsa de la cortina izquierda, se encuentra una bolsa más pequeña que contiene parte delantera de la chimenea eléctrica está...
-
Page 24: Sección 3: Presentación Del Producto
SECCIÓN 3: PRESENTACIÓN DEL PRODUCTO Figura 2 TRONCOS Y BRASAS PANEL DE CONTROL CORTINAS DE MALLA PUERTAS DE VIDRIO Para favorecer la claridad, algunas ilustraciones entre las siguientes, se muestran sin la presencia de las puertas de vidrio y cortinas de malla. -
Page 25: Funciones Del Panel De Control
SECCIÓN 4: FUNCIONAMIENTO FUNCIONES DEL PANEL DE CONTROL Figura 3 PARA ACCEDER AL PANEL DE CONTROL- Abra las puertas de cristal delanteras; a continuación, corra las cortinas de malla hacia los costados. Levante la puerta LIFT con bisagras que cubre el panel de control (figura 3). PANEL DE CONTROL MAIN POWER: El botón MAIN POWER suministra energía a todas las funciones de la chimenea. -
Page 26: Sección 5: Servicio De Mantenimiento
SECCIÓN 5: SERVICIO DE MANTENIMIENTO BOMBILLAS Figura 6 120V (bombilla B con base candelabro). El inserto 33EB304GRS solo requiere (3) bombillas transparentes de tipo vela de candelabro de 40 vatios y 120V. Para su comodidad, si una bombilla se quema, es conveniente reemplazar todas las bombillas al mismo tiempo. - Page 27 (Figura 10). DIRIGIDO HACIA ABAJO El modelo 33EB304GRS tiene 2 tornillos y los modelos 39EB364GRS y 45EB424GRS cuentan con 3 tornillos. 4) 4) Coloque los tornillos y el difusor en un lugar seguro, ya que se debe instalar nuevamente luego de cambiar las bombillas.
-
Page 28: Sección 7: Mantenimiento
SECCIÓN 7: MANTENIMIENTO Los motores utilizados para el ventilador y el adentro y afuera. Cuando la puerta está en generador de llamas están prelubrificados, posición abierta, debe pasar el aspirador para prolongar la vida útil y no requieren sobre la rejilla del calentador. Debe también ninguna lubrificación adicional. -
Page 29: Garantía Limitada De Dos Años
Esta garantía limitada cubre únicamente al chimenea ClassicFlame empotrado y/o instalado en comprador original del Hogar eléctrico para forma profesional (el "Hogar eléctrico para chimenea") chimenea que haya sido adquirido a través de un... - Page 30 ADVERTIDO A LOS DIRECTORES, AUTORIDADES V. RENUNCIA DE GARANTÍA Y LIMITACIÓN O AGENTES DE LA POSIBILIDAD DE TALES DE RESPONSABILIDAD PÉRDIDAS, COSTOS O DAÑOS, O SI LAS MISMAS SON PREVISIBLES. EN NINGÚN CASO NO EXISTEN OTRAS GARANTÍAS EXPLÍCITAS LA COMPAÑÍA NI NINGUNO DE SUS DIRECTORES, OFRECIDAS POR LA COMPAÑÍA QUE NO SEAN AUTORIDADES NI AGENTES SERÁN LAS GARANTÍAS LIMITADAS DESCRITAS...
Need help?
Do you have a question about the 45EB424GRS and is the answer not in the manual?
Questions and answers