Dacor DYWS4 Manual
Wine dispensing system
Hide thumbs
Also See for DYWS4:
- Installation instructions manual (12 pages) ,
- Quick start (4 pages) ,
- Planning manual (2 pages)
Table of Contents
Advertisement
Use and C are Manual
Wine Dispensing System
Model DYWS4
T a b l e o f C o n t e n t s
Important Safety Instructions ................................. 1
Setting Up Your Wine Dispensing System ............... 7
Operating Your Wine Dispensing System ............... 8
Parts and Accessories ........................................ 22
Before You Call for Service ................................. 22
Warranty and Service ....................................... 24
Warranty Card .....................................Back Cover
* WineStation is a registered trademark of Napa Technology
Part No. 107375 Rev. C
Advertisement
Table of Contents

Related Manuals for Dacor DYWS4


Summary of Contents for Dacor DYWS4
-
Page 1: Table Of Contents
Use and C are Manual Wine Dispensing System Model DYWS4 T a b l e o f C o n t e n t s Important Safety Instructions ......... 1 Getting to Know Your Wine Dispensing System ..3 Setting Up Your Wine Dispensing System ....7 Operating Your Wine Dispensing System .... - Page 2 © 2013 Dacor, all rights reserved...
-
Page 3: Important Safety Instructions
If you have any questions, other than warranty ing this or any other appliance. questions, call: Always contact Dacor Customer Service about prob- Dacor Customer Service lems or situations that you do not understand. (800) 793-0093 (U.S.A. and Canada) -
Page 4: General Safety Precautions
• Only allow individuals to use the wine dispensing the appliance. Dacor cannot be held responsible for system who are able to operate it properly. damage to property or injury to persons caused by • To avoid an electric shock hazard or other personal... -
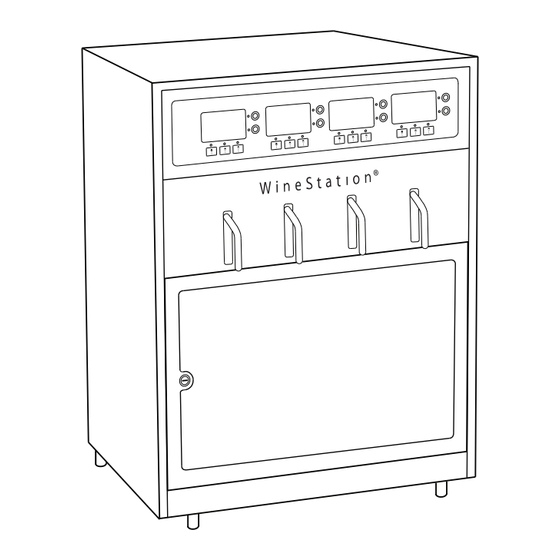
Page 5: Getting To Know Your Wine Dispensing System
Getting to Know Your Wine Dispensing System Introduction • There are three factors that affect wine preser- vation; oxidation, temperature and light. Your wine dispensing system limits the effects of these factors to provide a winery fresh taste for up to 60 days after opening the bottle. Your wine dispensing system uses argon gas, which is heavier than air. - Page 6 Getting to Know Your Wine Dispensing System System Main Power Switch (under spout cover) Switch Positions SERVICE MODE RESERVED For use by authorized service personnel only Main power Use the switch to turn the system ON and OFF and to access the main service switch menu (see page 11).
-
Page 7: Control Panel
Getting to Know Your Wine Dispensing System Control Panel DACOR 2008 Red Wine Display The display provides the system status and information for the wine bottle installed below the particular display. It can be programed with specific informa- tion about each type of wine being served (see page 12). The display is also used for programming the various system functions. - Page 8 Getting to Know Your Wine Dispensing System Dispensing Head Spout The stainless steel spout protrudes from the front of the unit when the spout cover is closed and delivers the wine to your glass when one of the pour but- tons above it is pushed.
-
Page 9: Setting Up Your Wine Dispensing System
WARNING Do not use any power supply other than the one provided with the system or a Dacor approved replacement. Do not attempt to modify or bypass the power supply. 1. If not already connected, plug one end of the plastic gas tubing (provided) into the inert gas 6. -
Page 10: Operating Your Wine Dispensing System
To avoid personal injury, use only the included gas pressure regulator or a Dacor specified replacement. 11. Make sure the regulator adjustment knob is turned all the way in the OFF direction. 12. Connect the gas supply line from the wine dispensing system to the gas connector on the regulator assembly. - Page 11 Operating Your Wine Dispensing System 6. The gasket must be fully un-tightened (collar all Attaching the Clean-Pour the way up, touching the main body) before you insert the head. Turn the collar as shown until it Dispensing Heads stops. CAUTION To avoid dropping a wine bottle when carrying it around with the dispensing head attached, always hold the bottle itself (not just the head).
-
Page 12: Basic Operation
Operating Your Wine Dispensing System Attaching the Dispensing Heads Basic Operation (cont.) NOTE: The control panel must be unlocked for the unit to operate. If the control panel is locked, see 11. Inspect the dispensing head. If more than three page 15 (Unlocking the Control Panel). - Page 13 Operating Your Wine Dispensing System 5. push the purge button (P) next to the display NOTE: Dacor recommends replacing the pickup above the bottle that has just been inserted. tube with each bottle change, but the pick-up The food grade argon will replace the air in the tube may be washed out in a mild solution of bottle, assuring preservation.
- Page 14 Operating Your Wine Dispensing System 3. push the center button below the display repeat- Changing the Individual Bottle edly to select ±1 Year, ±10 Year or No Year. When the display is set to ±10 Year, the display Settings jumps 10 years every time the up (▲) and down (▼) buttons on the right are pushed.
- Page 15 Operating Your Wine Dispensing System ◊ To leave the generic display on the screen 2. push Set VOL. (for example White Wine) push Exit. Exit 2008 ▲ Red Wine 2010 White Wine Select ▼ Wine Year Exit White Other 3. push the button for which you want to adjust the ◊ To select a specific wine type push the up pour volume (for example 1oz).
- Page 16 Operating Your Wine Dispensing System 4. push Exit. Changing Individual Bottle Settings • When you are done adjusting the bottle position (cont.) settings. Slide the power switch up to the ON position. • Lower the spout cover and close the front door. Turning Pour Detect On or Off The wine dispensing system can detect if there is a Control Panel Settings...
- Page 17 Operating Your Wine Dispensing System Locking the Control Panel Setting the System Temperature, System Fan and Temperature Scale(F/C) The control panel lock may be set from the front panel to avoid undesired operation. The system has three temperature settings, OFF, To lock the control panel: ON and MAX.
- Page 18 7. Slide the power switch up to the ON position. 8. Lower the spout cover and close the front door. Diagnostic Screen When calling Dacor with questions about your wine dispensing system, the Customer Service represen- 4. push the Units button repeatedly to switch tative may ask you to access this screen for infor- between degrees F and degrees C.
- Page 19 If you want you can change the name on the top of displays. the display from DACOR to anything you want, up to 7. Lower the spout cover and close the front door. 20 characters long (for example Our Wine Cellar).
- Page 20 Operating Your Wine Dispensing System Pre-programmed Wine Selections Red Wines Barolo Cabernet Sauvignon Mourvedre/Mataro Sangiovese Bordeaux Chianti Nebbiolo Shiraz Brunello Grenache petit Verdot Syrah Burgundy Malbec petite Sirah Tempranillo Cabernet Franc Merlot primitivo Zinfandel White Wines Chardonnay pino Blanc pinot Gris Rose Gewurztraminer Riesling...
-
Page 21: Care And Cleaning
Care and Cleaning Cleaning the Dispensing Heads Cleaning Dacor recommends cleaning the heads and pick up tubes with each bottle change. To clean the dispens- WARNING ing head follow these steps: 1. Remove the pick up tube and discard or wash it • Clean only the parts of the appliance listed in this... - Page 22 Clean stainless steel surfaces with a mild solution of detergent and warm water. Rinse and dry with a soft, lint-free cloth. You may also use Dacor Stain- less Steel Cleaner. Use it according to the directions on the package.
- Page 23 To avoid personal injury, use only the included gas blue lights below the LCD screens will be illumi- pressure regulator or a Dacor specified replacement. nated, indicating that the unit is ready for use. Replace the gas cylinder when any of the red lights 7.
- Page 24 Care and Cleaning 4. push WineStation Service next to any of the Gas Leak Test displays. If you suspect your wine dispensing system has a leak, you can run a gas leak test to make sure Bottle Service before calling for service. To test for gas leaks: WineStation Service 1.
-
Page 25: Parts And Accessories
Parts and Accessories Description Dacor Part Number Dacor Stainless Steel Cleaner A302 package of pickup tubes (package of 10) AWSpT Silicon spray, food grade (11 oz. spray can) AWSSS Bottle sizing tool AWSSZ Clean-pour dispensing head gaskets, package of 20 (8 red, 8 white, 4 green) - Page 26 Before You Call for Service Problem May Be Caused By What to Do Empty bottle message/ Wine bottle empty. Replace the wine bottle. See page 11. red light on solid in bottle pickup tube not installed. Remove bottle and dispensing head. position.
-
Page 27: Warranty And Service
1. Review the Before You Call for Service sec- tion of this manual (page 23). For warranty repairs or questions and for Dacor Dis- tinctive Service (DDS) in the US and Canada 2. Use the helpful tips found in our Problem Solu- tion Guide. -
Page 28: What Is Covered
Dacor. dential consumer use. If your Dacor product fails to function within one year of • Failure of the product caused by improper product the original date of purchase, due to a defect in material installation. - Page 29 Notes...
- Page 30 Notes...
- Page 31 NO POSTAGE NECESSARY IF MAILED IN THE UNITED STATES BUSINESS REPLY MAIL FIRST-CLASS MAIL PERMIT NO 1600 CITY OF INDUSTRY CA POSTAGE WILL BE PAID BY ADDRESSEE DACOR ATTN WARRANTY PROCESSING DEPT PO BOX 90070 CITY OF INDUSTRY CA 91715-9907...
-
Page 32: Warranty Information
Please rest assured that under no conditions will Dacor sell your name or any of the information on this form for mailing list purposes. We are very grateful that you have chosen Dacor products for your home and do not consider the sale of such information to be a proper way of expressing our gratitude! Owner’s Name:...
Need help?
Do you have a question about the DYWS4 and is the answer not in the manual?
Questions and answers