Table of Contents
Advertisement
Quick Links
User's Manual - English
Safety precautions
Follow these precautions to ensure safe installation and
mounting of your flat panel TV.
Flat Panel TV Wall Mount
1.
Be sure you have purchased the correct wall mount
With 0-15° Tilt
for your TV. Recheck the size and weight constraints.
2.
Gather all necessary tools before you begin installation.
You will need a #3 bit Phillips screwdriver, electric
drill, drill bit (included), level (integrated level on
product), stud finder, and hammer (for brick and
concrete installations).
Fits TVs 23"- 37"
3.
It is essential for the wall mount plate to be attached
Maximum Load Capacity – 66 lbs. (29.9 kg)
to wall studs. (Use a stud finder.)
4.
Use the included hardware for mounting purposes.
This hardware has been provided to ensure a safe and
secure mount.
5.
Hire a licensed electrician to relocate an electrical
outlet, if needed.
6.
Be sure to purchase wires long enough to connect
the TV to the audio and video components in your
installation.
7.
We recommend you hire a professional installer,
MAF70
if you have any concerns about installing the TV
wall mount yourself.
Thank you for choosing the RCA MAF70 Universal Flat
Panel TV Wall Mount. This mount can be used for all
Keep your sales receipt to obtain warranty parts and
major brands of 23" - 37" flat panel TVs, 66 lbs (29.9 kg) or
service and for proof of purchase. Attach it here and record
under. This wall mount features a 0-15-degree tilt for easy
the model number. This number is located on the product.
viewing. Before attempting to mount your television set,
please remove all parts from this package and read the
Model No. __________________________________________
installation instructions carefully.
Purchase Date: ______________________________________
WARNING: Use of this mount with a TV weighing
over 66 lbs. or with a screen larger than 37" could cause
Dealer/Address/Phone ________________________________
the mount to fail causing property damage and/or
personal injury.
Limited Lifetime Warranty
Audiovox Electronics Corporation (the "Company") warrants to you the
Preparing to install
original retail purchaser of this product that should it, under normal use
and conditions, be proven defective in material or workmanship during
its lifetime while you own it, such defect(s) will be repaired or replaced (at
the Company's option) without charge for parts and repair labor.
Before beginning the installation process, verify that you
To obtain repair or replacement within the terms of this Warranty, the
have all the necessary tools on hand. The following tools
product is to be delivered with proof of warranty coverage (e.g. dated bill
are required for proper installation:
of sale), specification of defect(s), transportation prepaid, to the Company
at the address shown below. Do not return this product to the Retailer.
This Warranty does not cover product purchased, serviced or used
Tools
outside the United States or Canada.
This Warranty is not transferable and does not extend to costs incurred for
#3 bit Phillips screwdriver
installation, removal or reinstallation of the product. This Warranty does
Stud finder
not apply if in the Company's opinion, the product has been damaged
through alteration, improper installation, mishandling, misuse, neglect,
Electric drill
or accident.
THE EXTENT OF THE COMPANY'S LIABILITY UNDER THIS
Drill bit (included)
WARRANTY IS LIMITED TO THE REPAIR OR REPLACEMENT
5/16" (8mm) masonry drill bit for concrete/
PROVIDED ABOVE AND, IN NO EVENT, SHALL THE COMPANY'S
LIABILITY EXCEED THE PURCHASE PRICE PAID BY PURCHASER
brick installation
FOR THE PRODUCT.
Level (integrated level on product)
This Warranty is in lieu of all other express warranties or liabilities. ANY
IMPLIED WARRANTIES, INCLUDING ANY IMPLIED WARRANTY
Hammer (for concrete installations)
OF MERCHANTABILITY OR FITNESS FOR A PARTICULAR PURPOSE
SHALL BE LIMITED TO DURATION OF THIS WARRANTY. IN NO CASE
SHALL THE COMPANY BE LIABLE FOR ANY CONSEQUENTIAL OR
Package Contents
INCIDENTAL DAMAGES WHATSOEVER. No person or representative is
authorized to assume for the Company any liability other than expressed
See Detailed Installation Instruction guide for a complete
herein in connection with the sale of this product.
list of package contents.
Some states/provinces do not allow limitations on how long an implied
warranty lasts or the exclusion or limitation of incidental or consequential
damage so the above limitations or exclusions may not apply to you. This
Warranty gives you specific legal rights and you may also have other
rights which vary from state/province to state/province.
U.S.A.: Audiovox Electronics Corporation, 150 Marcus Blvd.,
Hauppauge, New York 11788
CANADA: Audiovox Return Center, c/o Genco, 6685 Kennedy Road,
Unit 3, Door 16, Mississauga, Ontario L5T 3A5
Trademark(s) Registered, Marques Deposee, Marcas Registradas.
All other brands and product names are trademarks or registered
trademarks of their respective owners.
© 2007 Audiovox Accessories Corporation
111 Congressional Blvd., Suite 350
Carmel, IN 46032
www.rca.com
MAF70_NA_IB_01
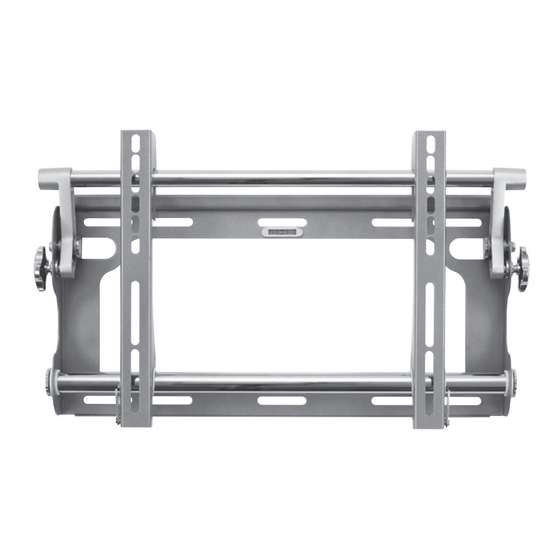
Product diagram
Attaching the TV mount plate
1.
Unplug your flat panel TV before starting this step of
the installation.
Adjustment Knobs
IMPORTANT:
may cause damage to the viewing surface.
Integrated Bubble Level
2.
Check screw size before attaching the TV mount
plate to the TV, determine which hardware to use.
Examine the back of your TV. If the back is flat, use
the M4x12mm bolts. If your TV has a recessed back,
use the longer M4x30mm bolts and 1/2" spacers.
3.
After you have determined which bolts to use, attach
the TV mount plate to the back of your TV.
NOTE:
Attaching the TV mount plate
to the wall mount plate
Padlock Hole
1.
To complete the installation, pick up the TV and
TV Mount Plate
(padlock not
place the mounting hooks (located on the back of the
TV mount plate) on the horizontal bars on the wall
included)
Wall Mount Plate
mount plate.
Security Lock Position
2.
Press down firmly to ensure proper installation.
Cord Management Hook
3.
Secure in place using the security bar.
4.
Attach padlock (not included) through security bar
hole if additional security is desired.
Operation and adjustment
Attaching wall mount plate
Your RCA Flat Panel TV Wall Mount features an adjustable
15-degree tilt for easy viewing.
Drywall Installation
1.
To adjust the tilt:
Use a stud finder to locate two wood studs where you
want to install the mount.
1.
Locate the adjustment knobs, located on both sides of
the wall mount plate.
NOTE:
It is required that the wall mount plate be
attached to wall studs.
2.
Loosen the knobs by turning it counter-clockwise.
2.
Locate a stud using a stud finder, awl or nail. Find the
3.
Adjust the tilt to the desired level and re-tighten the
center of the stud and pre-drill the mounting holes
knobs to lock the adjustment in place.
with the supplied wood bit.
3.
Place the wall mount plate against the wall, with the
cord management hook towards the bottom.
Specifications
4.
Secure the wall mount plate to the wall, using two
drywall screws, but do not completely tighten it yet.
5.
Model:
Using the integrated bubble level, carefully adjust the
wall mount plate until it is level.
Description:
6.
Insert the remaining screws and tighten all screws
completely.
Color:
TV Size Range:
Concrete/Brick Installation
Maximum Load:
1.
Place the wall mount plate against the wall with the
Minimum Profile:
cord management hook towards the bottom.
Maximum Hole Pattern:
2.
Using the integrated bubble level, mark off the position
Tilt:
of the holes that will be used for securing the mount.
Universal VESA Compatibility
3.
Place the wall mount plate aside.
Integrated Bubble Level
4.
Cord Management
Using an electric drill and a 5/16" (8mm) masonry bit,
drill holes in the marked locations.
Dimensions:
Weight:
5.
Remove any excess dust from the holes.
6.
Insert a concrete anchor into each hole. If necessary, use
a hammer to lightly tap each anchor into place so they
are flush with the wall.
7.
Once all anchors are in place, place the wall mount
plate back into position.
8.
Attach the wall mount plate, using the drywall screws
provided.
9.
Make sure all screws are tightened and secure.
NEVER lay the TV face down as this
Montage mural pour téléviseur à
écran plat inclinable de 0 à 15°
S'adapte aux téléviseurs de 23 po à 37 po
Be careful not to over-tighten the bolts.
Capacité de charge maximale – 29,9 kg (66 lb)
Merci d'avoir choisi le montage mural universel pour
téléviseur à écran plat RCA MAF70. Ce montage peut
être utilisé pour toutes les grandes marques de téléviseurs
à écran plat de 23 po à 37 po dont le poids est égal ou
inférieur à 29,9 kg (66 lb). Ce montage mural permet un
angle d'inclinaison de 0 à 15º pour faciliter le visionnement.
Avant de commencer l'installation de votre téléviseur,
veuillez sortir toutes les pièces de cet emballage et lire
attentivement les instructions d'installation.
AVERTISSEMENT : L'utilisation de ce montage avec un
téléviseur dont le poids dépasse 29,9 kg (66 lb) ou avec un
écran de plus de 37 po pourrait provoquer une défaillance
du montant et entraîner des dommages matériels ou des
blessures.
Garantie à vie limitée
Audiovox Electronics Corporation (l'Entreprise) garantit à l'acheteur au
détail d'origine que ce produit est exempt de tout défaut de matériau ou
de fabrication s'il est utilisé dans des conditions normales, pendant toute
sa durée de vie aussi longtemps que vous en êtes le propriétaire; de tels
défauts seront réparés ou l'appareil sera remplacé (à la discrétion de
l'Entreprise) sans que vous ayez à débourser des frais pour les pièces et
la main d'oeuvre.
Pour faire réparer ou remplacer dans le cadre de cette Garantie, le produit
MAF70
doit être livré avec preuve de couverture de garantie (par ex.: une facture),
Two-piece, low-profile design
la spécification du ou des défauts et le transport pré-payé, à l'adresse
de l'Entreprise indiquée ci-dessous. Ne retournez pas ce produit chez le
RCA Universal Flat Panel TV
détaillant. Cette garantie ne couvre pas un produit acheté, entretenu ou
Wall Mount
utilisé à l'extérieur des États-Unis ou du Canada.
Cette Garantie ne peut être transférée et ne couvre pas les frais
Silver
d'installation, de retrait ou de réinstallation du produit. La Garantie ne
23" – 37"
s'applique pas si, de l'avis de l'Entreprise, le produit a été endommagé
en raison d'une modification, d'une installation inadéquate, d'une
66 lbs. (29.9 kg)
manipulation inadéquate, d'une mauvaise utilisation, d'une négligence
ou d'un accident.
2.75" (6.9 cm)
LA RESPONSABILITÉ DE L'ENTREPRISE EN VERTU DE CETTE
16.9" x 12.5"
GARANTIE EST LIMITÉE À LA RÉPARATION OU AU REMPLACEMENT
INDIQUÉ CI-DESSUS ET EN AUCUN CAS, NE DOIT DÉPASSER LE
+/- 0-15°
PRIX D'ACHAT PAYÉ PAR L'ACHETEUR DU PRODUIT.
Cette Garantie remplace toute autre garantie ou responsabilité explicite.
TOUTE GARANTIE IMPLICITE, INCLUANT TOUTE GARANTIE
IMPLICITE DE QUALITÉ MARCHANDE OU D'ADAPTATION À
UN USAGE PARTICULIER EST LIMITÉE À LA DURÉE DE CETTE
GARANTIE. EN AUCUN CAS L'ENTREPRISE NE PEUT ÊTRE
24.8" W x 12.1" H x 3.4" D
RESPONSABLE POUR UN QUELCONQUE DOMMAGE CONSÉCUTIF
OU INDIRECT. Aucune personne ou aucun représentant n'est autorisé
11.44 lbs.
à assumer au nom de l'Entreprise une responsabilité autre que celle
exprimée dans la présente en rapport avec la vente de ce produit.
Certaines juridictions ne permettent pas les limitations implicites quant
à la durée d'une garantie, non plus que l'exclusion ou la limitation des
dommages indirects ou consécutifs, de sorte que les limitations ou
exclusions énoncées ci-dessus pourraient être nulles dans votre cas. Cette
Garantie vous confère des droits juridiques spécifiques qui s'ajoutent aux
autres droits éventuels qui peuvent varier d'une juridiction à l'autre.
É-U : Audiovox Electronics Corporation, 150 Marcus Blvd.,
Hauppauge, New York 11788
CANADA : Audiovox Return Center, c/o Genco, 6685 Kennedy Road,
Unit 3, Door 16, Mississauga, Ontario L5T 3A5
Marques déposées
Toutes les autres marques et noms de produits sont des marques
de commerce ou des marques de commerce déposées de leurs
propriétaires respectifs.
© 2007 Audiovox Accessories Corporation
111 Congressional Blvd., Suite 350
Carmel, IN 46032
www.rca.com
Guide de l'utilisateur- Français
Précautions de sécurité
Suivez ces précautions pour assurer une installation et
un montage sécuritaires de votre téléviseur à écran plat.
1.
Assurez-vous d'avoir acheté le montage mural qui
convient à votre téléviseur. Revérifiez les contraintes
de taille et de poids.
2.
Rassemblez tous les outils requis avant de commencer
l'installation. Vous devrez utiliser une tournevis à
tête cruciforme n° 3, une perceuse électrique, un
foret (inclus), un niveau (niveau intégré au produit),
un localisateur de montants et un marteau (pour
une installation dans de la brique et du ciment).
3.
La plaque de montage doit être fixée à des montants
muraux. (Utilisez un localisateur de montants.)
4.
Utilisez la visserie incluse pour le montage. Cette
visserie est fournie pour assurer un montage
sécuritaire.
5.
Faites appel à un électricien qualifié pour déplacer
une prise électrique, si nécessaire.
6.
Assurez-vous d'acheter des fils suffisamment longs
pour connecter le téléviseur aux composants audio
et vidéo de votre installation.
MAF70
7.
Nous vous recommandons d'engager un installa-
teur professionnel si vous hésitez à installer
vous-même le téléviseur.
Conservez votre facture comme preuve d'achat et pour
obtenir des pièces et du service sous garantie. Attachez-la
ici et prenez note du numéro de modèle. Ce numéro se
trouve sur le produit.
N° de modèle _______________________________________
Date d'achat : _______________________________________
Distributeur / Adresse / Téléphone _____________________
Préparation à l'installation
Avant de commencer le processus d'installation, vérifiez
que tous les outils requis sont à portée de main. Voici
les outils requis pour une installation correcte :
Outils
Tournevis à tête cruciforme n° 3
Localisateur de montants
Perceuse électrique
Foret (inclus)
Foret à maçonnerie de 8 mm (5/16 po) pour une
installation dans du béton ou de la brique
Niveau (intégré au produit)
Marteau (pour une installation dans du béton)
Contenu de l'emballage
Voyez le guide d'instructions d'installation détaillées pour
connaître la liste complète du contenu de l'emballage.
MAF70_NA_IB_01
Advertisement
Table of Contents

Related Manuals for RCA MAF70


Summary of Contents for RCA MAF70
- Page 1 Attach padlock (not included) through security bar vous-même le téléviseur. Thank you for choosing the RCA MAF70 Universal Flat Merci d’avoir choisi le montage mural universel pour hole if additional security is desired. Panel TV Wall Mount. This mount can be used for all téléviseur à...
- Page 2 Presiónelos firmemente para garantizar una instalación Gracias por elegir el Montaje en Pared Universal para a la instalación del montaje en pared del TV. segura. TV de Panel Plano MAF70 de RCA. Este montaje puede Enfoncez fermement pour installer correctement. utilizarse con todas las principales marcas de televisores Fije la placa de montaje Fíjelos en su posición utilizando la barra de seguridad.
Need help?
Do you have a question about the MAF70 and is the answer not in the manual?
Questions and answers