
Subscribe to Our Youtube Channel
Related Manuals for Frymaster Cooking Computer KFC-1 SMS


Summary of Contents for Frymaster Cooking Computer KFC-1 SMS
- Page 1 Frymaster, a member of the Commercial Food Equipment Service Association, recommends using CFESA Certified Technicians. 24-Hour Service Hotline 1-800-551-8633 FEB 2001 8195733...
-
Page 2: Chapter 1: Important Information
It is used on Frymaster KJ3FC, KSCF18G, and KSCFH18E open fryers and can be programmed for heat curves for any product. It is designed to operate in both full-pot and split-pot fryers. The KFC-1 SMS also has shortening management programming and an internal real time clock. -
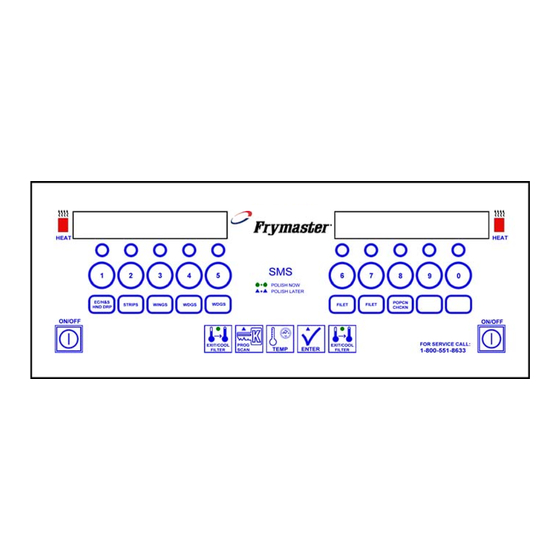
Page 3: Product Buttons
1.3 KFC-1 SMS Computer Controls KFC-1 SMS Computer Button Function On/Off Turns the fryer ON and OFF. For a full-pot fryer, press either ON/OFF switch to turn the computer on. For a split-pot fryer, press the left ON/OFF switch to operate the left pot and press the right ON/OFF switch to operate the right pot. -
Page 4: Program Scan
1.3 KFC-1 SMS Computer Controls (cont.) Button Function Program Scan Shows the remaining cook time for other active cook cycles when operating in the multiple cook cycle mode. In programming mode, this button activates programming mode, and advances through the programming steps. Enter Shows the remaining cook time. - Page 5 1.4 Morning (AM) Polishing Cycle Computer ON/OFF button to turn fryer ON. When the fryer reaches filtration setpoint, the display alternates between START and PLSH. Open drain valve. Turn pump ON. Computer displays PLSH 30:00 to polish shortening for 30 min. Computer display changes to PLSH.
- Page 6 1.4 Morning (AM) Polishing Cycle (cont.) Computer counts down. Polishing lasts 30 minutes. Press EXIT/COOL FILTER button Computer displays oil temperature and fryer heats to setpoint. Close drain valve. Pump shortening into frypot. Turn pump OFF. Cool appears in right display. Fryer displays drop when it’s at setpoint and ready to cook.
- Page 7 1.5 Afternoon (PM) Polishing Cycle Assemble filter. Sprinkle filter powder over filter paper in filter pan. At 2 p.m. an alarm sounds and computer display alternates between START and PLSH. Open drain valve. Turn pump ON. Computer displays PLSH 30:00 to polish shortening for 30 minutes. Press EXIT/COOL FILTER button on computer face to shut off alarm.
- Page 8 1.5 Afternoon (PM) Polishing Cycle (cont.) Computer counts down. Close drain valve. Press EXIT/COOL FILTER button Computer displays LOW and fryer heats to setpoint. At the end of the polishing cycle, the computer displays FILL and an alarm sounds. Press Exit/Cool Filter to shut off alarm.
- Page 9 1.6 Delaying Afternoon (PM) Polishing Cycle At 2 p.m. an alarm sounds and computer display alternates between START and PLSH. Press and hold PROG SCAN and ENTER buttons for five seconds. Press EXIT/COOL FILTER button on computer face and fryer returns to Drop mode. Display alternates between DYPL and the oil temperature.
- Page 10 1.7 Using Polish Now Feature Computer display alternates between DYPL and temperature display, indicating the polish cycle has been delayed. Assemble filter. Sprinkle 8 ounces of filter powder over filter paper in filter pan. Computer displays START and PLSH. Press EXIT/COOL FILTER button on computer face to shut off alarm.
- Page 11 1.7 Using Polish Now Feature (cont.) Open drain valve. Turn pump on. Computer displays PLSH 30:00 to polish shortening for 30 min. Computer counts down Close drain valve. Pump shortening into frypot. Watch for bubbles to form in the frypot. Turn pump off.
-
Page 12: Operating Instructions
1.7 Using Polish Now Feature (cont.) Computer displays LOW and fryer heats to setpoint. 1.8 Operating Instructions Turn the fryer ON for cooking operations. Fryer is heating. Fryer displays DROP when oil/shortening temperature is at setpoint and ready to cook. If HEAT light alternates on and off, it indicates the fryer is in the melt cycle. - Page 13 1.8 Operating Instructions (cont.) Computer displays LOW. Computer displays DROP. Drop product into frypot. The oil/shortening has reached setpoint temperature. Press the TEMP button during the cook cycle countdown to check actual cooking temperature (if desired). Pressing the TEMP button twice will display set temperature for the selected product.
- Page 14 1.8 Operating Instructions (cont.) Computer displays DONE and an alarm sounds. Cook cycle is complete. Computer displays COOL indicating oil/shortening has cooled to a standby temperature of 250 °F (121 °C). Computer display alternates between DRAIN and OPEN, indicating that drain valve is open, and the computer is locked out.
- Page 15 1.8 Operating Instructions (cont.) Press EXIT/COOL FILTER button to clear lockout and FILL message. Computer will display COOL, indicating fryer has returned to cool standby mode. Press EXIT/COOL FILTER button again to return fryer to previous setpoint temperature. To begin the filtering cycle, close drain valve. Computer will display FILL.
-
Page 16: Chapter 2: Programming Instructions
CHAPTER 2: PROGRAMMING INSTRUCTIONS 2.1 General The KFC-1 SMS Computer arrives with a default program loaded in its nonvolatile memory. Nonvolatile memory retains product-cooking instructions so this information will not be lost if there is a power surge or outage. To begin programming, ensure the computer is OFF on each side and both displays show OFF. - Page 17 2.2.1 Programming for Extra Tasty Crispy Chicken Enter Programming Mode as outlined in Section 2.2 Computer displays PRODUCT. Computer displays HEADS. Computer displays INTERVAL in the left display and PROD 1 in the right display. Computer displays COOKTIME. Press button #4 to set head count to "4". Press ENTER for next step.
- Page 18 2.2.1 Programming for Extra Tasty Crispy Chicken (cont.) Computer displays SET--TEMP. Computer displays FLEX. Computer displays INTERVAL in the left display and PROD 1 in the right display. Computer displays COOKTIME. Enter 3 4 0, in that sequence. Press ENTER to save 340 °F (171 °C) as set-- temp for interval #1.
- Page 19 2.2.1 Programming for Extra Tasty Crispy Chicken (cont.) Computer displays SET--TEMP. Computer displays FLEX. Computer displays INTERVAL in the left display and PROD 1 in the right display. Computer displays COOKTIME. Enter 3 1 0, in that sequence. Press ENTER to save 310 °F (154 °C) as set-- temp for interval #2.
- Page 20 2.2.1 Programming for Extra Tasty Crispy Chicken (cont.) Computer displays SET--TEMP. Computer displays FLEX. Computer displays INTERVAL in the left display and PROD 1 in the right display. Computer displays PREALM 1. Enter 3 3 0, in that sequence. Press ENTER to save 330 °F (166 °C) as set-- temp for interval #2.
- Page 21 2.2.1 Programming for Extra Tasty Crispy Chicken (cont.) Computer displays PREALM 2. Computer displays EX-CYCLE in the left display and SET--TEMP in the right display. Press TEMP button to toggle between SET--TEMP, COOL AND FILTER. Stop selection at FILTER. Computer displays FILTER. Enter 0 0, in that sequence.
- Page 22 2.2.1 Programming for Extra Tasty Crispy Chicken (cont.) Computer displays NUM FILT. Computer displays INTERVAL in the left display and PROD 1 in the right display. Press button #1 to select Filter Lockout mode of "1". Press ENTER to set Filter Lockout Mode of "1".
- Page 23 2.2.2 Programming for Colonel’s Crispy Strips Enter Programming Mode as outlined in Section 2.2 Computer displays PRODUCT. Computer displays HEADS. Computer displays INTERVAL in the left display and PROD 2 in the right display. Computer displays COOKTIME. Press button #2 for product. Press button #0 to set head count to "0".
- Page 24 2.2.2 Programming for Colonel’s Crispy Strips (cont.) Computer displays SET--TEMP. Computer displays FLEX. Computer displays INTERVAL in the left display and PROD 2 in the right display. Computer displays PREALM 1. Enter 3 4 0, in that sequence. Press ENTER to save 340 °F (171 °C) as set-- temp for interval #1.
- Page 25 2.2.2 Programming for Colonel’s Crispy Strips (cont.) Computer displays PREALM 2. Computer displays EX-CYCLE in the left display and SET--TEMP in the right display. Computer displays INTERVAL in the left display and PROD 2 in the right display. Press PROG SCAN button to advance to Exit Cycle program mode.
- Page 26 2.2.3 Programming for Hot Wings/Hot BBQ Wings Enter Programming Mode as outlined in Section 2.2 Computer displays PRODUCT. Computer displays HEADS. Computer displays INTERVAL in the left display and PROD 3 in the right display. Computer displays COOKTIME. Press button #3 for product. Press button #0 to set head count to "0".
- Page 27 2.2.3 Programming for Hot Wings/Hot BBQ Wings (cont.) Computer displays SET--TEMP. Computer displays FLEX. Computer displays INTERVAL in the left display and PROD 3 in the right display. Computer displays PREALM 1. Enter 3 4 0, in that sequence. Press ENTER to save 340 °F (171 °C) as set-- temp for interval #1.
- Page 28 2.2.3 Programming for Hot Wings/Hot BBQ Wings (cont.) Computer displays PREALM 2. Computer displays EX-CYCLE in the left display and SET--TEMP in the right display. Computer displays INTERVAL in the left display and PROD 3 in the right display. Press PROG SCAN button to advance to Exit Cycle program mode.
- Page 29 2.2.4 Programming for Potato Wedges Enter Programming Mode as outlined in Section 2.2 Computer displays PRODUCT. Computer displays HEADS. Computer displays INTERVAL in the left display and PROD 4 or 5 in the right display. Computer displays COOKTIME. Press button #0 to set head count to "0". Press ENTER for next step.
- Page 30 2.2.4 Programming for Potato Wedges (cont.) Computer displays SET--TEMP. Computer displays FLEX. Computer displays INTERVAL in the left display and PROD 4 or 5 in the right display. Computer displays PREALM 1. Enter 3 4 0, in that sequence. Press ENTER to save 340 °F (171 °C) as set-- temp for interval #1.
- Page 31 2.2.4 Programming for Potato Wedges (cont.) Computer displays PREALM 2. Computer displays EX-CYCLE in the left display and SET--TEMP in the right display. Computer displays INTERVAL in the left display and PROD 4 or 5 in the right display. Press PROG SCAN button to advance to Exit Cycle program mode.
- Page 32 2.2.5 Programming for Sandwiches/Filets Enter Programming Mode as outlined in Section 2.2 Computer displays PRODUCT. Computer displays HEADS. Computer displays INTERVAL in the left display and PROD 6 or 7 in the right display. Computer displays COOKTIME. Press button #0 to set head count to "0". Press ENTER for next step.
- Page 33 2.2.5 Programming for Sandwiches/Filets (cont.) Computer displays SET--TEMP. Computer displays FLEX. Computer displays INTERVAL in the left display and PROD 6 or 7 in the right display. Computer displays PREALM 1. Enter 3 4 0, in that sequence. Press ENTER to save 340 °F (171 °C) as set-- temp for interval #1.
- Page 34 2.2.5 Programming for Sandwiches/Filets (cont.) Computer displays PREALM 2. Computer displays EX-CYCLE in the left display and SET--TEMP in the right display. Computer displays INTERVAL in the left display and PROD 6 or 7 in the right display. Press PROG SCAN button to advance to Exit Cycle program mode.
- Page 35 2.2.6 Programming for Popcorn Chicken Enter Programming Mode as outlined in Section 2.2 Computer displays PRODUCT. Computer displays HEADS. Computer displays INTERVAL in the left display and PROD 8 in the right display. Computer displays COOKTIME. Press button #8 for product. Press button #0 to set head count to "0".
- Page 36 2.2.6 Programming for Popcorn Chicken (cont.) Computer displays SET--TEMP. Computer displays FLEX. Computer displays INTERVAL in the left display and PROD 8 in the right display. Computer displays PREALM 1. Enter 3 4 0, in that sequence. Press ENTER to save 340 °F (171 °C) as set-- temp for interval #1.
- Page 37 2.2.6 Programming for Popcorn Chicken (cont.) Computer displays PREALM 2. Computer displays EX-CYCLE in the left display and SET--TEMP in the right display. Computer displays INTERVAL in the left display and PROD 8 in the right display. Press PROG SCAN button to advance to Exit Cycle program mode.
-
Page 38: Chapter 3: Additional Computer Settings
CHAPTER 3: ADDITIONAL COMPUTER SETTINGS Programming for Shortening Management Listed below are procedures for initiating the Shortening Management System software and setting local time, daylight savings time and stagger between polishings. Setting Stagger Time prevents frypots in the same battery from entering a “Polish” cycle simultaneously. - Page 39 3.2 Setting Daylight Savings Time/Stagger Between Polishings Press ON/OFF button to turn computer OFF. Press PROG SCAN button to enter CODE. Enter Code #: 1 6 5 5, in that sequence. Computer displays DAYLIGHT in the left display and XXXX in the right display. Computer displays CODE in the left display and (Blank) in the right...
-
Page 40: Setting Local Time
Computer displays STAGGER in the left display and 0 MIN in the right display. Press TEMP button to toggle between 0, 15, 30 or 45 MIN. Press ENTER to lock in choice. 3.3 Setting Local Time Press ON/OFF button to turn computer OFF. Press PROG SCAN button to enter CODE. - Page 41 Computer displays SET TIME in left display and 00:00 in right display. Example: To enter 8:00 AM, enter 0 8 0 0, in that sequence. Press ENTER to set time. To enter 4:00 PM, enter 1 6 0 0, in that sequence.
- Page 42 Frymaster, L.L.C. 8700 Line Avenue, Shreveport, Louisiana USA 71106 Service Center (800) 551-8633 or (318) 865-1711 Printed in the United States of America 819-5733 English 02/01...
Need help?
Do you have a question about the Cooking Computer KFC-1 SMS and is the answer not in the manual?
Questions and answers