
Related Manuals for National Geographic 327NC


Summary of Contents for National Geographic 327NC
- Page 1 327NC Indoor Thermometer with 2 – 6 Digital Photo Frame Thermomètre intérieur avec cadre 7 – 11 photo numérique...
- Page 2 Thermometer Front: Thermometer Back:...
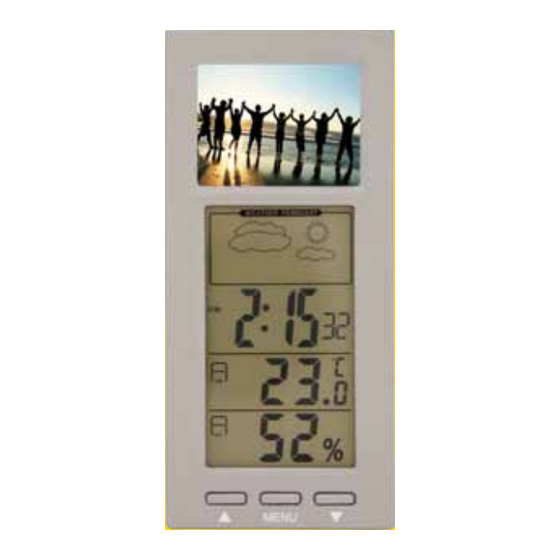
- Page 3 Indoor Thermometer with Digital Photo Frame A. 2.4” TFT LCD Panel B. Weather Forecast Icon C. Time D. Indoor Temperature E. Indoor Relative Humidity Button 2. MENU Button Button 4. SNZ Button 5. Date/Time Button 6. Alarm Button 7. Set/Day Button 8.
- Page 4 4.0 Date and Time Setup 1. Press and hold the Date/Time button until “12Hr” begins to flash. 2. Press the Set/Day button to toggle between 12Hr and 24Hr. 3. Press the Date/Time button to confirm. 4. Next the seconds will begin to flash. Press the Set/Day button to reset the seconds to zero. Press the Date/Time button to confirm. 5. The hour digits will begin to flash. Follow steps 2-3 to set the hour digits, minute digits, year, month and date. NOTE: Press the Set/Day button to display the seconds or day of the week. 5.0 Setting the Alarm Time 1. Press the Alarm button to display the alarm time.
- Page 5 8.0 Weather Forcast Icon The weather forcast icon is based on the humidity reading. 20%RH to 41%RH to 66%RH to 76%RH to 40%RH 65%RH 75%RH 90%RH 9.0 Changing the Battery NOTE: the SR44 battery is only necessary for the weather and clock functions. 1. Using a flat object, such as a screwdriver or coin, remove the battery compartment on the back of the unit by pushing outwards on the cover. 2. Replace the battery with a new SR44, with the + side facing up. 3. Replace the battery cover. 10.0 Connecting the Photo Frame to PC Support System: Windows 2000, XP, Vista NOTE: When using the Digital Photo Frame for the first time, it is recommended to charge the unit for 6-8 hours before first use. To charge the unit, plug the USB cable to your computer and then to the Digital Photo Frame.
- Page 6 10.1 Transfer Photos Using Software (JPEG and BMP Photos Supported) On the left-hand-side of the software screen, “Computer Browser”, select the folder where you store your photos. Editing Computer Browser Buttons Crop Box Photo Album Total number of photos and memory Photo Preview Once open, click on the photo you want to transfer. A preview will appear underneath...
- Page 7 10.3 Downloading Photos to Digital Photo Frame Once all the photos have been added to the “Photo Album”, click on Download to transfer the photos to the Digital Photo Frame. NOTE: Avoid unplugging the USB cable from the PC or unit while downloading the photos. If the USB cable is unplugged it may cause the unit to malfunction.
- Page 8 13.0 Deleting Photos on Digital Photo Frame You can delete one or all photos directly from the Digital Photo Frame without having to plug the unit via USB cable to the PC. 1. Press the MENU button on the unit. 2. Press the button to select “Delete”. Press the MENU button to confirm. 3. To delete one photo, select “Delete One” by using the buttons. Press the MENU button to confirm. Select “Yes” and press the MENU button to confirm. NOTE: Before deleting the one photo, make sure the photo that you want to delete is displayed on the photo screen, then press the MENU button and continue with steps 2-3 above. 4. To delete all photos, select “Delete All” and confirm. 5. Select “Cancel” to discontinue the operation. NOTE: Once a photo is deleted on the Digital Photo Frame it will also be deleted in the Photo Album on the software. 14.0 Product Specifications Weather Features Temperature Measuring Range -10°C to 50°C (14°F to 122°F) Temperature Accuracy...
- Page 9 15.0 One Year Warranty If this instrument proves to be defective in material or workmanship within one year of purchase, it will be repaired or replaced without charge upon receipt of the unit prepaid with $5.00 to cover handling, packaging and return postage to the address below. Thermor Ltd. 16975 Leslie Street Newmarket, ON L3Y 9A1 www.biosexactly.com...
- Page 10 Panneau avant du thermomètre : Panneau arrière du thermomètre :...
- Page 11 Thermomètre intérieur avec cadre photo numérique A. Écran LCD TFT numérique de 2,4 po B. Icône de la prévision météorologique C. Heure D. Température intérieure E. Humidité relative intérieure 1. Bouton 2. Bouton MENU 3. Bouton 4. Bouton SNZ (rappel d’alarme) 5. Bouton Date/Heure 6. Bouton Alarme 7.
- Page 12 4.0 Réglages de la date et de l’heure 1. Appuyez et tenez enfoncé le bouton Date/Heure [Date/Time] jusqu’à ce que le chiffre “12 H” clignote. 2. Appuyez sur le bouton Réglage/Jour [Set/Day] pour basculer entre les formats 12 H et 24 H. 3. Appuyez sur le bouton Date/Heure [Date/Time] pour confirmer. 4. Les secondes clignoteront ensuite. Appuyez sur le bouton Réglage/Jour [Set/Day] pour réinitialiser les secondes à zéro. Appuyez sur le bouton Date/Heure [Date/Time] pour confirmer.
- Page 13 8.0 Icône de la prévision météorologique L’icône de la prévision météorologique est basée sur la mesure de l’humidité. H.R. DE 20 % H.R. DE 41 % H.R. DE 66 % H.R. DE 76 % à 40 % à 65 % à 75 % à 90 % 9.0 Changement de la pile REMARQUE : La pile SR44 est nécessaire uniquement pour les fonctions météo et horloge. 1. En utilisant un objet plat comme un tournevis ou une pièce de monnaie, retirez le couvercle du compartiment de la pile derrière l’instrument en poussant le couvercle vers l’extérieur.
- Page 14 REMARQUE : Pour pouvoir ouvrir le logiciel, l’instrument doit toujours être branché au PC par le câble USB. 10.1 Transfert de photos en utilisant le logiciel (JPEG et BMP supportés) À la partie gauche de l’écran du logiciel, “Navigateur de l’ordinateur”, sélectionnez le dossier où vous mémorisez vos photos. Touches d’édition Navigateur de l’ordinateur Zone de recadrage Album de photos Nombre total de photos et mémoire Prévisualisation des photos Dès que le fichier apparaît, cliquez sur la photo que vous désirez transférer. Une prévisualisation s’affichera sous “Navigateur de l’ordinateur” dans “Prévisualisation des photos”.
- Page 15 REMARQUE : Dès que les photos ont été ajoutées à “l’album de photos” du logiciel, elles seront sauvegardées automatiquement. 10.3 Téléchargement des photos vers le cadre photo numérique Dès que les photos ont été ajoutées à “l’album de photos”, cliquez sur “Télécharger” [Download] pour transférer les photos vers le cadre photo numérique. REMARQUE : Évitez de débrancher le câble USB du PC ou de l’instrument lors du téléchargement des photos. Si le câble USB est débranché, l’instrument pourrait ne pas fonctionner adéquatement.
- Page 16 12.0 Arrêt automatique 1. Appuyez sur le bouton MENU de l’instrument. 2. Appuyez sur le bouton pour sélectionner “Arrêt automatique” [Auto OFF]. Appuyez sur le bouton MENU pour confirmer. 3. Pour désactiver la fonction arrêt automatique, sélectionnez “Arrêt” [Off] en utilisant les boutons . Appuyez sur le bouton MENU pour confirmer. 4. Pour activer la fonction arrêt automatique, sélectionnez “En marche”[On] et confirmer. L’arrêt automatique peut être réglé entre 1 et 30 minutes. 5. Sélectionnez “Annuler” [Cancel] pour abandonner l’opération. 13.0 Supprimer les photos du cadre photo numérique Vous pouvez supprimer une ou plusieurs photos directement du cadre photo numérique sans avoir à brancher l’instrument à l’aide du câble USB au PC. 1. Appuyez sur le bouton MENU de l’instrument.
- Page 17 Call your cable or satellite provider for availability. Visit our website: www.nationalgeographic.com © 2011 National Geographic Society NATIONAL GEOGRAPHIC et Yellow Border Design sont des marques de commerce de National Geographic Society. Tous droits réservés. Branchez-vous sur le canal National Geographic.
Need help?
Do you have a question about the 327NC and is the answer not in the manual?
Questions and answers