Advertisement
Table of Contents
- 1 Table of Contents
- 2 Important Safety Instructions
- 3 Accessories
- 4 Location of Parts and Controls
- 5 Operation
- 6 Scanning
- 7 Image Playback
- 8 Deleting an Image
- 9 Printing Photos
- 10 Transferring Scanned Images to a PC
- 11 Cleaning the Scanner
- 12 Troubleshooting
- 13 Specifications
- 14 Warranty
- Download this manual
Advertisement
Table of Contents

Related Manuals for Brookstone Instant Slide & Negative


Summary of Contents for Brookstone Instant Slide & Negative
- Page 1 iCONVERT ® Instant Slide & Negative Scanner CONVERT SLIDES & NEGATIVES TO DIGITAL FILES— NO COMPUTER NEEDED...
-
Page 2: Table Of Contents
Table of conTenTs Cautions, Warnings and FCC Information . . . . . . . . . . . . . . . . . . . . . . . . . . . . . . . . . . . . 2 Accessories . -
Page 3: Important Safety Instructions
caUTIon • TO REDUCE THE RISK OF ELECTRIC SHOCK, DO NOT REMOVE COVER . THERE ARE NO SERVICEABLE PARTS INSIDE . • TO REDUCE THE RISK OF FIRE OR ELECTRIC SHOCK, DO NOT EXPOSE THIS UNIT TO RAIN OR MOISTURE . The lightning flash with arrow-head symbol within an equilateral triangle is intended to alert the user to the presence of uninsulated “dangerous voltage”... - Page 4 WaRnInG Close supervision is necessary when this appliance/product is used by or near children or mentally disabled individuals . 2 . Use this unit only for its intended use as described in this manual . 3 . Unplug this unit during lightning storms or when unused for long periods of time . 4 .
- Page 5 WaRnInG Do not try to disassemble the unit . 2 . Changes or modifications to this unit could void the warranty . 3 . Do not place the unit near heat sources such as radiators and heating vents . 4 . Do not store the unit in extreme temperatures . 5 .
- Page 6 fcc InfoRMaTIon FEDERAL COMMUNICATIONS COMMISSION (FCC) This device has been tested and found to comply with the limits for a Class B Digital Device, pursuant to Part 15 of the FCC Rules . Operation is subject to the following two conditions: •...
-
Page 7: Accessories
accessoRIes Cleaning Brush Negative Tray Power Adapter (5V/1 . 0 A) Slide Tray Mini USB Cable... -
Page 8: Location Of Parts And Controls
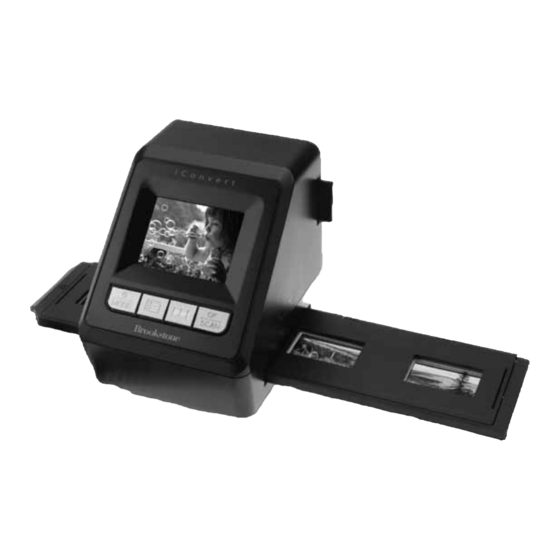
locaTIon of PaRTs anD conTRols LCD Screen Power/Mode Button Menu Button Next Button 5 . OK/SCAN Button 6 . SD/MMC Card Slot Negative/Slide Tray Slot 8 . Mini USB Port Front 9 . DC-IN 5V Jack 10 . Power Adapter (not shown) Back... - Page 9 locaTIon of PaRTs anD conTRols Negative Tray Hinge 2 . Slide Tray Hinge 3 . Negative Tray Open Tab 4 . Slide Tray Open Tab Negative Tray Slide Tray...
-
Page 10: Operation
oPeRaTIon GETTING STARTED 1 . Connect one end of the supplied power adapter (DC 5V) to the scanner and the other end to an electrical outlet (see example below) . Power Power adaptor Adapter 2 . Press and the power turns on . 3 . - Page 11 PLACING THE NEGATIVES AND SLIDES IN THE TRAYS 1 . Open the trays by pulling the OPEN tab . 2 . Place the negative or slide films with the shiny side facing up . Follow the illustrations below to place the negative or slide film . 3 .
- Page 12 LOADING SLIDE AND NEGATIVE TRAYS 1 . Insert the tray through the FILM HOLDER SLOT with the arrow mark facing up and toward the slot in the direction from RIGHT to LEFT . 2 . Gently push the tray into the unit until the photo you wish to scan is showing on the screen .
-
Page 13: Scanning
scannInG SCANNER SETTINGS Film Type 1 . In the Scan mode, press to bring up Exposure the Setting Menu . Flip 2 . Repeatedly press to select the option, Language then press oK/scan to confirm . Menu Description Select the type of film that is placed in the film holder . Film Type Options: Auto, Slide ( ), Color Negative (... - Page 14 BEGIN TO SCAN 1 . Insert a memory card . 2 . Press to switch to the Scan mode if the scanner is in the Photo Playback mode . 00105 1 . Film type: Slide Films ( Negative Films ( Black and White Films Exposure Value 3 .
- Page 15 4 . Press to select Flip if it is necessary to rotate the image, then press oK/scan to enter . Film Type Exposure Flip Language 5 . Select a flip option, then press oK/scan to confirm . Normal Vertical Horizontal Hor and Ver 6 .
-
Page 16: Image Playback
IMaGe PlaYbacK 1 . Press to switch to the Photo Playback mode if the scanner is in the Scan mode . 100-0006 Image Playback mode 2 . Number of Folder/Scan Note: The icon shows on the screen when the scanner is in the Image Playback mode. -
Page 17: Deleting An Image
ROTATING AN IMAGE to select Rotate, then press oK/scan . 1 . Press Rotate Delete Print to select an angle, then press oK/scan to confirm and exit . 2 . Press DELETING AN IMAGE to select Delete, then press oK/scan . 1 . -
Page 18: Printing Photos
to select a delete option, then press oK/scan to confirm and exit . 2 . Press PRInTInG PhoTos to select Print from the Playback menu, then press oK/scan . 1 . Press 2 . Connect to a PictBridge-compatible printer using the mini USB cable when the “Please connect the device”... - Page 19 Press to select the photo you wish to print when the message “Press OK to print” appears on the screen . 3 . Press oK/scan again to print . Note: 1. Do not connect the USB cable before the “Please connect the device” message appears;...
-
Page 20: Transferring Scanned Images To A Pc
TRansfeRRInG scanneD IMaGes To a Pc IMPORTANT: Please turn the power to off before connecting to a PC. 1 . Insert the SD/MMC memory card into the memory card slot of the scanner, connect the mini USB connector to the scanner, the other end to the PC’s USB port, and the Power Adapter to an electrical outlet (see below) . - Page 21 4 . Select AutoPlay that corresponds to the SD/MMC card, and then click the Open folder to view files to access the DCIM folder in the scanner (see right) . 5 . You may transfer the scanned images stored on the SD/MMC card to your PC using the drag-and-drop method .
-
Page 22: Cleaning The Scanner
cleanInG The scanneR To get high image quality and good recognition results, occasionally clean the unit before scanning films . Ensure the cleaning brush is clean prior to use . Store the cleaning brush in a safe place to protect it from dust and damage . Left side DO NOT insert the cleaning brush into the slot at the left side of the scanner . -
Page 23: Troubleshooting
TRoUbleshooTInG ISSUE SOLUTION Does not detect the Manually select the film type (see page 12) . film type automatically . Ensure the slide or negative film is clean Image quality of and dust-free before scanning . the scan is poor . My computer does not Ensure the USB cable is firmly plugged recognize the scanner . -
Page 24: Specifications
sPecIfIcaTIons Image Sensor . . . . . . . . . . . . . . . . . . . . . . . . . . . . . . . 1/2 . 5 -inch 5 megapixels CMOS sensor Lens . - Page 25 sPecIfIcaTIons (CONTINUED) Power Source . . . . . . . . . . . . . . . . . . . . . . . . . . . . . . . AC 100-240V 60Hz; DC 5V/1 .
-
Page 26: Warranty
(“Warranty Period”) . If a defect arises and a valid claim is received within the Warranty Period, at its option, Brookstone will either 1) repair the defect at no charge, using new or refurbished replacement parts, or 2) replace the product with a new product that is at least functionally equivalent to the original product, or 3) provide a store credit in the amount of the purchase price of the original product . - Page 27 Brookstone, in so far as permitted by law, provides these products “as is . ” This warranty does not apply to: a) damage caused by failure to follow instructions relating to product’s use or the installation of components; b) damage caused by accident, abuse, misuse, fire, floods, earthquake or other external causes;...
- Page 28 Merrimack, New Hampshire USA 03054 • 800-846-3000 • www.Brookstone.com 649236...
Need help?
Do you have a question about the Instant Slide & Negative and is the answer not in the manual?
Questions and answers
Bought new memory, trying to scan an it says memory card full