Table of Contents
Advertisement
Quick Links
TIDE 3.0
Model FS80960
Model FS80961
Model FS80962
FEATURES:
• Tide data for 75 beaches worldwide
• 180 minute offset
• Displays present and future tide
data
• 9 programmable favorite locations
• Optional big time with shark fin
animation
• 100 meters H20
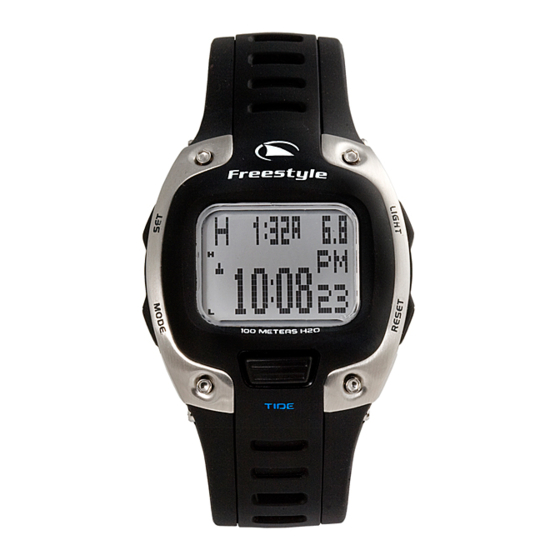
CONTROL BUTTONS
S1: Start Button
S2: Stop/Reset Button
S3: Mode Button
S4: Set Button
S5: Light Button
S4
S3
S1
DISPLAY MODE
The watch has six display modes:
NORMAL TIME, TIDE, CHRONO,
TIMER, HEAT TIMER and ALARM.
To change from one display mode to
another, press S3 button once
NOTE: In any setting mode, if there is
no manipulation for about 120
seconds, the watch will automatically
exit the setting procedure.
TO SET THE TIME AND
CALENDAR
1. Press S3 button to select NORMAL
TIME mode.
2. Press and hold S4 button for two
seconds until the ìSETî message
appears and the Time Zone blinks
on the display.
3. Press S1 button or S2 button to
toggle between Time Zone 1 and
Time Zone 2.
4. Press S3 button once, the Hour
digits (including AM/PM for 12-hour
format) will blink.
5. Press S1 button to increase the
digits by one unit, or press S2 button
to decrease the digits by one unit.
Holding down either button will
speed up the process.
6. Press S3 button once, the Minute
TRIM
digits will blink.
selected, only date/time and tide/time
formats will be available in NORMAL
7. Press S1 button or S2 button to set
the Minute digits.
TIME mode; if ON is selected, the Big
8. Press S3 button once, the Second
Time display format shall also be
digits will blink.9.
Press either
available in NORMAL TIME mode
S1 button or S2 button to set the
Second digits to zero.
NOTE: The Time Format and Date
10.Press S3 button once, the Month
Format settings apply only to the
selected Time Zone; while the settings
digits will blink.
11.Press S1 button or S2 button to set
of Day Language, Hourly Chime,
Button Beep, Big Time Option and Tide
the Month digits.
12.Press S3 button once, the Date
Height unit apply to both Time Zones.
digits will blink.
13.Press S1 button or S2 button to set
the Date digits.
DIFFERENT DISPLAY FORMATS
14.Press S3 button once, the Year digits
IN NORMAL TIME MODE
will blink.
There are three display formats in each
15.Press S1 button or S2 button to set
Time Zone in NORMAL TIME mode:
the Year digits.
date/time, tide/time and big time.
16.Press S3 button once, the Time
Format will blink.
To change from one Time Zone to
17.Press S1 button or S2 button to
another, press S2 button once.
toggle between 12-hour and 24-
hour Time Format.
To change from one display format to
18.Press S3 button once, the Date
another, press S1 button once.
Format will blink.
19.Press S1 button or S2 button to
In date/time display format,
cycle among MM-DD-YY (month-
the primary time day and date are
date-year), DD-MM-YY (date-
shown in the top of the display; the
month-year) and YY-MM-DD (year-
time in hours, minutes and seconds
month-date) to set the Date Format.
is shown in the bottom of the display.
20.Press S3 button once, the Day (of
The data is shown in the Date and Time
the week) Language will blink.
Formats of the displayed Time Zone,
21.Press S1 button or S2 button to
which are set in this mode along with
cycle among English, French,
the date and time.
Portuguese and Spanish to set the
Day Language.
If there is previous and upcoming tide
S5
22.Press S3 button once, the Hourly
data, the left-hand part of the display
Chime status will blink.
shows the tide status for the currently
23.Press S1 button or S2 button to
selected tide location. Otherwise, no
toggle between ON and OFF of
graphic is displayed.
Hourly Chime.
S2
24.Press S3 button once, the Button
In tide/time display format,
Beep status will blink.
the display is identical to the date/time
25.Press S1 button or S2 button to
format except that the next tide (high
toggle between ON and OFF of
or low) for the currently selected tide
Button Beep.
location, the time of the next tide, and
its height are shown in place of the
26.Press S3 button once, the Big Time
Option status will blink.
day and the date. The tide time is
shown in the same format as the
27.Press S1 button or S2 button to
toggle between ON and OFF of Big
primary time. The Tide Height is shown
Time Option.
in the current Tide Height unit
selected.
28.Press S3 button once, the Tide
Height unit will blink.
If no previous or upcoming tide data
29.Press S1 button or S2 button to
toggle between feet and meters for
is available, this format shall be
unavailable and the format shall revert
Tide Height unit.
30.After finished making all the
to date/time.
settings, press S4 button to confirm
In big time display format,
the settings.
only the hours and minutes of the
primary time are shown, no AM/PM
NOTE: The date is displayed in the
indication.
current Date Format, but the setting
A shark fin animation shall occur once
sequence shall always be month, date,
per minutes. For even minutes, the fin
and then year, regardless of the Date
shall move from left to right one dot
Format chosen.
column at a time, and for odd minutes,
the fin shall move from right to left.
NOTE: The available days of the month
The big time display format is included
shall be determined by the month
only if the Big Time Option is on.
setting. If February is set, the available
days of the month shall be 1 to 29. If
February 29 is set for a year that is not
NOTE: The current tide level and
a leap year, the date shall be corrected
direction (rising or falling) shall be
to February 28 upon exit from the
presented by a tide status graphic,
setting procedure.
which is represented by an arrow head
two dots high and three dots wide. The
steps shall appear as follows:
NOTE: For Big Time Option, if OFF is
.
NOTE: If no previous or upcoming tide
data is available, the sentence "NO
TIDE DATA FOR DATE" will be
displayed.
NOTE: The date, time and tide height
unit will be displayed in the formats
of the primary time set in NORMAL
TIME mode.
NOTE: If the displayed time represents
DST (daylight savings time), which
means that the time was adjusted from
the stored tide data, the DST flag will
appear.
NOTE: Scanning shall stop
automatically if the last date for which
there is tide data is reached.
For setting tide location,
1. Press S3 button to select TIDE
mode. The favorite number and the
name of current tide location will
appear.
2. Press S4 button, the "SET" message
appears and the FAV (favorite)
number blinks on the display. The
default favorite number is the one
In displays 1 through 10, the tide is
for the current location.
rising; while in display s 11 through
3. Press S1 button or S2 button to
20, the tide is falling. When the time
move forward or backward
of day advances to the minute after
respectively the favorite number
the time of high tide, display 11 is
and therefore the corresponding
shown; when the time of day advances
location name to be selected.
to the minute after the time of low tide,
4. Press S3 button, the geographical
the sequence repeats beginning with
REGION will blink.
display 1.
5. Press S1 button or S2 button to
move forward or backward
respectively the REGION to be
TO USE TIDE DATA
selected.
For displaying tide information of
6. Press S3 button, the geographical
current time and location,
LOCATION will blink.
1. Press S3 button to select TIDE
7. Press S1 button or S2 button to
mode. The favorite number and the
move forward or backward
name of current tide location will
respectively the LOCATION to be
appear.
selected.
2. After two seconds, the next
8. Press S3 button, the DST (daylight
upcoming tide (high or low), base
savings time) status will blink.
on the primary time, for the current
9. Press S1 button or S2 button to
tide location will be displayed. The
move forward or backward
date will be displayed in the top line,
respectively the DST status to be
the next tide will be displayed in the
selected. If AUTO is selected, the
middle line followed by the time of
watch shall determine when the
that tide (with a superscript A/P
location is on DST; if OFF or ON is
representing AM/PM in 12-hour
selected, the DST status is forced
to the selected status all the time.
format), and the height of the next
tide will be displayed in the bottom
Please note that the current DST
line (including minus sign if
status is shown with the DST flag.
necessary).
10.Press S3 button, the time offset (in
3. Press S1 or S2 button to display the
the unit of minutes) to the tide data
previous and next tide respectively.
for the selected location will blink.
4. Press and hold S1 button or S2
11.Press S1 button or S2 button to
button until the "SCAN" message
increase or decrease respectively
appears to initiate date scanning in
the time offset. The offset has no
the forward or backward direction
impact on the DST status.
respectively.
12.If 0 is selected for the offset, the
5. Release either button when the
above step is the end of the setting
desired date is displayed.
sequence. Otherwise, the sequence
6. After abandoning the date scanning
continues with the setting of 16-
procedure, while the "SCAN"
character custom location name,
message is still displayed, press S1
in which pressing S1 button or S2
button or S2 button to move forward
button can cycle forward or
backward respectively the
or backward respectively the
displayed date by one day. Press
characters to be selected, and
and hold the corresponding buttons
pressing S3 button can proceed to
to re-initiate date scanning.
the next character to be set.
13.After finished making all the
settings, press S4 button to confirm
the settings.
TO USE THE CHRONOGRAPH
For the measurement of elapsed time,
1. Press S3 button to select
CHRONOGRAPH mode.
2. Press S1 button to start counting.
3. To stop counting, press S2 button.
Press S1 button to resume from
where it left off.
4. To reset to zero, press S2 button
once to stop counting and then
press S2 button again.
NOTE: For the first hour, the CHRONO
time is displayed in the MM.SS hh
(minutes.second hundredths) format.
After one hour, the CHRONO time is
displayed in HH:MM SS
(hours:minutes.seconds) format.
NOTE: The CHRONO can count up to
a maximum time of 99:59.59
(99hours:59minutes.59seconds).
TO SET THE TIMER
1. Press S3 button to select TIMER
mode.
2. Press S4 button, the "SET" message
appears and the Hour digits blink
on the display.
3. Press S1 button to increase the
digits by one unit, or press S2 button
to decrease the digits by one unit.
Holding down either button will
speed up the process.
4. Press S3 button once, the Minute
digits will blink on the display.
5. Press S1 button or S2 button to set
the Minute digits.
6. Press S3 button once, the Second
digits will blink on the display.
7. Press S1 button or S2 button to set
the Second digits.
8. Press S3 button once, the action to
be taken at the end of a countdown
will blink.
9. Press S1 button or S2 button to
toggle between STOP and REPEAT.
If STOP is selected, the TIMER
stops; if REPEAT is selected, the
TIMER repasts its countdown
indefinitely.
10.After finished making all the
settings, press S4 button to confirm
the settings.
NOTE: The TIMER can count up to a
maximum time of 23:59.99
(23hours:59minutes.59seconds).
TO USE THE TIMER
1. Press S3 button to select TIMER
mode.
2. Press S1 button to start a
countdown.
3. To stop counting, press S2 button
once. Press S1 button to resume
from where it left off.
4. To reset the TIMER, press S2 button
once to stop counting and then
press S2 button again.
5. Upon completion of a countdown,
if STOP is selected as the action to
be taken, the TIMER stops at zero
Advertisement
Table of Contents

Related Manuals for Freestyle FS80960


Summary of Contents for Freestyle FS80960
- Page 1 TIDE 3.0 11.Press S1 button or S2 button to set the Month digits. 12.Press S3 button once, the Date Model FS80960 digits will blink. Model FS80961 13.Press S1 button or S2 button to set the Date digits.
- Page 2 3) A Check, Money Order payable to Freestyle USA in the amount 2. Make sure your crown is returned Accidental breakage or damage of $8.50 for processing and to the original position before you due to normal wear or misuse of handling.
- Page 3 WEST CST USA Huntingt Huntington Beach, CA Trestles Trestles, San Clemente, California Oceansd Oceanside, California La Jolla La Jolla, California Humboldt Bay, CA Humboldt Bay, California Ocean B. Ocean Beach, outer coast Mvricks Mavericks, California St. Cruz Santa Cruz, California Morro B.
Need help?
Do you have a question about the FS80960 and is the answer not in the manual?
Questions and answers