Table of Contents
Advertisement
Advertisement
Table of Contents

Related Manuals for Simaudio MOON i-1


Summary of Contents for Simaudio MOON i-1
- Page 1 Owner’s Manual MOON Integrated Amplifier...
-
Page 2: Important Safety Instructions
MOON i-1 Integrated Amplifier Important Safety Instructions Read these instructions. Keep these instructions. Heed all warnings. Follow all instructions. Do not use this apparatus near water. Clean only with a dry cloth. Do not block ventilation openings. Install in accordance with the manufacturer’s instructions. - Page 3 To prevent shock hazard, all three connections must ALWAYS be used. Connect the MOON i-1 only to an AC source of the proper voltage; Both the shipping box and rear panel serial number label will indicate the correct voltage. Use of any other voltage will likely damage the unit and void the warranty AC extension cords are NOT recommended for use with this product.
-
Page 4: Table Of Contents
MOON i-1 Integrated Amplifier Table of Contents Congratulations ..........5 Unpacking and Warnings ........5 Introduction ............ 6 Installation & Placement ........6 Front Panel Controls ......... 7 Rear Panel Connections ........8 SimLink™ ............9 Operating the i-1 ..........9 Remote Control Operation ........10... -
Page 5: Congratulations
Before setting up your new MOON i-1, we encourage you to please read this manual thoroughly to properly acquaint yourself with its features. We hope you enjoy listening to the MOON i-1 integrated amplifier as much as the pride we have taken in creating this fine audio product. -
Page 6: Introduction
Installation & Placement The MOON i-1 requires reasonable ventilation to maintain an optimum and consistent operating temperature. As a result, it should be placed in a location with empty space around it for proper heat dissipation. As well, it should be placed on a solid level surface. -
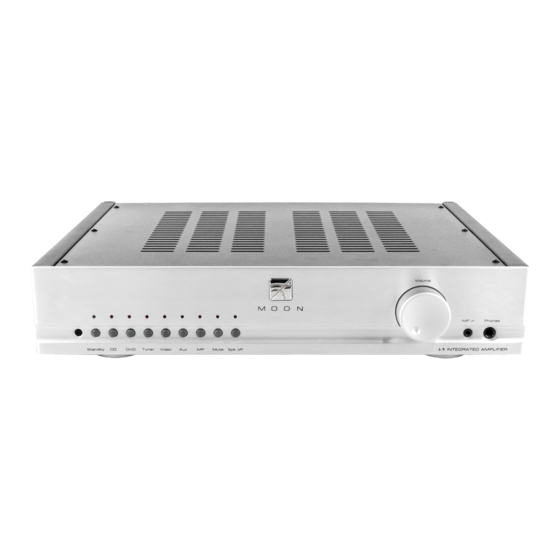
Page 7: Front Panel Controls
The MOON i-1 integrated amplifier has six (6) inputs labeled CD, DVD, Tuner, Video, Aux, and MP. Each of the first five (5) inputs has a corresponding pair of input connections located on the unit’s rear panel (refer to the section entitled “Rear Panel Connections”... -
Page 8: Rear Panel Connections
RCA inputs in the event that you wish to use your MOON i-1 as a preamplifier only. The output level on the ‘PRE OUT’ is variable and is adjusted by the i-1’s volume control. -
Page 9: Simlink
Ensure that the AC wall outlet you use has a functioning ground. For the best sonic performance, it is preferable that you plug your MOON i-1 directly into a dedicated AC outlet and avoid using an extension cord. In order to obtain the maximum performance from your audio system, we strongly recommend that the detachable power cord not come into physical contact with any of the interconnect and speaker cables running to and from your i-1. -
Page 10: Remote Control Operation
To engage the ‘CRM-2’ remote for use with the MOON i-1 Integrated Amplifier, you must first press the button labeled AMP. -
Page 11: Specifications
Dimensions (W x H x D, inches) ......16.88 x 3.50 x 14.75 NOTE: In the event that you require the RS-232 codes for your MOON I-1, please contact Simaudio Ltd. directly by either email (service@simaudio.com) or by toll-free telephone (877-980-2400).
Need help?
Do you have a question about the MOON i-1 and is the answer not in the manual?
Questions and answers