Table of Contents
Advertisement
Advertisement
Table of Contents

Related Manuals for Simaudio MOON i 3.3


Summary of Contents for Simaudio MOON i 3.3
- Page 1 Owner’s Manual MOON i 3.3 Integrated Amplifier...
-
Page 2: Important Safety Instructions
MOON i 3.3 Integrated Amplifier Important Safety Instructions Read these instructions. Keep these instructions. Heed all warnings. Follow all instructions. Do not use this apparatus near water. Clean only with a dry cloth. Do not block ventilation openings. Install in accordance with the manufacturer’s instructions. Do not install near any heat sources such as radiators, heat registers, stoves or another apparatus that produces heat. - Page 3 European Community Please read all instructions and precautions carefully and completely before operating your Simaudio MOON i 3.3 Integrated Amplifier. ALWAYS disconnect your entire system from the AC mains before connecting or disconnecting any cables, or when cleaning any component.
-
Page 4: Table Of Contents
Front Panel Controls ......... 7 Optional Digital Inputs ........8 Optional Phono Section ........9 Optional Balanced Input ........11 Rear Panel Connections ........11 SimLink™ ............13 Operating the i 3.3 ..........13 Remote Control Operation ........14 Specifications ..........15 www.simaudio.com Revision no.: 20101001 ____________________________________________________________________________________... -
Page 5: Congratulations
MOON i 3.3 integrated amplifier from potential damage that may occur during shipping. Please write the serial number of your new Simaudio MOON i 3.3 in the space provided below for future reference. Serial No.: ________________... -
Page 6: Introduction
MOON i 3.3 Integrated Amplifier Introduction Your MOON i 3.3 integrated amplifier incorporates many significant design features to achieve its “world class” level of performance. This is an abbreviated list of the more important features: An oversized power supply using a custom toroidal transformer design Rated output of 100 watts/channel into 8 ohms and 200 watts/channel into 4 ohms Five line-level inputs including one front-mounted 1/8”... -
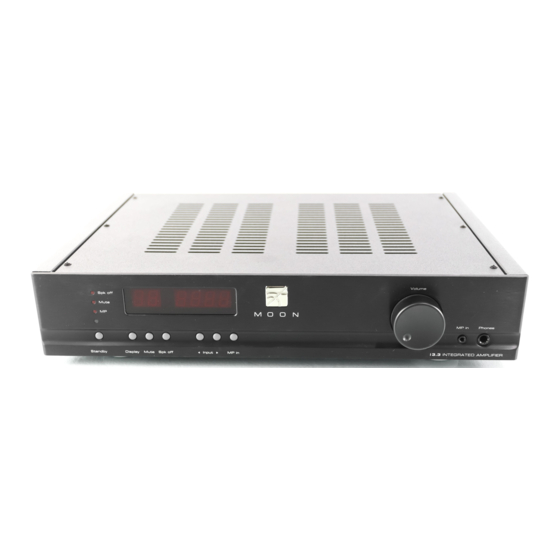
Page 7: Front Panel Controls
MOON i 3.3 Integrated Amplifier Front Panel Controls Figure 1: MOON i 3.3 Front panel The front panel will look similar to Figure 1 (above). The large display window indicates the selected input source. In the event that your i 3.3 includes the digital input option, additional information will appear in the display window. Refer to the section entitled “Optional Digital Inputs”... -
Page 8: Optional Digital Inputs
MOON i 3.3 Integrated Amplifier Front Panel Controls (Cont’d) The “A2” input can be configured as a ‘pass-through’ which bypasses the i 3.3’s gain control section, allowing you to control the gain setting via the connected source component’s own volume control – a home theater processor for example; In other words, this input operates like the input of a power amplifier. -
Page 9: Optional Phono Section
Optional Phono Section The MOON i 3.3 Integrated Amplifier features an optional phono section that may be installed only at an authorized dealer or at the Simaudio factory. Circuit Board Layout: Figure 3: MOON i 3.3 Optional Phono Section Circuit Board Layout... -
Page 10: Internal Settings
MOON i 3.3 Integrated Amplifier Optional Phono Section (Cont’d) Internal Settings There are three (3) types of settings available on the optional phono section of the MOON i 3.3 Preamplifier; Capacitance loading, Resistance loading, and Gain level. Each setting is adjustable through the use of jumpers. For each type of setting, there are 2 banks of jumpers –... -
Page 11: Optional Balanced Input
MOON i 3.3 Integrated Amplifier Optional Balanced Input The balanced input option provides for one additional line-level input on an XLR connector. The “B1” input uses a fully balanced differential circuit and is intended for use with a source component that outputs a fully balanced differential signal. The MOON i 3.3 optional balanced input takes full advantage of the benefits of balanced circuitry: When using an unbalanced interconnect, the audio signal runs through both the center wire and the shield/ground wire. - Page 12 MOON i 3.3 Integrated Amplifier Rear Panel Connections (cont’d) In the event that your MOON i 3.3 is equipped with the aforementioned the digital input option, you will find 4 digital inputs labeled D1, D2, D3 and D4. The D1 input is on an optical Toslink connector; both the D2 and D3 inputs are on a S/PDIF connector;...
-
Page 13: Simlink
MOON i 3.3 Integrated Amplifier SimLink™ The SimLink™ provides communication features between various MOON components. For example, if you were to connect the CD 3.3 to the i 3.3 via the SimLink™, pressing the (play) button on the CD 3.3 will cause the i 3.3 to automatically switch to the input labeled ‘CD’. -
Page 14: Remote Control Operation
The MOON i3.3 Integrated Amplifier uses the ‘CRM-2’ full-function remote control (figure 5). It operates on the Philips RC-5 communication protocol and is can be used with other Simaudio MOON components. The ‘CRM-2’ remote uses two AA batteries (included). To install them, simply slide the back plate off in the direction of the arrow;... -
Page 15: Specifications
MOON i 3.3 Integrated Amplifier Specifications Configuration ............Stereo Power Supply Transformer ........400VA Power Supply Capacitance ........40,000µF Class Of Operation - Amplifier ........Class A/B Single-ended inputs ..........4 (RCA) Mini-jack input ............1 (1/8”) Optional Balanced inputs ......... 1 (XLR) Input Sensitivity ............. - Page 16 Jack......... 3.5mm microphone jack Input Impedance....1kΩ Current Consumption..12mA NOTE: In the event that you require the RS-232 codes for your MOON 3.3, please contact Simaudio Ltd. directly by either email (service@simaudio.com) or by toll-free telephone (877-980-2400). Fuse Replacement: For the 120V version use a 5A fast blow (3AG size).
Need help?
Do you have a question about the MOON i 3.3 and is the answer not in the manual?
Questions and answers