
Related Manuals for Dimplex PowerChef TBQ-120-REG


Summary of Contents for Dimplex PowerChef TBQ-120-REG
-
Page 1: Electric Grill
Owner’s Manual Serial Number: TBQ-120-___ Model Number: PowerChef Electric Grill ® TBQ-120-REG TBQ-120-DLX Dimplex North America Limited 1367 Industrial Road Cambridge ON Canada N1R 7G8 1-888-346-7539 www.dimplex.com 7210190100rev02... - Page 2 PowerChef Electric Grill Features ® Program Cooking Welcome and Thank You for purchasing a Dimplex Electric Grill. The PowerChef Electric Grill’s advanced cooking control ® panel provides precision controllability on a wide choice of This introduction highlights the many features of the popular foods, assuring they are cooked to perfection.
-
Page 3: Table Of Contents
Contents Important Instructions ..................Page 4 Package Contents ................... Page 5 PowerChef Assembly Instructions ..............Page 7 ® Model and Serial Number Information ........Page 18 PowerChef ® Site Selection and Installation ................Page 18 Guide to your new PowerChef Electric Grill .......... -
Page 4: Important Instructions
25. This appliance is not to be operated by means of an 8. The use of non Dimplex North America accessory external timer or separated remote control device. attachments is not recommended and may cause damage to the unit or injury. -
Page 5: Package Contents
Package Contents Optional Accessories for TBQ-120-REG (Included with the TBQ-120-DLX) - Page 6 Package Contents Item Description Quantity Grill Assembly Stand Column Stand Base Left Shelf Right Shelf Drip Tray Rear Panel Warming Rack Hot Dog Roller (TBQ-120-DLX model only) Shaft for Hot Dog Roller (TBQ-120-DLX model only) Hot Dog Roller Motor (TBQ-120-DLX model only) Hot Dog Roller Mounting Bracket (TBQ-120-DLX model only) Grill Brush (TBQ-120-DLX model only) Grill Light Accessory (TBQ-120-DLX model only)
-
Page 7: Powerchef ® Assembly Instructions
PowerChef Assembly ® Step 1 Included... - Page 8 PowerChef Assembly ® Step 2 CAUTION: Two people are required for this portion of assembly. Power Cord Included Required (not supplied) CAUTION: Power cord comes out the front, bottom edge of Grill Assembly. When positioning Grill Assembly onto Stand Column, ensure power cord does not get pinched.
- Page 9 PowerChef Assembly ® Step 3...
- Page 10 PowerChef Assembly ® Step 4 Required (not supplied)
- Page 11 PowerChef Assembly ® Step 5...
- Page 12 PowerChef Assembly ® Step 6 (TBQ-120-REG only - skip to Step 7 for TBQ-120-DLX) Included ! NOTE: If required, shelf alignment can be adjusted. To adjust, install shelf (Item D) with 2 of Items U and V and loosely tighten. Align shelf in line with hood and tighten with wrench supplied.
- Page 13 PowerChef Assembly ® Step 7 ! IMPORTANT: Left Shelf only. (TBQ-120-DLX only) Included ! NOTE: If required, shelf alignment can be adjusted. To adjust, install shelf (Item D) with 2 of Items U and V and loosely tighten. Align shelf in line with hood and tighten with wrench supplied.
- Page 14 PowerChef Assembly ® Step 8 (TBQ-120-DLX only) ! NOTE: Align top and bottom slot on back of motor with edges of Mounting Bracket and slide forward. Reverse View...
- Page 15 PowerChef Assembly ® Step 9 ! NOTE: Remove all Hot Dog Roller packaging (TBQ-120-DLX only) material, hand wash in warm soapy water and rinse thoroughly before first use. ! NOTE: To assist with inserting shaft into Hot Dog Roller Motor, plug in and turn motor on. The motor operates at a low speed and will safely catch on the squared edges of the Hot Dog Roller Shaft.
- Page 16 PowerChef Assembly ® Step 10 (TBQ-120-DLX only) Light Front Hood Back Remove insulator strip ! NOTE: When placing light onto underside of handle, ensure that light is centered into notch under the hood handle. If installed incorrectly it will be difficult to replace the batteries.
- Page 17 ! NOTE: Run Power Cord through notch provided in Outlet Accessory panel. Front edge of panel will slide between Grill Assembly and Chassis Column (see inset). Dimplex suggests plugging Grill and Hot Dog Roller into the outlet accessory, then run an extension cord from accessory to wall outlet.
-
Page 18: Powerchef ® Model And Serial Number Information
PowerChef Model and Serial Number Information ® If you have any questions regarding our products please have the product model and serial numbers available upon calling customer service or technical support. To locate the model and serial number labels see below (Figure 1). Record the model number, serial number, on the front cover of this manual for future reference. -
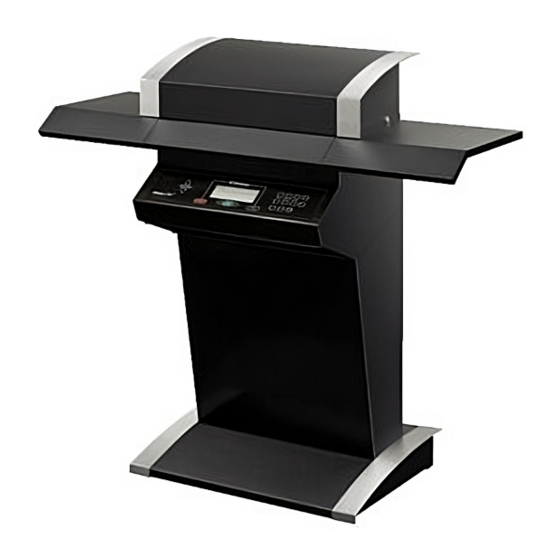
Page 19: Guide To Your New Powerchef ® Electric Grill
Guide to your new PowerChef Electric Grill ® Stainless Steel Trim Lift to Open Handle (TBQ-120-DLX model only) Chrome Plated Warming Rack EvenSear ® Cooking System Food Preparation Surfaces Touch to Operate Electronic Control Panel Hot Dog Roller Accessory Skillet Accessory (TBQ-120-DLX model only) (TBQ-120-DLX model only) -
Page 20: Control Panel Operating Guide
Control Panel Operating Guide Power Level PAUSE SELECT CANCEL On/Select Power Level Use to turn on the unit and to confirm the selections, Press up/down arrows to select desired power level. displayed. Use the power level up/down when in manual mode only. -
Page 21: Operation - Manual Mode
PowerChef Operation - Manual Mode ® Power Level SELECT CANCEL Operation Display Reads Action To Use the Manual Feature Touch ON/SELECT button. MANUAL (Flashing) Initial start-up. Touch ON/SELECT button & PREHEAT Preheat for 8 minutes. MANUAL is highlighted. Alarm sounds. PLACE FOOD Grill is ready for cooking - place food. -
Page 22: Operation - Program Mode
PowerChef Operation - Program Mode ® Power Level SELECT CANCEL Operation Display Reads Action To Use Program Feature Touch ON/SELECT button. MANUAL (Flashing) Initial start-up. Touch R (right) Arrow. PROGRAM Shifts operation from MANUAL to PROGRAM mode. Touch ON/SELECT button. PROGRAM Completes PROGRAM mode set up. - Page 23 PowerChef Operation - Program Mode ® Once your food and cooking choices have been selected: Operation Display Reads Action Food choice selections (as above). PREHEAT Grill is preheating. -STAGE TIME begins to count down from 8 minutes and TOTAL TIME displays total cooking time.
-
Page 24: Tbq-120-Dlx Accessories
17. The Outlet accessory provides for two (2) devices to accessory while grill is hot or operating. Allow grill to be plugged in for power. Dimplex recommends plugging cool for at least 15 minutes before adding any cooking the electric grill and Hot Dog Roller Motor into the Outlet accessory. - Page 25 TBQ-120-DLX Accessories Skillet Accessory build up on the cooking surface. Dimplex recommends to not attempt to remove this as Patina improves the release The Skillet is made of solid cast iron with an enamel coating of foods from the Skillet’s cooking surface.
- Page 26 Light are flush. For the complete line of electric BBQs and accessories Battery Replacement Procedure contact your authorized Dimplex dealer or visit us on the web Release Light accessory from mounted backing by sliding at www.dimplexoutdoors.com.
-
Page 27: Care And Cleaning
Care and Cleaning To keep your electric grill operating at its best possible Figure 10 performance Dimplex recommends that you clean the cooking grid and each accessory after each use. Drip Tray handle WARNING: Unplug the electric grill from outlet when not in use or before cleaning. - Page 28 Care and Cleaning Stainless Steel Trim Surfaces (TBQ-120-DLX) Clean all stainless steel panels with a damp, soft cloth or sponge with a mild detergent. Follow with a clean damp cloth to remove any remaining detergent residue. Buff dry. ! NOTE: Do not use oven cleaner, abrasive scouring powders or abrasive cleaning pads as they may scratch.
-
Page 29: Warranty
If Dimplex is unable to replace only and is not transferable. such product or part, or if Dimplex at it’s sole discretion deems the replacement not be commercially practical or cannot be completed on a...
Need help?
Do you have a question about the PowerChef TBQ-120-REG and is the answer not in the manual?
Questions and answers