
Related Manuals for Zoom Palmtop Studio PS-04


Summary of Contents for Zoom Palmtop Studio PS-04
- Page 1 Operation Manual © ZOOM Corporation Reproduction of this manual, in whole or in part, by any means, is prohibited.
-
Page 2: Usage And Safety Precautions
Alterations Please observe the following safety tips and precautions to Never open the case of the PS-04 or attempt to modify the ensure hazard-free use of the PS-04. product in any way since this can result in damage to the Warning unit. -
Page 3: Table Of Contents
Rhythm section ..........6 AUDIO mode screens ......36 Mixer section ..........7 V-takes ..........36 Operation modes of the PS-04 ....7 About V-takes ..........36 Switching V-takes ........36 Names and Functions of Parts ....8 Moving to a desired location in the song Top view .......... - Page 4 Storing an insert effect patch ....... 89 Files on SmartMedia card ....121 Changing an insert effect patch name ..90 Basic steps for using the send/return INDEX ............. 122 effect ............ 90 Selecting the send/return effect patch ............90 ZOOM PS-04...
-
Page 5: Introduction
• Two versatile effect streams The PS-04 provides insert effects that can be applied to the input or output, and send/return effects that are used via the mixer send/return loop. The insert effect provides a mastering effect function for processing the stereo mix. -
Page 6: Getting To Know The Ps-04
■ Effects section The PS-04 has two types of effects: insert effects and send/return effects. The insert effect, as its name implies, can be inserted at a selected point in the signal path. It consists of a number of single effects connected in series, such as compressor, amp simulator, chorus, etc. -
Page 7: Mixer Section
SYSTEM mode This mode is used to create new projects and to make settings that affect operation of the entire PS-04. To switch to this mode from any other mode, press the [SYSTEM] key so that the indicator lights up. -
Page 8: Names And Functions Of Parts
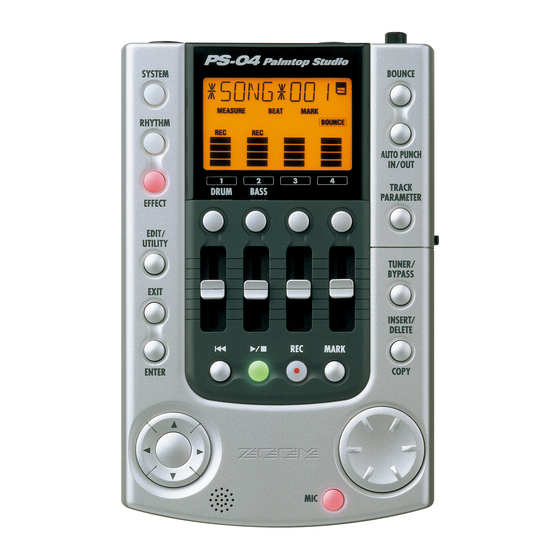
[AUTO PUNCH IN/ [RHYTHM] key OUT] key [EFFECT] key [TRACK PARAMETER] key [EDIT/ UTILITY] key [TUNER/BYPASS] key [EXIT] key [ENTER] key [INSERT/DELETE (COPY)] key Dial Cursor [E]/[R]/[Q]/[W] keys [MIC] key Built-in mic [U] key, [R/P]]key, [REC] key, [MARK] key ZOOM PS-04... -
Page 9: Front View
Front view Front view Card slot Rear view [INPUT LEVEL] knob [OUTPUT] jack [INPUT] jack [PHONES] jack [LINE IN] jack Side view [ON/OFF switch] [DC9V] jack ZOOM PS-04... -
Page 10: Getting Connected
PS-04. • To use a SmartMedia card that has already been formatted in a computer or a digital camera, be sure to first format it once more in the PS-04 (→ p. 100). ZOOM PS-04... -
Page 11: Operating The Unit On Batteries
When using the AC adapter, always use the [ON/OFF] switch on the side panel of the PS-04 to turn power on and off. Be especially careful when the card access indicator is lit. Disconnecting the AC adapter in such a case may lead to fatal data loss. -
Page 12: Listening To The Demo Song
SmartMedia card into the PS-04. Before switching the power on, turn the volume control of the monitoring system down. Set the [ON/OFF] switch on the side panel of the PS-04 to "ON". [ON/OFF] switch Project information saved on the SmartMedia card is automatically loaded. When the supplied SmartMedia card has been inserted, the demo song project will be loaded. -
Page 13: Recording
The indication "SELECT" appears on the display. Use the cursor left/right keys to bring up the indication "NEW" on the display, and press the [ENTER] key twice. The following indication appears on the display, and the PS-04 is ready for recording. OOOOOO OOOOOO Press the [TRACK PARAMETER] key. - Page 14 ] key goes out. To check the recording, press the [ ] key and then press the [ ] key. To cancel the recording standby condition, press the status key 1 again so that the "REC" indication goes out. ZOOM PS-04...
-
Page 15: Quick Guide
Quick Guide This section explains some of the basic operation steps of the PS-04. You will learn how to make preparations for recording, how to record tracks, do overdubs, use the mixer, and create the final stereo mix. The explanation is divided into five major steps. - Page 16 Longer recording time setting. (Recording time is doubled compared to HF.) Press the [ENTER] key. A new project is created, and this project is loaded automatically. The PS-04 returns to the AUDIO mode and the [SYSTEM] key goes out. The current counter position is shown on the display. (This is called the AUDIO mode top screen.)
-
Page 17: Selecting A Rhythm Pattern To Use
Step 1: Preparations before recording Selecting a rhythm pattern to use The PS-04 incorporates a rhythm function that always operates in sync with the recorder. This function can automatically repeat patterns that are several measures in length and contain drum sounds (drum kit) and bass sounds (bass program). - Page 18 To return from other modes to the AUDIO mode, the [EXIT] key is used. The PS-04 automatically saves your progress (settings and recorded contents) when you switch to another project or turn power off. There is no need to perform any special storage steps.
-
Page 19: Step 2: Recording The First Track
Specify the input source and the track on which to record, and start the recording process. Selecting the input source The PS-04 lets you select the [INPUT] jack, [LINE IN] jack, or built-in mic as input source for recording on the audio tracks. First select the source and then adjust the recording level. - Page 20 • When the [LINE IN] jack is selected as input source, adjust the output level of the source equipment so that there is no distortion in the input stage of the PS-04. While playing the instrument, operate the fader for the input source to adjust the recording level.
-
Page 21: Applying The Insert Effect
From the AUDIO mode top screen, press the [EFFECT] key. The [EFFECT] key lights up and the PS-04 switches to EFFECT mode. The display shows the insert effect top screen which lets you make various settings for the insert effect. -
Page 22: Selecting A Track And Starting To Record
By adjusting the fader for the respective track, you can adjust the monitor level. • If no recording track has been selected, the input signal will be sent directly to the stereo mix. Adjusting faders 1 – 4 will have no effect on the monitor level. ZOOM PS-04... - Page 23 Track 1 is no longer in recording standby mode. → • The recorded content can be edited ( p. 46). • If you switch the V-take, you can record on the same track while keeping the last → recording content ( p. 36). ZOOM PS-04...
-
Page 24: Step 3: Overdubbing
To stop recording of track 2, press the [ ] key once more. The indication "WAIT" is briefly shown on the display, and then the PS-04 returns to the original condition. ZOOM PS-04... - Page 25 ( p. 41). To stop playback, press the [ ] key once more. Press the status key 2 so that the "REC" indication for track 2 disappears. Record more tracks in the same way. ZOOM PS-04...
-
Page 26: Step 4: Mixing
When track parameters are shown, the cursor left/right keys or the status keys can be used to select the track. The level meter for the currently selected track flashes. ZOOM PS-04... - Page 27 Selects the V-take for this track. (For details, X=1 – 4 V TAKE X -Y see page 36.) X is the track number and Y is Y=1 – 10 the V-take number. RECLVL REC LEVEL 0 – 127 Adjusts the recording level. ZOOM PS-04...
-
Page 28: Applying The Send/Return Effect
The send/return effect has 40 patch slots, of which 30 are preprogrammed. For information on the various patches that are available, see the list in the last section of this documentation (→ p. 119). When you have selected the patch, press the [EXIT] key to return to the AUDIO mode top screen. ZOOM PS-04... - Page 29 While playing the recorded content, turn the dial to raise the send level for that track. Adjust the send level for the other tracks in the same way. Press the [EXIT] key to return to the AUDIO mode top screen. ZOOM PS-04...
-
Page 30: Step 5: Mixdown
Step 5: Mixdown Normally, mixdown refers to the procedure of sending a completed stereo mix to an external master recorder or similar. Here, we will use an empty pair of V-takes in the PS-04 instead of the external recorder. Applying the mastering effect The MASTERING algorithm of the insert effect can be used to increase the sound pressure of the stereo mix or emphasize a certain frequency range. -
Page 31: Mixdown (Bounce) Preparations
Step 5: Mixdown Mixdown (bounce) preparations The procedure of recording the signal mixed in the PS-04 (the signal as it appears at the [OUTPUT] jack) onto one or two audio tracks is called "bounce". The following steps show how to change the internal setting so that the mixed signal of audio tracks 1 –... -
Page 32: Carrying Out Mixdown (Bounce)
The bounce function is enabled, and the indication "BOUNCE" appears on the display. In this condition, the stereo mix (the signal as it appears at the [OUTPUT] jack) will be sent to V-takes 10 of tracks 1 and 2. ZOOM PS-04... -
Page 33: Playing The Bounced Tracks
From the AUDIO mode top screen, press the [TUNER/BYPASS] key. The insert effect is bypassed. Press the [TRACK PARAMETER] key and use the cursor left/right keys or the status keys to select one of the bounce target tracks. TR 1- ZOOM PS-04... - Page 34 Raise the faders of the bounce target tracks, and slide the other faders fully down. When the fader setting value is 100, the recording level and playback level are identical. (The current fader value can be checked with the track parameter FADER.) ZOOM PS-04...
- Page 35 ] key to return the recorder to the start, and press the [ ] key. The bounced content is played back. To stop playback, press the [ ] key once more. When you are satisfied with the results, return to the PS-04 to the condition before the bounce operation. ZOOM PS-04...
-
Page 36: Reference [Recorder]
This section explains the functions for audio recording and playback. AUDIO mode screens V-takes Immediately after turning the PS-04 on, the AUDIO ■ About V-takes mode is automatically selected and the counter Each of the audio tracks 1 – 4 has ten virtual tracks showing the current position appears. -
Page 37: Moving To A Desired Location In The Song (Locate/Marker Function)
Press the [EXIT] key to return to the point. AUDIO mode top screen. The numeric indication for measure/beat display depends on the time signature and tempo of the pattern/song selected in RHYTHM mode. (For details, see page 59.) ZOOM PS-04... -
Page 38: Setting A Mark In A Song
The selected mark is deleted, and all subsequent function). marks will be renumbered, as shown below. Display the AUDIO mode top screen. MARK MARK D Use the cursor left/right keys to switch the counter indication to mark units. ZOOM PS-04... -
Page 39: Playing Back The Same Passage Repeatedly (A-B Repeat Function)
Turn the dial to change the indication to ON, and press the [ENTER] key. Playback "START" is shown beneath the counter to indicate that the start point (point A) can be set. By switching the counter indication, you can set the ZOOM PS-04... -
Page 40: Re-Recording Only A Specified Part (Punch-In/Out Function)
The [REC] key goes out, and the PS-04 switches “punch-out”. from recording to playback (punch-out). The PS-04 provides two ways to do this. You can Press the [ ] key to stop recorder use the panel keys to punch-in/out manually playback. -
Page 41: Using Auto Punch-In/Out
When you cancel the auto punch-in/out function so that the indication goes out, the settings for the To rehearse the auto punch-in/out punch-in and punch-out point are lost. To redo the procedure, press only the [ ] key. recording, repeat steps 3 - 7. ZOOM PS-04... -
Page 42: Combining Multiple Tracks On Another Track (Bounce Function)
“REC” indication. In the default condition of the PS-04, the bounce destination recording track(s) will be muted. To play back a track while you bounce-record on Combining multiple tracks on... -
Page 43: Selecting The Bounce Target V-Take
In this example, we will bounce the contents of audio tracks 1 – 4 onto V-takes 10 of tracks 1/2. In the default condition of the PS-04, the result of the bounce operation will be recorded on the V-take Set the bounce target operation to that is currently selected for the recording track(s). -
Page 44: Changing The Precount Operation
To monitor the bounced recording correctly, return the EQ and effect settings for the track to the default condition. To cancel the bounce function, press the [BOUNCE] key once more. The “BOUNCE” indication disappears from the ZOOM PS-04... -
Page 45: Checking The Grade Setting Of A Project
The AUDIO mode utility menu appears. Use the cursor left/right keys to bring up the indication “GRADE” on the display. GRADE GRADE Press the [ENTER] key. The recording grade setting for the currently active project is shown as follows. ZOOM PS-04... -
Page 46: Reference [Track Editing]
Move a specified range of audio data. Press the [ENTER] key. • Erase The subsequent steps will differ, depending on Erase a specified range of audio data. which command was selected in step 3. See the ZOOM PS-04... -
Page 47: Copying A Specified Range Of Data
2, and there are no audio data, the "*" symbol is shown. press the [ENTER] key. Press the [ENTER] key. The indication “ENT/EXIT” appears on the display. The indication “END” appears, and you can specify the copy end point. ZOOM PS-04... -
Page 48: Moving A Specified Range Of Data
The indication “END” appears, and you can specify menu appears again. the move end point. By pressing the [EXIT] key instead of the [ENTER] key, you can cancel the operation and return to the OOOOOO OOOOOO previous screen. ZOOM PS-04... -
Page 49: Erasing A Specified Range Of Data
All data before the point specified here will be erased. To carry out the erase operation, press the [ENTER] key once more. Press the [ENTER] key. When the erase process is finished, the track edit The indication “END” appears, and you can specify ZOOM PS-04... -
Page 50: Editing Using V-Takes
The parameters for tracks 1 – 4 can also be • COPY controlled in EFFECT mode. Copy the audio data of a specified V-take to another V-take. Use the cursor left/right keys to select the track which includes the ZOOM PS-04... -
Page 51: Deleting A V-Take
To carry out the copy operation, By pressing the [EXIT] key instead of the [ENTER] press the [ENTER] key once more. key, you can cancel the operation and return to the previous screen. The copy process is carried out, and the track ZOOM PS-04... -
Page 52: Exchanging V-Takes
CHNG 1 Use the cursor left/right keys to move the flashing part, and turn the dial to select the track and V-take to use as exchange target. Press the [ENTER] key. The indication “ENT/EXIT” appears on the display. ZOOM PS-04... -
Page 53: Reference [Mixer]
Reference [Mixer] This section explains the functions and operation of the mixer built into the PS-04. About the PS-04 mixer • The signal produced by the mixer can be → bounced to any track if desired ( p. 42). The mixer in the PS-04 can be used to create a final... - Page 54 [LINE IN] jack R MIC+INPUT Built-in mic [INPUT] jack 1 + 3 or 1 + 4 MIC+LINE Built-in mic [LINE IN] jack L + R 2 + 3 or 2 + 4 LIN+INPUT [LINE IN] jack L + R [INPUT] jack ZOOM PS-04...
-
Page 55: Selecting The Recording Track(S)
Track 2 or 4 Input 2 If the source is stereo (2 signals), the signals will be mixed and then sent to the track. To deactivate the recording standby condition, press the currently selected status key once more. ZOOM PS-04... -
Page 56: Mixing The Playback Sound From Tracks
Depending on the track or input for When the PS-04 is in AUDIO mode, faders 1 – 4 are assigned to audio tracks 1 – 4. The level of each which you want to make the track is shown by the respective level meter. - Page 57 Selects the V-take for this track. (For X=1 – 4 V TAKE X - Y details, see page 36.) X is the track Y=1 – 10 number and Y is the V-take number. RECLVL REC LEVEL 0 – 127 Adjusts the recording level. ZOOM PS-04...
-
Page 58: Linking Tracks (Stereo Link)
To cancel the stereo link function, set the cursor [ ] key until the indication the stereo link parameter to OFF. “S-LINK” is shown on the display. S-LINK S-LINK ZOOM PS-04... -
Page 59: Reference [Rhythm]
You can also import all patterns or song maximum of 99 measures of drum/bass sounds is information from another project. called a pattern. The PS-04 has a capacity for up to 511 patterns per project. 346 patterns are already preprogrammed, allowing you to play a rhythm simply by selecting a pattern. -
Page 60: Drum Track/Bass Track
The part that records drum sound patterns in the measures and beats. While the rhythm is stopped, you PS-04 is called the drum track and the part that can use the cursor left/right keys and the dial to move records bass sound patterns the bass track. When within the pattern in units of measures or beats. -
Page 61: Changing The Tempo
PATTERN mode. The key lights up, and the recorder and the rhythm The tempo can be set while the PS-04 is running or pattern begin to play. (If there are recorded audio stopped. The currently set tempo can be checked tracks, the contents will be heard.) -
Page 62: Playing Drum/Bass Sounds Manually
Bank 3 CONGA CONGA CONGA Press the [RHYTHM] key several CRASH TOM 2 TOM 1 TOM 3 Bank 2 times to switch the PS-04 to CYMBAL PATTERN mode. CLOSED OPEN SNARE KICK Bank 1 HI-HAT HI-HAT You should first choose the desired drum kit/bass program as necessary. -
Page 63: Creating A Pattern
PATTERN mode top screen. For example, when F# Minor is selected, the bank and note arrangement is as follows. Turn the dial to select an empty pattern. Empty patterns are indicated as “EMPTYxxx (where xxx is the pattern number). ZOOM PS-04... - Page 64 PATTERN mode top screen. Drum track step input To perform step input, the PS-04 must be in stop mode, so that you can enter the sounds one by one When a “<>” is shown on both sides of the in the order that they should be played.
- Page 65 • The velocity setting can be changed with fader 3. This information is also stored. • If you hold down several status keys together, multiple sounds are input at the same position. ZOOM PS-04...
- Page 66 1/3 ..Eighth triplet note 1/4 ..Sixteenth note 1/6 ..Sixteenth triplet note Duration: quarter note Duration: eighth note Status key [R/P] key Quantize setting: sixteenth note ZOOM PS-04...
- Page 67 By performing the input procedure again, you the duration for which the status key is pressed is can add playing information to the track. also recorded. When the pattern reaches the end, it returns to the beginning and you can continue to record. ZOOM PS-04...
-
Page 68: Copying A Pattern
Press the [RHYTHM] key several [REC] key. times to bring up the PATTERN mode The key flashes and the PS-04 switches to the top screen. pattern playback mode. If you press a status key in this condition, the result will not be recorded. This... -
Page 69: Deleting A Pattern
Basic procedure for pattern editing To change pattern specific parameters, proceed as Press the [EXIT] key several times to follows. return to the PATTERN mode top screen. Press the [RHYTHM] key several times to bring up the PATTERN mode top screen. ZOOM PS-04... - Page 70 When “ORG ROOT” was selected Use the cursor left/right keys to cause the character Current root ("o" stands for #) that you want to change to flash. Then turn the dial to select the character. (The name can be up to five ZOOM PS-04...
-
Page 71: Setting Pattern Mode Operation (Pattern Utility)
To use the pattern utility menu, proceed as follows. When all settings have been made, Press the [RHYTHM] key several press the [EXIT] key repeatedly to times to switch the PS-04 to return to the PATTERN mode top PATTERN mode. screen. -
Page 72: Changing The Metronome Volume
Refer to “Basic procedure for pattern Then turn the dial to adjust the volume (OFF, 1-15). utility” and bring up the indication “TIMSIG”. When you press the [ENTER] key, the display changes as follows. Time signature of the pattern ZOOM PS-04... -
Page 73: Song Mode Operation
This shows the current position in the song in This method uses simple formulas to specify measures and beats. While the PS-04 is stopped, rhythm pattern playback from start to end. The you can use this screen to move to another location result is written to the song in a single operation. - Page 74 (in beat units). measures. • The interval until the next pattern information entry point is longer than the pattern itself, the pattern will be played repeatedly. If the ZOOM PS-04...
- Page 75 [REC] key. PATTERN A PATTERN B PATTERN C The [REC] key goes out and the PS-04 returns to the SONG mode top screen. If you press the [ PATTERN A PATTERN C key, the created song will be played.
-
Page 76: Fast Input
O+C1 O+C1 Fader 1 Input "1" O+C1+ O+C1+ Fader 2 Input "+" The following keys and faders are used for FAST O+C1+2 O+C1+2 input. Fader 1 Input "2" +C1+2 +C1+2 Fader 2 Input ")" C1+2 _ ZOOM PS-04 C1+2 X... - Page 77 The pattern sequence for the song is written according • The FAST method can only be used to write a to the formula. Then the PS-04 returns to the condition song in one go, from beginning to end. of step 2. By pressing the [EXIT] key to return to the Writing only a partial song is not possible.
- Page 78 At the chord information input screen, you can use the cursor left/right keys to move the input point in measure units. (To check the position, press the cursor [ ] key repeatedly to bring up the current position screen.) ZOOM PS-04...
- Page 79 Measure Pattern PATTERN 001 PATTERN 020 Beat Root / Chord D maj G min Tempo BPM-135 Drum track volume Bass track volume Drum kit STNDRD Bass program FINGER SLAP ZOOM PS-04...
- Page 80 0 – 6 (See page 120 ) Bass program ← BSPRG 0 – 4 (See page 120 ) ← Drum level DRVOL 0 – 15 Bass level ← BSVOL 0 – 15 ← Time signature Measure TIMSIG 1/4 – 8/4 ZOOM PS-04...
-
Page 81: Editing A Song
By pressing the [R/P] key, you can play the finished song to check the result. Turn the dial to select the copy source start measure, and press the [ENTER] key. The indication “END” appears, and you can select the copy end point. ZOOM PS-04... - Page 82 You can transpose the bass track of the rhythm song transpose action again. in semitone units. Press the [RHYTHM] key repeatedly to bring up the SONG mode top screen. Press the [EDIT/UTILITY] key. The SONG mode utility menu appears. ZOOM PS-04...
-
Page 83: Clearing A Song
Turn the dial to select the project from which to import. Press the [ENTER] key. The indication "ENT/EXIT" appears on the display. To carry out the import operation, press the [ENTER] key once more. When the import operation is completed, the "IMPORT" indication returns. ZOOM PS-04... -
Page 84: Reference [Effects]
Reference [Effects] This section explains how to use and edit the effects built into the PS-04. ■ Insert effect About the effects The insert effect is a multi-effect that combines The PS-04 has two types of effects, “insert effects” various single effects such as compressor and amp which are inserted at a specific point in the signal simulator. -
Page 85: Send/Return Effect
“patch”. The send/return effect can use the various algorithms. There are three 40 patches. In the default condition, 30 patches are configurations: mono input/stereo output, preprogrammed. stereo input/stereo output, and mono input x 2/ mono output x 2. ZOOM PS-04... -
Page 86: Effect Mode Screens
■ EFFECT mode screens insert effect patch and editing its contents. To make insert effect and send/return effect settings, you must switch the PS-04 to EFFECT ■ Selecting the insert effect mode by pressing the [EFFECT] key from the patch AUDIO, RHYTHM, or SYSTEM mode. -
Page 87: Editing An Insert Effect Patch
Basic steps for using the insert effect information on the tuner function, see page 92.) When you press the [TUNER/BYPASS] key or the ● Stereo track recording [EXIT] key, the PS-04 returns to the condition of Track 1 or 3 Effect step 2. - Page 88 (For details, see the list in the 104. last section of this documentation.) Module PRE AMP DELAY/MODULATION TOTAL COMP PATCH PATCH (Page 1) (Page 2) (Page 1) (Page 2) LEVEL/ZNR NAME ZOOM PS-04...
-
Page 89: Storing An Insert Effect Patch
Basic steps for using the insert effect To adjust the ZNR (Zoom Noise Reduction) sensitivity, use the cursor Name of parameter being adjusted left/right keys to bring up the Parameter setting value indication “TOTAL” on the display, DEPTH DEPTH and then operate fader 2. -
Page 90: Changing An Insert Effect Patch Name
[ENTER] key. The patch can now be edited, and the name of the The insert effect top screen returns. To retain the effect type currently selected for that patch is entered name, store the patch. shown. ZOOM PS-04... -
Page 91: Storing A Send/Return Effect Patch
From the send/return effect top then use the faders to make the adjustment. screen, select the patch whose name you want to change, and press the Repeat the above procedure as [EDIT/UTILITY] key. necessary to adjust other parameters. ZOOM PS-04... -
Page 92: Using The Tuner Function
Repeatedly press one of the cursor left/right keys to cause the first character of the patch name to flash. The PS-04 incorporates a versatile tuner that can also accommodate 7-string guitar and other unconventional tunings. This section explains how TIGHT TIGHT to use the tuner function. -
Page 93: Using Other Tuning Types
Detected note name (o stands for #) The reference pitch will be reset to A = 440 Hz Pitch is sharp when the PS-04 is turned off and then on again. To quit the tuning function, press the [EXIT] key. - Page 94 The insert effect bypass condition is canceled, and the previous display appears again. If required, you can change the reference pitch used by the tuner. The default setting is A = 440 Hz. The procedure is the same as for the chromatic tuner. ZOOM PS-04...
-
Page 95: Reference [System]
• DELETE • Other system settings Delete a specified project. • PROTECT All steps that you carry out with the PS-04 Write-protect the currently loaded project. affect only the currently loaded project. It is not possible to handle multiple projects •... -
Page 96: Selecting A Project
You can select and load a project saved on SmartMedia card as follows. Turn the dial to select one of the following recording grade settings. When you turn power to the PS-04 on, the most • HF (Hi-Fi) recently used project will be automatically loaded. -
Page 97: Deleting A Project
To carry out the delete operation, To verify how much recording time is left on the press the [ENTER] key once more. To SmartMedia card, proceed as follows. cancel the operation, press the [EXIT] key. Refer to “Basic steps for handling ZOOM PS-04... -
Page 98: Changing The Name Of A Project
To return to the original screen, You can also use faders 1 – 3 to enter press the [EXIT] key repeatedly. characters and fader 4 to move the flashing Each press of the [EXIT] key goes back by one position. screen. ZOOM PS-04... -
Page 99: Setting The Built-In Mic Gain
You can adjust the input sensitivity of the built-in mic as follows. You can set the display backlight of the PS-04 to on or off as follows. If the PS-04 is powered from With the recorder stopped, press the batteries, setting the backlight to off will help [SYSTEM] key. -
Page 100: Formatting A Smartmedia Card
PS-04 is inserted, audio recording/playback and saving of other data will not be possible. Before using a new SmartMedia card, be sure to format the card in the PS-04. Insert the new SmartMedia card and turn power to the PS-04 on. -
Page 101: Specifications
Voices Drum 5, bass 1 Supplied accessory Drum kits SmartMedia card Bass programs 5 Resolution 48 PPQN * 0 dB = 0.775 Vrms Tempo 40 – 250 BPM * Design and specifications are subject to change without notice ZOOM PS-04... -
Page 102: Troubleshooting
Troubleshooting If there are problems during operation of the PS-04, check the following points first. ■ Noise is heard during mixdown Problems during playback • Display the input source for the input, and turn ■ No sound, or sound is very weak the recording level fully down. -
Page 103: Problems With Effects
The tuner function can only be used in this mode. ■ Insert effect does not work • Check the connection of the instrument and • Make sure that the PS-04 is not in the bypass make sure that the correct input source is condition (→ p. 86). -
Page 104: Appendix
Combination of crunch and cabinet simulator. Combination of vintage overdrive and cabinet simulator. Combination of vintage distortion and cabinet simulator. Combination of metal-style distortion and cabinet simulator. 9002 Combination of the Zoom 9002 distortion and cabinet simulator. GAIN TONE LEVEL CABI... - Page 105 Periodically varies the level of the sound. TREMOLO DEPTH RATE CLIP Gives a varying wah sound that depends on the picking intensity. AUTO WAH TYPE POSI RESO SENS Modifies the pitch of the direct sound. PITCH SHIFT TONE ZOOM PS-04...
- Page 106 Adjusts the mix amount of the effect sound. DRYLVL 0 - 30 Adjusts the mix amount of the direct sound. 0 - 20 DIRMIX Adjusts the mix amount of the direct sound. Table 4 R MODE Selects the change type and width. ZOOM PS-04...
- Page 107 Adjusts the patch volume level. OFF, 1 - 30 Adjusts the sensitivity. MIC algorithm ● COMP module TYPE Parameter Keeps the dynamic range consistent. COMP THRESH RATIO ATTACK LEVEL Controls the signal peeks. LIMIT THRESH RATIO RELEAS LEVEL ZOOM PS-04...
- Page 108 Creates a "violin playing" sound with soft attack. SLOW-A TIME CURVE Automatic vibrato effect. VIBE DEPTH RATE Changes the sound with step-like filter characteristics. STEP DEPTH RATE RESO Produces a metallic sound. RING POSI RATE Talking-modulator-like effect. RESO SENS ZOOM PS-04...
- Page 109 Table 6 of GUITAR/BASS R SYNC Adjusts the control waveform cycle. algorithm F-WAH: bPF, LPF Specifies the filter type. TYPE ARRM P: Table 3 of GUITAR/ Selects the pitch change type. BASS algorithm ● TOTAL module See the GUITAR/BASS algorithm. ZOOM PS-04...
- Page 110 Sets the pitch shift amount. SHIFT 0 - 10 Adjusts the tone. TONE 0 - 30 Adjusts the balance between the direct sound and effect sound. TIME 1 - 100 Adjusts the delay time. ● TOTAL module See the GUITAR/BASS algorithm. ZOOM PS-04...
- Page 111 Doubling that allows the delay time to be set in 1-ms steps up to 100 ms. DOUBL L/r TIME TONE Parameter Setting range Description 1 - 100 Adjusts the delay time. TIME TONE 0 - 10 Adjusts the tone. 0 - 30 Adjusts the mix amount of the effect. ZOOM PS-04...
- Page 112 DIMENSIOn RISE_1 RISE_2 Parameter Setting range Description 0 - 30 Adjusts the emphasizing degree of the stereo component. RISE_1 0 - 30 Adjusts the spaciousness that includes the monaural component. RISE_2 ● TOTAL module See the GUITAR/BASS algorithm. ZOOM PS-04...
-
Page 113: Send Effect
TIME 0 - 10 Adjusts the amount of feedback. 0 - 10 Adjusts the cut amounts of the delay sound's high range. DAMP L10 - L1, C, r1 - r10 Adjusts the stereo position of the delay sound. ZOOM PS-04... -
Page 114: Rhythm Patterns
Hip hop DNC4V RCK17 MTL02 Pattern name DNC1F RCK18 MTL03 HIP01 DNC2F RCK19 MTL04 HIP02 DNC3F RCK20 MTL1V HIP03 DNC4F RCK21 MTL2V HIP04 House RCK22 MTL1F HIP05 Pattern name RCK23 MTL2F HIP06 HUS01 RCK24 THR01 HIP07 HUS02 RCK25 THR02 ZOOM PS-04... - Page 115 AMB01 BLD01 AMB02 Pattern name BLD02 AMB03 SKA01 BLD03 AMB04 SKA02 BLD04 AMB1V SKA03 BLD05 AMB2V SKA04 BLD06 AMB1F Reggae BLD07 Pattern name AMB2F BLD08 RGG01 Blues BLD09 RGG02 Pattern name BLD10 BLS01 RGG03 BLD11 BLS02 RGG04 BLD1V ZOOM PS-04...
-
Page 116: Effect Patches
Spacious lead sound with dual overlay effect BLEFNG Bluesy sound for finger picking MELODY Tastefully seasoned sound for melodies WILDFZ Vintage fuzz box Zoom's original "cry effect" sound B-PICK Tight sound for playing with a pick B-OD Retro distortion sound B-DRV Hard distortion sound B-FING Allround sound for finger picking... - Page 117 CNCERT Concert hall effect for piano HONKEY Honky-tonk piano simulation SHUDDR Sliced sound for techno tracks TKPIKO For sequence phrases or muted guitar MTONE Distortion with emphasized midrange body DOUBLR Doubling for vocal track BASBST Emphasizes low range ZOOM PS-04...
- Page 118 Bright and sharp outlook WARMY Vocal/Vocal Warm sound with prominent midrange FAT+ Guitar/Vocal Spruces up a thin midrange FOLK D Guitar/Guitar Fresh and clean sound CNTMPY Vocal/Piano Versatile crisp sound TV NWS Vocal/Vocal TV newscaster sound EMPTY 20-29 ZOOM PS-04...
- Page 119 Chorus for weak guitar sound FLAT-C Fast-rated chorus DEEP-C Versatile deep chorus For instruments with strong harmonics such as electronic piano or syn- DETUNE thesizer ECHO Flamboyant analog-style delay DLY375 Matches the commonly-used 120 BPM tempo LNGDLY Long delay for ballads ZOOM PS-04...
-
Page 120: Drum Kits/Bass Programs
Power kit JAZZ Jazz kit ANALOG Analog kit GENE General kit FUNK Funk kit SCRAT Scratch kit ● Bass programs Display Program name FING Finger bass PICK Pick bass SLAP Slap bass ACSTK Acoustic bass SYNTH Synth bass ZOOM PS-04... -
Page 121: Compatibility With Ps-02 And Mrs-4
■ MRS-4 conventional SmartMedia reader/writer. If the files have different names, they will not be • The data for the PS-04 has no compatibility recognized on the PS-04. with that of the MRS-4. • Zoom Corporation does not bear any liability for any consequences of using the MRS-4 SmartMedia card on the PS-04. -
Page 122: Index
... . . 83 Storing a patch..89 Delete Precount ... . 72 Deleting a pattern..69 ZOOM PS-04... - Page 123 Stereo link ....58 System ....95 SYSTEM mode ... . 95 ZOOM PS-04...
-
Page 124: Zoom Corporation
• Connect the equipment into an outlet on a circuit different from that to which the receiver is connected. • Consult the dealer or an experienced radio/TV technician for help. ZOOM CORPORATION NOAH Bldg., 2-10-2, Miyanishi-cho, Fuchu-shi, Tokyo 183-0022, Japan PHONE: +81-42-369-7116 FAX: +81-42-369-7115 Web Site: http://www.zoom.co.jp PS-04 - 5000-2...
Need help?
Do you have a question about the Palmtop Studio PS-04 and is the answer not in the manual?
Questions and answers