
Related Manuals for TerraTec Cameo 400 DV


Summary of Contents for TerraTec Cameo 400 DV
- Page 1 Video System Digital Video Editing System English Manual Status 19.12.00 VideoSystem Cameo 400 DV...
- Page 2 Meticulous care has been taken in the preparation of all text passages and illustrations in this manual. TerraTec Electronic GmbH and its authors, however, accept no liability, legal or otherwise, for errors or the consequences of such errors. We reserve the right to technical modifications.
-
Page 3: Table Of Contents
You aren’t alone........................28 Links to camcorder manufacturers:................. 28 The following companies offer Enablers for various DV camcorders:........ 29 Further links to digital video editing ................29 The Service from TerraTec......................30 Hotline, Mailbox, Internet....................30 Broken?! .........................31 General Service Agreement..................... 32 Terminology .......................... -
Page 4: Preface
Cameo 400 is a piece of high-quality, state-of-the-art technology. With this product you have obtained one of the most powerful PC video processing solutions. We are sure that your Cameo 400 DV will serve you well in the future and raise the fun factor ;-) on your PC. -
Page 5: Installation
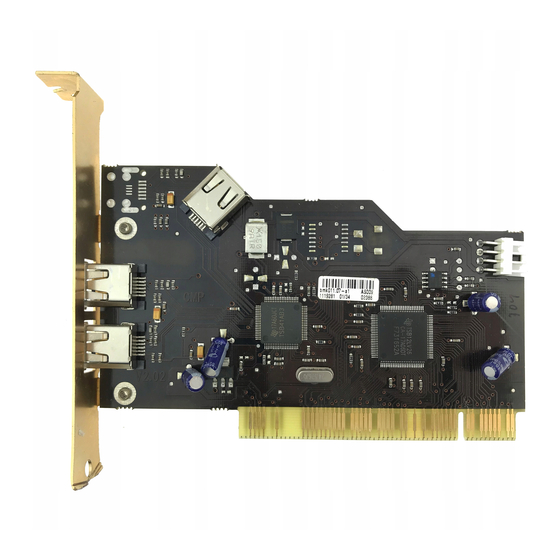
Installation Card Diagram The external IEEE 1394 ports These connecters provide the link between the Cameo 400 DV and the outside world, like your camcorder for example. The internal IEEE 1394 ports In the future IEEE 1394 devices will appear for internal PC use. This connection standard allows you to use such devices with the Cameo 400 DV. -
Page 6: The Internal Power Supply Voltage
The internal power supply voltage If you want to connect other IEEE 1394 devices that draw their power from the Cameo 400 DV at some time in the future, then you should connect the Cameo 400 DV directly to your PC power supply. -
Page 7: Connecting A Dv Camcorder
Connecting other FireWire™ devices should be done according to the device's documen- tation. Installing the card Before you insert the Cameo 400 DV in your PC, pay attention to the specifics of your configuration. Also refer to the manual for your computer and other expansion cards for their settings. -
Page 8: Installing The Driver
Updates from Windows 98 to Windows 98 SE can be found in professional shops and are a wise investment for your system as well as the digital video; definitely saving you lots of time and trouble. VideoSystem Cameo 400 DV... -
Page 9: Installation Under Windows 98 Se
During the driver installation your camcorder should not be connected to the Cameo 400 DV. Once you have inserted the Cameo 400 DV in your PC and booted, Windows 98 SE recognizes the card as a new hardware device and the following screen appears. - Page 10 Enter the path to the Win98se folder on the installations CD. Optionally, you can click on “Browse” and search for the file manually. When Windows has found the necessary files choose “Search for the best driver for your device (Recommended)” and click on “Next”. VideoSystem Cameo 400 DV...
- Page 11 Windows then carries out the driver installation for you. Nothing else should happen at this point. Should you recieve further commands or requests to do something, and are not sure what to do, you can typically just hit enter succesfully. VideoSystem Cameo 400 DV...
-
Page 12: Driver Installed - This Is What It Looks Like
PC. The Device Manager is found in the Control Panel under “System”. After you have connected your camera and turned it on, the Plug and Play function adds it to the Device Manager. VideoSystem Cameo 400 DV... -
Page 13: Installation Under Windows 2000
Installation under Windows 2000 During the driver installation your camcorder should not be connected to the Cameo 400 DV. Under Windows 2000 the installation is the easiest, because everything that is needed for DV processing is already there. The driver installation is automatic, without asking for anything. -
Page 14: The Software Installation
If, on the other hand, you are using a Canon or JVC camcorder and working with Windows 98 SE, then installing this driver could be important for you, as the necessary standards are otherwise missing. VideoSystem Cameo 400 DV... - Page 15 Instead of choosing MS 1394 always choose TI 1394. After installing the Texas Instruments IEEE1394 driver you have to restart your computer. Afterwards your camcorder should be listed in the Device Manger like in the example: VideoSystem Cameo 400 DV...
-
Page 16: The Software In Overview
The Adorage Magic effects packet works as a Plug-In for MSP. You will find the extra effects in the MSP production archive under the transition effects. Cool 3D 1.0 Cool 3D offers lots of 3D title tools. Self created titles can be integrated and utilized in your video project. VideoSystem Cameo 400 DV... -
Page 17: First Cut
Using the button “Browse” you can set the path where the file is to be saved. Pay attention that you have enough free memory, as each second of DV video requires approximately 3.5 MB. To begin the recording phase click on “OK”. VideoSystem Cameo 400 DV... - Page 18 It is generally recommended to give your video clip a name that clearly identifies it so that finding and recognizing it later is simplified. VideoSystem Cameo 400 DV...
-
Page 19: Dv Editing With The Video Editor
4. Timeline (The Timeline offers a complete overview of all aspects of your project. All video clips, effects, audio tracks, etc… are clearly layed out in an easy to follow placement graph.) VideoSystem Cameo 400 DV... - Page 20 In the dialog menu that appears choose your video clip. You can then see that your video clip has been added to the Timeline. Watch your video clip, by clicking the play button in the Preview window. VideoSystem Cameo 400 DV...
-
Page 21: Effective Transitions
Use the mouse to pull the Adorage symbol from the right side of the Production Archive menu onto the FX track in the Timeline and position it exactly where your video clips overlap. The overlapping area is then the length of the transitional effect. VideoSystem Cameo 400 DV... - Page 22 Cameo400 DV. The preview is then given directly on the cammcorder. Disconnect your camcorder from the Cameo or switch your camcorder off in order to see your video in the Preview window. VideoSystem Cameo 400 DV...
-
Page 23: Transfering Dv To Your Camcorder
We recommend that you convert your entire project into one DV video clip in order to transfer it to your camcorder. After having edited a video clip from the DV camcorder, the audio track will probably have to be re-processed. VideoSystem Cameo 400 DV... -
Page 24: Attachment
DMA mode is activated in the Device Manager. Also check that the Cameo 400 DV does not share its IRQ with any other device. We recommend using a seperate drive exclusively for your video material. You should also configure the temporary folder for MediaStudio Pro 6.0 VE to use this hard drive. - Page 25 Video files aren't recorded or the PC crashes during the recording. Check to be certain that the Cameo 400 DV has an IRQ (Interrupt) alone. Open the Device Manager (Click on “Start” -> “Settings” -> “Control Panel” -> “System”. In the Device Manager double click on “Computer”...
- Page 26 Install the DV updates from the installation CD. Some cameras have problems identifying the status over the FireWire port. Remove the cassette from the camera and tape the holes on the back side with two small tape strips. VideoSystem Cameo 400 DV...
-
Page 27: The Perfect Pc
When using IDE drives, be certain that the drive’s DMA mode is activated in the Device Manager. It is furthermore recommended to utilize a second drive exclusively for video data. VideoSystem Cameo 400 DV... -
Page 28: You Aren't Alone
- http://www.panasonic.de England - http://www.panasonic.co.uk France - http://www.panasonic.fr Italy - http://www.panasonic.it Spain - http://www.panasonic.es Netherland - http://www.panasonic.nl SONY Germany - http://www.sony.de England - http://www.sony.co.uk France - http://www.sony.fr Italy - http://www.sony.it Spain - http://www.sony.es Netherlands - http://www.sony.nl VideoSystem Cameo 400 DV... -
Page 29: The Following Companies Offer Enablers For Various Dv Camcorders
Netherlands http://www.twintek.nl/dvwidget.html http://enable.dvin.org/ http://enable.dvin.org Further links to digital video editing (English site that concerns itself with DV film http://www.dvfilmmaker.com related themes). (manufacturer of composition and editing http://www.mainconcept.com programs and other helpful software) (German site) http://www.videox.net VideoSystem Cameo 400 DV... -
Page 30: The Service From Terratec
If you have a difficult problem that the handbook, you, or your neighbor or salesman can't solve - then please contact us directly. The first method - if an option - is the internet: at http://www.terratec.net/ you will find the answers to frequently asked questions (FAQ) as well as the newest drivers. All this is also reachable over our mailbox system. -
Page 31: Broken
Before you send your card to us you must contact one of our co-workers. Note the name of the support technician and pay attention to the following points: Complete the Service card included with your Cameo 400 DV fully and clearly. Concisely detailed error descriptions can be used to speed up the process. Shipments without error descriptions cannot be processed and will be returned at the senders expense. -
Page 32: General Service Agreement
9. Final Provision TerraTec Electronic GmbH reserves the right at any time to change or expand these General Service Conditions. In any case, these General Terms and Conditions from TerraTec Electronic GmbH are valid as accepted. VideoSystem Cameo 400 DV... -
Page 33: Terminology
D8 – Digital 8 is the logical conclusion to the Hi8 and VHS camcorder formats. It continues to use Hi8 or D8 cassettes but records in DV format. VideoSystem Cameo 400 DV... - Page 34 FireWire port to the digital recorder and creating their own protocol. Through FireWire and the Sony protocol the dream of loss free video processing was finally realized. Ilink – Sony's name for IEEE 1394 VideoSystem Cameo 400 DV...
- Page 35 Rendering – describes the processing of video or audio clips that have been changed e. g. by applying filters or effects. RGB Color Spectrum – In the RGB spectrum every visible pixel is comprised of three components: R(ed), G(reen) and B(lue). In order to achieve a natural color spectrum on the PC VideoSystem Cameo 400 DV...
- Page 36 (Y), and also by the color components I (cyan orange balance) and Q (magenta green balance). YIQ e. g. is primarily used by NTSC. YUV – This color spectrum is composed of the brightness component -> Luminance (Y) and the two color components -> Chrominance (U,V). VideoSystem Cameo 400 DV...
Need help?
Do you have a question about the Cameo 400 DV and is the answer not in the manual?
Questions and answers