Table of Contents
Advertisement
Quick Links
Advertisement
Table of Contents

Subscribe to Our Youtube Channel
Related Manuals for TerraTec TerraTValue BT878


Summary of Contents for TerraTec TerraTValue BT878
- Page 1 Version BT878 Manual (english) 26.08.99 TerraTValue PCI...
- Page 2 Meticulous care has been exercised in the preparation of all text passages and illustrations in this User Guide. TerraTec Electronic GmbH and its authors, however, accept no liability, legal or otherwise, for errors or the consequences of such errors. We reserve the right to technical modifications.
-
Page 3: Table Of Contents
Contents Contents ............................3 Introduction ............................5 Key features........................... 6 System Requirements ........................6 Package Contents .......................... 6 Hardware Overview ........................... 7 Installing the Hardware........................8 Windows 98 Installation ........................10 Step – 1 ............................10 Step – 2............................11 Uninstalling the Drivers........................ 11 Windows 95 Installation OSR-1 / OSR-2 ..................12 Installing the TV Software........................12 Important System Settings for Operating the TV Card ..............13... - Page 4 The Surface of the Teletext Software ..................45 The Symbol Bar of the Teletext Software ..................46 The "File" Menu .......................... 47 The "Teletext" Menu........................48 Status / Error List - Teletext Decoding ..................50 The TerraTec Hotline ........................51 FAQ..............................52 TerraTValue...
-
Page 5: Introduction
Introduction With the receiver system TerraTValue you have taken the next step towards a new multimedia future. Watch your favorite television station while comfortably reading teletext, and, at the same Ò Ò time, let Intel Intercast Technology show you selected Internet sites. These can now be transmitted over your television signal. -
Page 6: Key Features
Key features · Brooktree 878 chipset · Multiple-station preview of up to 100 stations simultaneously Ò Ò · Intel Intercast Technology – Receiving · SVHS and video inputs for external video Internet sites via TV signals sources · High-speed teletext – teletext without ·... -
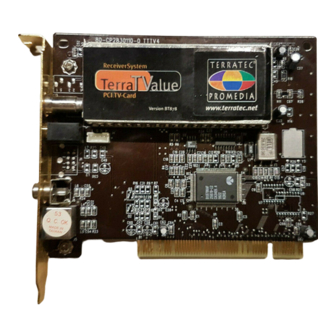
Page 7: Hardware Overview
Hardware Overview Ž Œ Œ SVHS-In Ž Audio-Out Video-In Antenna Terminal TerraTValue... -
Page 8: Installing The Hardware
Installing the Hardware Install the hardware as follows: 1. Switch off your PC and all connected peripheral devices, such as printer, monitor and so on. Leave the AC cord connected for the time being, so that your computer is still grounded. 2. - Page 9 fig. 1: Connect the output of the TV card to the input of the sound card as shown in this illustration. If you connect the TV card to the sound card, be sure to read the section called Important Settings for Sound Card Owners on page 14! 10.
-
Page 10: Windows 98 Installation
Windows 98 Installation Step – 1 1. Install the TerraTValue hardware and start Windows 98. 2. During startup, place the provided TerraTValue CD into your CD-ROM drive. 3. After Windows 98 has started, the TerraTValue is detected as a PCI Multimedia Video Device. -
Page 11: Step - 2
The easiest way to uninstall the drivers is to use the Uninstall utility which you can find in the \Drivers\Uninstall directory of your TerraTValue CD or at our Internet site at www.terratec.net. Uninstall the drivers as follows: 1. To uninstall the TerraTValue drivers, run the Uninstall utility. -
Page 12: Windows 95 Installation Osr-1 / Osr-2
Windows 95 Installation OSR-1 / OSR-2 1. Install the TerraTValue hardware and start Windows 95. 2. During startup insert the TerraTValue CD provided in your CD-ROM drive. 3. After Windows 95 has started, the TerraTValue is detected as a PCI Multimedia Video Device. -
Page 13: Important System Settings For Operating The Tv Card
Important System Settings for Operating the TV Card Observe the following items to ensure that the TV card provides optimal performance: · The color depth for your graphics board should be set to a minimum of 16 bits or 65536 colors so that the TV image can be displayed in true-to-life color. -
Page 14: Important Settings For Sound Card Owners
Important Settings for Sound Card Owners If you have connected the Audio output of the TV card to the Line-In input of your sound card using the provided jack-jack cable, you will have to make certain settings in the mixer for the sound card so that you can hear and record the TV/Video tone. -
Page 15: On The Search For Connections - The Connection Of External Devices To The Tv Card
On the Search for Connections – The Connection of External Devices to the TV Card In this chapter, you will learn everything you need to know about connecting external devices such as VCRs, video cameras and satellite receivers. Generally, you can connect external devices to TerraTValue through the antenna, video or SVHS inputs. -
Page 16: Connecting An External Device With Video-Out
Connecting an External Device with Video-Out External devices that have a Video-Out port can be connected to the Video-In port of TerraTValue using a cinch/cinch cable (see the following illustration). fig. 4: Use this cable to connect a device with a Video-Out port. Proceed with the cable connection as follows: 1. -
Page 17: Connecting An External Device With Svhs-Out
Connecting an External Device with SVHS-Out External devices that have a SVHS-Out port can be connected to the TV card by using a connector cable with male plugs on both ends. (see the following illustration) fig. 5: SVHS/SVHS cable Proceed with the cable connection as follows: 1. -
Page 18: Connecting An External Device With Scart Out
Connecting an External Device with Scart Out If you want to connect a device that has a scart out, you will need a special adapter cable to make the connection to the TV cable. The cable you will need must have a scart port on one side which you plug into the external device. - Page 19 Important! When purchasing an appropriate cable, you must pay attention its signal direction. There are cables for feeds into the VCR (Video-In), and there are cable types for feeds out of the VCR (Video-Out). Use a cable with the signal direction Video-Out! Preferably, you should buy a model that allows you to switch from in to out.
-
Page 20: Attention! -Connecting Audio To The Tv Card
Attention! -Connecting Audio to the TV Card In attaching external devices through the Video-in or SVHS-In ports, you should note, that only video signals (and not sound) can be transmitted over these two ports. For this reason, you will need a second cable connection, which goes from the audio-out ports of the external device to the Line-In input of your sound card. -
Page 21: The Tv Software In Detail
The TV Software in Detail The 32-bit TV software of TerraTValue provided here offers you full control over all integrated functions. Install channels automatically through channel scan, shoot stills that are then immediately saved as bmp files or directly record completely compressed video sequences in real time. -
Page 22: Shortcut Keys In The Tv Software
Shortcut Keys in the TV Software The most important functions of the TerraTValue software can also be accessed with the touch of a button. Use the following keys or key combinations to carry out the individual functions: Function Keys Previous Channel Cursor Down Next Channel Cursor Up... -
Page 23: Touch Of A Button - The Functions Of The Right Mouse Button
Touch of a Button – The Functions of the Right Mouse Button If you click on the surface of the TV software with the right mouse button, a context menu appears which allows you to quickly access a few practical functions of the TV software. fig. -
Page 24: Quick Access - The Channel List In The Status Bar
Quick Access – The Channel List in the Status Bar The channel list, which you can open with a simple mouse click in the status bar of the TV software, represents a very quick navigational possibility for everyday use. fig. 8: The Channel List in the Status Bar TerraTValue... -
Page 25: Editing Channel Settings
Editing Channel Settings Through the Channel Scan window you have the option of changing your channel settings at any time. You can, for example, assign a channel name or fine tune the channel if it does not have optimal picture quality. To change the channel settings, do the following: 1. -
Page 26: Adding Stations Manually
Adding Stations Manually If, for example, some stations were not found during the Channel Scan, or if you want to set a channel yourself, you can do this too through the Channel Scan window. To add a station manually, proceed as follows: 1. -
Page 27: The "File" Menu
The "File" Menu The Menu Point "New Teletext Window" Through this menu point you can call up a new teletext window of the teletext software. You can also do this through the symbol bar interface shown here. The Menu Point "Save As" After you have shot a frame, you can save it as a bmp file through this menu point. -
Page 28: The "View" Menu
The "View" Menu The Menu Point "Caption" Through this option you can hide and show the TV software's captions. The Menu Point "Status Bar" Through this option you can hide and show the status bar of the TV software. The Menu Point "View None" This very useful function hides all of the TV software's window frames that might possibly disturb you . -
Page 29: The "Channel" Menu
The "Channel" Menu The Menu Point "Channel... " Through this menu point you can call up the channel list, from which you can pick a particular station to view. The channel list is very practical to use if you drag its window next to the TV software. -
Page 30: The "Options" Menu
The "Options" Menu The Menu Point "Video Source" Through the menu point Video Source you can set the video source displayed by the TV software. The video source selection is always important if you want to record something from an external VCR or video camera. Additionally, this menu point allows you to set a few picture parameters such as brightness and contrast as well as set the television standard. - Page 31 NOTE! The option Video Standard makes it possible for you to choose different television standards. This only makes sense, for example, if you have an NTSC VCR or camera connected to the TV card. Then you can choose the setting NTSC under the option Video Standard, so that the delivered signals can be processed correctly.
- Page 32 The Setting Image Format Through this menu point you can determine how many bytes per pixel are used when capturing a frame or recording a video sequence. Be careful, however. The more bytes you set to save a pixel, the greater the data yield and the bigger the resulting file will be! Image Format What it Means for the Recording 32-Bit RGB...
- Page 33 The Menu Point "Copy to Clipboard" After you have captured a single frame, you can copy it onto the Windows clipboard by going to the menu point Copy to Clipboard. From there, the frame can be pasted into any number of other applications. Pasting can be done by using the key combination Ctrl-V or the menu point Edit\Paste.
- Page 34 The Menu Point "Mosaic" The TV software's mosaic offers you a quick overview of up to 100 television stations. To do this, the mosaic flips through all the stations and captures one frame from every channel. These frames are listed one after the other and can then be activated with a mouse click.
-
Page 35: Uninstalling The Tv Software
Uninstalling the TV Software It is very easy to uninstall the TV software. You might have to uninstall the software, for example, if you receive a new version or if you have difficulty operating the TV card: 1. Call up the control panel and doubleclick on the software symbol. 2. -
Page 36: Attention! - Recording Parameters Of Video Sequences
Attention! – Recording Parameters of Video Sequences There are four important factors you should take into consideration when recording a video sequence. These factors could have a decisive effect on the amount of data recorded and the quality of your recording. The deciding factors are: a.) The video format of the television picture you want to record b.) The number of frames per second to be recorded c.) The set compression factor during the recording... - Page 37 Under the menu point Options\Video Format you will find another very important parameter for recording video sequences. The setting Image Format lets you determine how many bytes to use to save one pixel of the TV picture. As before, the more bytes per pixel you have, the greater the data yield when recording.
-
Page 38: Less Is Often More - The Number Of Frames Per Second To Be Recorded
Less is often More – The Number of Frames per Second to be Recorded A video sequence consists of a fast succession of single frames. For our eyes to perceive a fluid movement, 15 frames must be shown per second. This holds true as well when recording video sequences. -
Page 39: More Or Less - Determine The Compression
More or Less - Determine the Compression In the previous two segments you learned that the amount of data received while recording a video sequence is determined by the size of the video format and the number of frames. The bigger the video format and the greater the number of frames per second, the more data accrued. -
Page 40: The Right Sound - The Audio Parameters For Video Sequence Recording
The Right Sound – The Audio Parameters for Video Sequence Recording When recording video sequences with sound, different sound qualities can be set. You can choose the sound qualities: · CD Quality · Radio Quality · Telephone Quality · No Audio for the recording. -
Page 41: In Detail - More Video Recording Settings
In Detail - More Video Recording Settings You can select two other settings for video sequence recording. One is the selection of a file name for saving the video sequence and the other a time frame after which the record function should automatically turn off. -
Page 42: Attention Trap - Recording A Video Sequence
Attention Trap – Recording a Video Sequence Now that you have learned in the previous segments all about the settings available for recording a video sequence, you can practice your newly applied knowledge: 1. First of all, go under the menu point Options\Video Source and set the signal source from which you want to record the video sequence. - Page 43 Troubleshooting - Video Sequence Recording 1. The recorded video sequence seems jumpy. In this case, there are several possible solutions: · Lower the video format to be recorded through the menu pointOptions\Video Format · Lower the set number of frames per second through the menu point Options\Video Recording Settings ·...
-
Page 44: Say Cheese - Recording A Single Frame
Say Cheese - Recording a Single Frame 1. First, go to the menu point Options\Video Source and set the signal source from which you want to record the frame. There, choose Tuner, if you want to record a video sequence from a running television program or choose Composite or. SVideo respectively, depending on connection type. -
Page 45: Always Informed - The Teletext Software
Always Informed – The Teletext Software The teletext software offers you actual functions for the world of teletext. Save interesting teletext pages such as stock tips and recipes directly or print them out. Through the integrated teletext caching, all pages are loaded in the background and can be accessed at the touch of a button. -
Page 46: The Symbol Bar Of The Teletext Software
The Symbol Bar of the Teletext Software History function Through these two interfaces you can page through the most recently read teletext pages, whether forward and back. This history function is also accessible through the menu point Teletext/History Forward and History Back respectively. These buttons are grayed out until you have used the Plus or Minus buttons further to the right to scroll through the pages. -
Page 47: The "File" Menu
The "File" Menu The menu point "New window" This menu point opens a new teletext window for you. This function is practical, for example, if you want to compare the teletext contents of different channels with one another. The menu point "Open" Use this menu point to open up saved teletext pages. -
Page 48: The "Teletext" Menu
The "Teletext" Menu The menu point "Channels" Pulls up a list for setting a new station. The menu point "Teletext Caching" Lets you set up the buffer for the teletext pages. Teletext caching saves all the teletext pages to the background allowing you to then access them at the touch of a button. The menu point "Reveal"... - Page 49 The menu point "Lock Subpages" This menu point is especially practical when a teletext page consists of several subpages. Normally the individual pages scroll through automatically according to a set interval. To lock the current subpage, simply activate the menu point Lock Subpage. The menu point "History Back"...
-
Page 50: Status / Error List - Teletext Decoding
Status / Error List - Teletext Decoding The three status lights have the following meanings. Green: The teletext is being decoded or is decoded Yellow:The teletext cannot be decoded Red: No teletext signal is being received Clicking inside this field opens an error log in which you can view past occurring errors. TerraTValue... -
Page 51: The Terratec Hotline
The TerraTec Hotline If you still have problems or questions, please review all of the instructions in this documentation first. If you are certain that you can’t solve your problem without assistance, please call our hotline. Our friendly support team is available from Monday through Friday from 1 p.m. to 8 p.m. -
Page 52: Faq
Question 1: Your computer crashes when you use the TV software and can only be revived with a restart. Answer 1: · First, check in the device manager under 'computer' to see if TerraTValue is on the same interrupt as another slot card. This can lead to your computer crashing, especially if TerraTValue is on the same interrupt as a graphics card. - Page 53 Question 3: When starting your computer the error message "No suitable DirectX Provider - Overlay channel disabled?" appears. Answer 3: · This error message appears when your graphic card's installed drivers do not conform to DirectX. In this case, you should purchase and install the current driver for your graphics card.
- Page 54 Question 5: What is the maximum resolution at which TerraTValue can digitalize video sequences? Answer 5: · As with most common TV cards with Brooktree 848 or 878 chips, the TerraTValue can digitalize video sequences with a maximum resolution of 768x576 pixels. The amount of data that comes with this video format, however, blows any possibility of having momentary access to your hard drive.
- Page 55 Question 7: When starting the TV software, you receive the message "The file TV.EXE is linked to: Export - OLEAUT32.DLL:420" Answer 7: · In this case, you are probably working with an older version of Windows 95, which works with older DLL files. These are responsible for the exchange of data between applications. The TerraTValue software needs these files for a dynamic exchange of data to take place.
- Page 56 Question 10: How do I connect my TV card with Linux? Answer 10: · You can find information on this on the Internet at http://www.thp.uni-koeln.de/~rjkm/linux/terra/terra.html. Question 11: When recording video I get picture but no sound. Answer 11: · For a video sequence to be recorded at all, the output of the TV card has to first be connected to the Line-In input of your sound card.
- Page 57 Question 13: Does TerraTValue have a video-out? Answer 13: · No, generally TV cards do not have video-out. If you want to produce video material from your system, you will have to use a graphics card with video-out. Question 14: No stations were found during the channel scan.
Need help?
Do you have a question about the TerraTValue BT878 and is the answer not in the manual?
Questions and answers