Table of Contents
Advertisement
Advertisement
Table of Contents

Related Manuals for TerraTec Aureon 7.1 Universe


Summary of Contents for TerraTec Aureon 7.1 Universe
- Page 1 Manual (English) Version: 04.03.04...
- Page 2 CE Declaration TerraTec Electronic GmbH, Herrenpfad 38, D-41334 Nettetal, Germany hereby declare that the product: SoundSystem Aureon 7.1 Universe to which this declaration refers is in compliance with the following standards or standardizing documents: EN 55022 Class B EN 55024 The following are the stipulated operating and environmental conditions for said compliance: residential, business and commercial environments and small-company environments.
-
Page 3: Table Of Contents
The software........................25 The drivers.........................25 The Aureon ControlPanel....................28 The remote control.......................35 The Remote Control Editor....................35 Standalone mode........................42 Sound Rescue TerraTec Edition 2.0 ..................43 Intervideo WinDVD 5.0 – 8-channel ..................56 Service at TerraTec.......................57 SoundSystem Aureon 7.1 Universe (English) - Page 4 Welcome! We're pleased that you have chosen a TerraTec SoundSystem and would like to congratulate you on this decision. You've purchased a sophisticated product representing the state of the art of audio technology, and we're convinced that our product will prove extremely useful to you in the coming years and provide you with a great deal of entertainment.
- Page 5 Don't miss the remarks in the margins marked with an exclamation point! They contain infor- mation such as summaries of the following sections, notes on important settings or tricks that can make your day-to-day audio work significantly easier. Thanks for your attention—enjoy! ...your TerraTec Team SoundSystem Aureon 7.1 Universe (English)
-
Page 6: From Opening The Package To Installation
1 TerraTec registration card with the serial number · 1 Algorithmix registration and update card Please return the registration card to us at the earliest possible opportunity or register online at http://www.terratec.net/register.htm. This is important for support and hotline services. SoundSystem Aureon 7.1 Universe (English) -
Page 7: Short And To The Point For Busy Pros
Note! Even if you're a seasoned pro, you should still at least skim the The software. chapter starting on page 25. The information on drivers and the first sections on the ControlPanel are impor- tant for your overall understanding of the system. Thank you. Short and to the point for busy pros. -
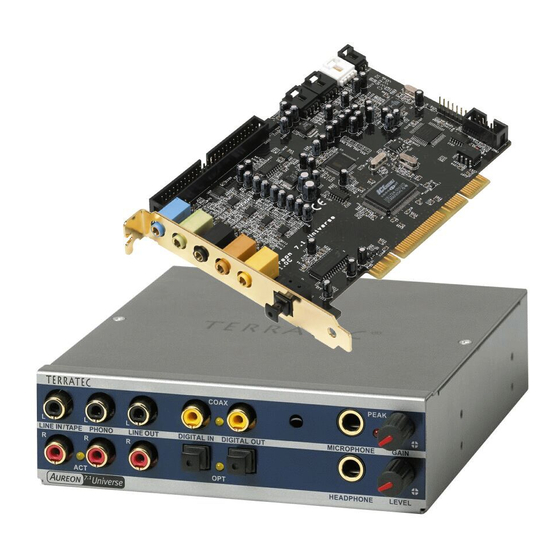
Page 8: The Connections Of The Aureon 7.1 Universe Pci Card
The connections of the Aureon 7.1 Universe PCI card. ‡ † … CN22 CN20 € ‚ ƒ „ Analog stereo input (3.5 mm mini-jack) € Analog stereo output 1 “Front” (3.5 mm mini-jack) Analog stereo output 2 “Rear” (3.5 mm mini-jack) ‚... -
Page 9: The Connections Of The Aureon 7.1 Universe Front Module
The connections of the Aureon 7.1 Universe front module ‚ ƒ † ‡ € „ … Stereo audio input (cinch/RCA with signal LED) for line-level devices such as a tape deck € Stereo audio input (cinch/RCA) for connecting a turntable with moving magnet (MM, MD) pickup system ... -
Page 10: Installation-Step By Step
Installation—step by step. Safety note. Before opening the case, unplug the AC power cable from the wall socket as well as from the · Switch off your PC and all connected peripheral devices such as your printer and monitor. Leave the AC power cable connected for the time being, so that your computer is still grounded. -
Page 11: Installing The Front Module
Installing the front module. · Find a free 5¼" bay on the front of your PC. If possible, please install the module in a bay below the CD, ZIP drive or other devices due to the dangling cables. It may be necessary to break out the cover plate. - Page 12 The connections and their uses.” starting on page 21.) · Reconnect the AC power cable as well as all other cables and turn your PC on. Make sure that your speakers or hifi system is set to low volume. · Start your computer.
-
Page 13: Installing The Driver Software
Installing the driver software. The SoundSystem Aureon 7.1 Universe currently comes with drivers for Windows 2000 and Windows XP. The card cannot be used under Windows 95, 98, ME and Windows NT 4. You should therefore determine which operating system you are using before installing the card. For information on your operating system and its version number, please check the System dialog in the Windows Control Panel. -
Page 14: Installation Under Windows 2000
Installation under Windows 2000. After the computer restarts and Windows detects the new hardware using the Add New Hard- ware Wizard, the following window displays. Click “Next”. Select the “Search for a suitable driver for my device (Recommended)” item and click “Next”. SoundSystem Aureon 7.1 Universe (English) - Page 15 Activate the checkbox “CD-ROM drives” and click “Next”. Acknowledge this screen by clicking “Next”. SoundSystem Aureon 7.1 Universe (English)
- Page 16 Continue the installation by clicking “Yes”. It is possible that such a dialog window appears again in the course of the installation. If this is the case, simply click “Yes”. Windows now performs the driver installation and acknowledges the process with several windows that can be viewed.
-
Page 17: Installation Under Windows Xp
Installation under Windows XP. After the computer restarts and Windows detects the new hardware using the Add New Hard- ware Wizard, the following window displays. Click “Next”. Select “Search for the best driver in these locations” and click “Next”. SoundSystem Aureon 7.1 Universe (English) - Page 18 Select “Continue Anyway”. It is possible that such a dialog window appears again in the course of the installation. If this is the case, simply click “Continue Anyway”. After successful driver installation, the additional bundled software can be added easily using the autorun option.
- Page 19 call up “Control Panel -> Software” and locate the programs to be removed. Select the various programs and click “Add/Remove Programs...”. Installed drivers should look like this. After a successful driver installation, you should verify the correct condition of your Windows system.
-
Page 20: Multimedia Settings
Multimedia settings. Finally, check your system's “Multimedia” settings and ensure that the playback of audio data via the Windows Wave Mapper is correctly set up. Open the “Multimedia Properties” (“Control Panel” > “Multimedia”) and select “AUDIO”. The output via the Wave Mapper is preferable for many programs and for the output of Win- dows system sounds. -
Page 21: The Connections And Their Uses
The connections and their uses. Now that you have successfully installed your new sound card, we come to the most impor- tant part—connecting external devices and configuring the software. Safety note. When connecting analog devices, ensure that the power is off to protect your speakers and your hearing from sudden peaks. - Page 22 The outputs are laid out in the format that you probably already know from 5.1 / 7.1 hifi appli- cations: for the two front speakers (Front, Left and Right) for the two rear speakers (Rear, Left and Right) C/W for the center speaker (mono) and the subwoofer signal, the so-called LFE channel (also mono).
- Page 23 Phono The left (top) and right inputs are designed for recordings from turntables without an interme- diate preamp—without a doubt one of the highlights of the SoundSystem. You can plug your vinyl player directly into the front module thanks to its integrated phono preamp, and the system also handles the necessary filtering.
- Page 24 The front module also contains an expansion socket: the connector with 26 small pins is designed for the wavetable modules that you may remember from “way back when”. TerraTec had a number of these supplementary modules in its product range under the “WaveSystem”...
-
Page 25: The Software
The software. The drivers. The SoundSystem Aureon 7.1 Universe features a range of drivers for a variety of applications. The drivers support all bit rates between 8 and 32 bits with all common sample rates between 8 and 192 kHz. As a rule, the sample rates are not “interpolated”. In other words, the Aureon 7.1 Universe always automatically sets itself to the sample rate with which an application is recording or playing back. - Page 26 In detail—special properties of the Aureon driver. The following contains in-depth information for those with the need to know. Less experi- enced users won't encounter any problems if they skip over this section. 32-bit data transfer. The drivers support a special data transfer format known as “32-bit unpacked”. Audio data streams are transferred to the computer's main memory via the PCI bus.
- Page 27 (MME and/or DirectSound) in parallel (multi-client, a “luxury” that faithful TerraTec customers have enjoyed since 1997). WDM sample rate (SR) interpolation. The multi-client capability of the WDM architecture also permits the simultaneous playback of multiple audio data streams with differing sample rates. The sample frequency used for all data streams is oriented towards the file with the highest sample frequency.
-
Page 28: The Aureon Controlpanel
The Aureon ControlPanel. The Aureon ControlPanel is— next to the drivers— by far the most important piece of software in the package. Here you can configure your Aureon 7.1 Universe to suit any given situation, adjust sensitivities, reduce volume levels, and much more. In the mixer window, you can control the volume of each source. - Page 29 In the Master area on the right, a master volume controller for the system appears on all pages of the Aureon ControlPanel. This always allows you to have direct access in case you need to make a quick adjustment. The “Surround” window. The Surround controls the volume of up to 8 audio channels for multichannel playback, as used in DVD audio, for example.
- Page 30 The “Input” window The control center of your Aureon 7.1 Universe—in this window, you can set the sensitivity for each input, and select the input from which you want to record. Click the button above a fader to select the corresponding input for recording. If you can't decide on just one input, you can always use the “Stereomix”...
- Page 31 The “Settings” window. Here's where we come to the real nuts and bolts. To be more precise, to a number of sophisti- cated technical details—which aren't very difficult to understand, however. Specifically, these are: The Settings page for the configuration of drivers, digital interfaces/filters and the color settings of the ControlPanel.
- Page 32 The language. Here, you can set the Aureon 7.1 Universe ControlPanel to the language of your choice. Enable Taskbar This button adds an icon for the ControlPanel to your Windows taskbar, and starts the Aureon ControlPanel automatically each time the computer is restarted. Digital Out.
- Page 33 This setting is system-dependent. In the best case, the software will have a latency of around 1.5 ms. On average systems with processor loads typical for a music PC, you can expect values around 7-30 ms. Note that you may have to restart the ASIO application before your new settings take effect.
- Page 34 “nor- mal” (gray) Windows elements. The Information window …will display information on the audio drivers and system settings. These details can be useful when contacting TerraTec support. SoundSystem Aureon 7.1 Universe (English)
-
Page 35: The Remote Control
You can raise and lower the playback volume of your system by pressing Vol Up and Vol Down. So that operation via remote control will be as effective as possible, the TerraTec Remote Control Editor control software has the capability to forward commands to all Windows applications. - Page 36 While developing the software interface between the operating system on the one side and the TerraTec hardware on the other, our first priority was to provide the user with as much flexibility as possible, and thus not to restrict the remote control options to TerraTec applications.
- Page 37 Using the example of the Windows Calculator—an often underrated, cool little app—we want to provide you with an example of how you can create your own presets for a desired application. To do so, click the icon we mentioned above in your taskbar. 1.
- Page 38 To make it easier for you to navigate using the program icons, you can change the view so that the icons are displayed larger, if this is not already configured by default. From the “Open” dialog, it is best to select “Thumbnails” as the menu view. Now, select an application to be controlled.
- Page 39 “Remote control” pulldown menu to select the TerraTec product you want to use right now. Below it, you see the name of the button you have just pressed, in this case Channel + . This is also indicated by a red outline around the image of the remote control.
- Page 40 Here is a detailed overview of the individual functions, listed according to command type parameter… On-screen display menu (OSD) Display parameter Function Main menu Use this button to call up the main menu; in the default assignment, the menu is called up using the APP button.
- Page 41 Now, about the options: There, you can switch the on-screen display menu (OSD) on and off completely, and modify its display options. If you have installed more than one TerraTec product with infrared receivers, here you can choose which one you want enabled. You can select the “Start with Windows” option to ensure that the Remote Control Editor loads automatically to manage the command sets each time the system is started.
-
Page 42: Standalone Mode
Standalone mode. The Aureon 7.1 FireWire can provide enjoyment even without a PC. Even without an active FireWire connection, the high-quality converters live up to their reputation. This means that you can use the remote control to switch between sources, and thus output digital signals as analog signals and vice versa. -
Page 43: Sound Rescue Terratec Edition 2.0
Sound Rescue TerraTec Edition 2.0 1. Overview Sound Rescue TerraTec Edition 2.0 is a powerful tool that lets you clean up problematic material such as older recordings, directly on your PC. It lets you remove or significantly reduce unwanted noise while maintaining the authentic sound and quality of the original recording. - Page 44 Features: · Realtime operation with 233 MHz or better MMX Pentium and Windows® 95/98/Me/NT/2000/XP · High stability using its own, separate drivers · Recording at 44.1-kHz/16-bit “Red Book” WAV format · Worldwide, the fastest off-line processing · Fast, intuitive menu prompts ·...
- Page 45 CD. Then start the setup of Sound Rescue TerraTec Edition 2.0 and follow the instructions as they appear on the monitor. When Sound Rescue TerraTec Edition 2.0 is started for the first time, it checks whether a CD burner and burner software are installed on your system. Sound Rescue TerraTec Edition 2.0 has been tested with WinOnCD™...
- Page 46 3. User Interface Editing Area The editing area of Sound Rescue TerraTec Edition 2.0 consists of four main components: Descratcher (on the left), Denoiser (on the right), Analyzer (in the center) and the adjustment sliders for bass/treble/volume (on the bottom). Two sound-level meters let you control the output level while, at the same time, you can adjust the volume and the bass and treble levels using the sliders mentioned above.
- Page 47 Playback Area The Playback area is located in the lower section of the Sound Rescue TerraTec Edition 2.0 interface. Using its features, you can record a WAV file, load a file for editing, start and stop playback, and jump to any position in the WAV file by moving the cursor within the Waveform display.
- Page 48 The playback area of Sound Rescue TerraTec Edition 2.0 You can save the processed audio material by opening the file dialog box using the button. The sampling frequency of the saved file is identical to the frequency of the output file (44.1 kHz).
- Page 49 4. Recording To do so, click the With Sound Rescue TerraTec Edition 2.0, you can, of course, also make recordings. button and specify a location and name for the resulting WAV file in the dialog box that opens. You will now see the AlgoRec window, which shows you the input level for the standard recording device as configured in Windows.
- Page 50 The Split window of Sound Rescue TerraTec Edition 2.0 Select the option you want to execute, provide a name for a new file if necessary and then click OK.
- Page 51 6. Descratcher The Descratcher function effectively removes pops and crackling noises from old vinyl and shellac records as well as from audio files in which the tone quality has been decreased during recording because of switch noise, digital crosstalk or thyristor humming. The Descratching algorithm consists of two components: the Declicking filter and the Decrackling filter.
- Page 52 7. Denoiser The Denoiser belongs to the noise reduction systems. It does not require any special coding method prior to recording, such as that required by the familiar tape noise reduction system by DOLBY™ Lab. The Denoiser efficiently removes all types of wideband noises from recorded audio tracks.
- Page 53 8. Burning CDs When Sound Rescue TerraTec Edition 2.0 is started for the first time, it checks whether a CD burner and burner software are installed on your system. Sound Rescue TerraTec Edition 2.0 has been tested with WinOnCD<Trademark> 3.6 to 5.0, EasyCDCreator<Trademark> 5.0, Nero 4.0 to 5.0 and Feurio 1.63.
- Page 54 9. Application Notes The Descratcher and the Denoiser are user-friendly audio-restoration tools based on an extremely effective signal-processing algorithm. In most cases, they automatically produce good results. To get the most out of these tools, especially when working with badly damaged audio material, use the following, practical guidelines: ·...
- Page 55 Difference signal, the amount of filtering should be decreased. Important note: Sound Rescue TerraTec Edition 2.0 is a fast and effective tool. You will be amazed by how much you can improve the sound quality of old records and distorted audio files. However, please do not expect any miracles when trying to restore material that contains gaps or jumps.
-
Page 56: Intervideo Windvd 5.0 - 8-Channel
10. Contacting Us â For more information on extensions, updates and new products from Algorithmix visit us on the Internet at: http:// www.algorithmix.com or send an e-mail: to support@algorithmix.com if you want information on the installation and features of this product, or to info@algorithmix.com â... -
Page 57: Service At Terratec
(FAQ) and the latest drivers. If these options do not provide the necessary help, please contact our phone hotline. You can also reach us online. To do so, visit us at http://supporten.terratec.net/. In either case, please have the following information handy: ·... - Page 58 Broken?! Before you send the product back, be sure to contact us! Make a note of the name of your support contact and follow these simple instructions: · Please fill out the service request form provided with your card clearly and completely. The more clearly and detailed you describe the problem, the faster we will be able to help.
- Page 59 The warranty will not apply to damage caused by improper packaging. 6. Foreign manufactured products Devices that are not manufactured or distributed by TerraTec Electronic GmbH will be returned and a processing fee will be charged. 7. Repairs liable to your expense Repairs out of the warranty period are liable to your expense.
Need help?
Do you have a question about the Aureon 7.1 Universe and is the answer not in the manual?
Questions and answers