Table of Contents
Advertisement
Quick Links
Advertisement
Table of Contents

Related Manuals for Meade LX850


Summary of Contents for Meade LX850
- Page 1 Instruction Manual LX850™ German Equatorial Mount Telescope System With StarLock™...
- Page 3 Children should always have adult supervision while observing. Travel Screw: The LX850 f/8 ACF optical tube assembly (OTA) is shipped from the factory with the focusing mechanism protected by a travel screw. This screw secures the...
-
Page 4: Table Of Contents
StarLock and Mount Flexure....26 The LX850 Telescope ......5... -
Page 5: The Lx850 Telescope
OTA’s, eliminates image shift and mirror flop. Precise focus is a snap (patent pending) If you are like us, you can’t wait to get outside under a dark sky to use your new LX850 telescope. We have provided a Getting Started Guide that will get you up and running in the shortest amount of time possible. After your first experience, please sit down with this manual and read about all the advanced features that are available to you with this telescope system. -
Page 6: Telescope Features
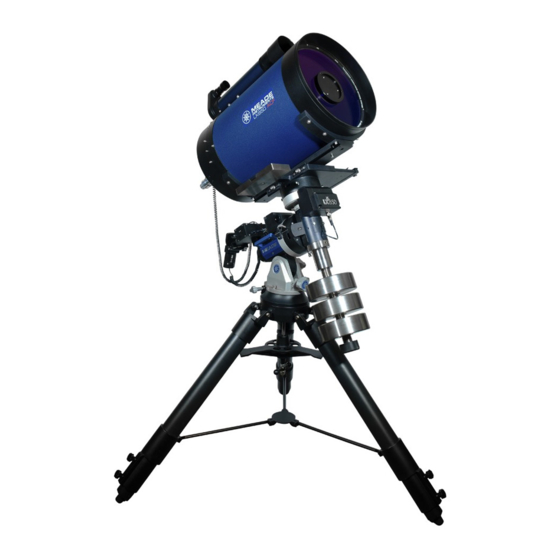
.68 inch diameter brass worms and 5.8 inch diameter, Automatic Guiding 225-tooth aluminum gears deliver smooth, precise StarLock — the heart of the LX850 — is the revolutionary movement with up to a 90 pound instrument load. Add new technology that makes target acquisition on your... - Page 7 Handbox Holder StarLock Imaging Sensor Assembly Handbox Holder Tension Knob StarLock Cable AutoStar II Coil Cord StarLock Mount (On OTA) Telescope Control Panel OTA Dovetail Lock Counterweight Safety Cap Altitude Scale Counterweight Shaft Figure 1: LX850 Key Features - Right View...
- Page 8 2& Dovetail Plate Safety Bolt Carry Handles Zero Image Shift Microfocuser StarLock Mount (on saddle ) Leg Locks StarLock Dovetail Lock Bolts 4& Spreader Bar DEC External Cable Access Port Tension Knob Figure 2: LX850 Key Features - Left View...
- Page 9 LX850 Key Features 3^ 3& Figure 3: Detail, RA Access Figure 4: StarLock Counterweight Mount Saddle Plate Configurations Losmandy® Style Dovetail Configuration Vixen® Style Dovetail Configuration Note that there are different angled surfaces on the dovetail brackets on the saddle. In addition to physically moving the dovetail to accommodate the differing width of Losmandy or Vixen it is important to orient the bracket so that the pitch to the dovetail matches the corresponding mount.
-
Page 10: Figure 6A: Telescope Control Panel
B. 12v DC Power Connector StarLock Telescope Connection C. Electronic Focus Port D. Illuminated Reticle Eyepiece Power Port Guider Status E. 12v DC Output RS-232 Port F. Handbox (HBX) Port G. RS232 Port Travel Screw Figure 2-B: LX850 Key Features - Telescope Control Panel... -
Page 11: Lx850 Key Features
2” Star Diagonal with 1.25” Adapter: Holds the Azimuth Lock Bolts. Once your LX850 is aligned eyepiece upright for easy viewing. Provides a on the celestial pole, lock the azimuth bolts to more comfortable right-angle viewing position. - Page 12 Dovetail Rail Safety Bolt: Make sure the Safety knob is securely attached. LX850 Carry Handles: Use these carry handles to help move the LX850 mount from one location StarLock Mount (Left side view): Attaches to another. StarLock to the telescope mount saddleplate.
-
Page 13: Assembly
Assembly You may want to perform the assembly of the LX850 5/16" Hex Head Wrench in the light of day to become familiar with the parts and operation before performing observations on the night LX850 Utility Tool sky. Setup the telescope in a large open area where you can see lots of sky. -
Page 14: Attach Mount Assembly To Tripod
Loosen the two (2) leg lock-knobs on each tripod leg. Adjust the height of the tripod to the desired height and with the tripod head approximately level, tighten the leg locks. Tighten the locks to a firm feel only; do not over tighten. -
Page 15: Attach Counterweight Shaft
Attach the Counterweight Shaft Routing Connector Cables Internally Remove the counterweight shaft, with attached safety Designed into the LX850 mount is a raceway that nut, from its packaging. The safety nut is attached at routes cables through the body of the mount. Cables the factory for shipping. -
Page 16: Removing The Saddle
Removing the Saddle so that it will plug into its corresponding receptacle. The four-pin connector is inserted into the four-pin Your telescope mount shipped from the factory with the receptacle on the back of the StarLock. The six-pin OTA mount saddle attached. You will have to remove connector is plugged into the six-pin receptacle on the it to gain access to the upper portion of the internal mount control panel labeled “StarLock”. -
Page 17: Attach The Control Module
The connecting cables for the RA & DEC are attached factory, dovetail rails are configured to receive a to the control panel module and can not be removed standard Losmandy®-style dovetail. Meade LX850 from the module. The short cable connects directly OTAs are shipped with their dedicated dovetail plates to the RA gearbox that is directly above the module. -
Page 18: Attach Diagonal And Eyepiece
Losmandy®-style dovetail plate. To prepare the LX850 Dovetail adapter to accept the Losmandy dovetail plate, the mounting rails on the dovetail adapter must be positioned in the correct location and with the correct long side of the rail facing inward toward its corresponding mounting rail. -
Page 19: Plug In The Autostar Ii Handbox
Attach the Viewfinder to the OTA The Meade OTAs sold with the LX850 are equipped with a standard 8x50 finderscope. To assemble and align the viewfinder, perform steps 1 through 6 below during the daytime. 1. Assemble the viewfinder by attaching all included thumbscrews onto the viewfinder bracket and Fig 26: Mounting StarLock to the saddle plate. -
Page 20: Balancing The Ra Axes
DEC axes. Position the OTA parallel The telescope is now properly balanced. Return the to the ground. LX850 to the original position with the counterweight Advanced Coma-Free OTAs: Slightly loosen the OTA shaft pointed to the ground and OTA pointed dovetail adapter lock knobs (Page 8, Fig. -
Page 21: Getting Started
Focusing the Telescope Focusing and Aligning the Viewfinder Meade Advance Coma-Free (ACF): 1 . If you have not already done so, insert the Meade Note: All LX850 ACF optical tube assemblies ship eyepiece into the diagonal mirror on the rear of from our factory with a Travel Screw. -
Page 22: Slew Speeds
precise focus use the smaller fine focus knob for final Autostar’s Setup/Align Menu. Once you do this at the focus. If you have a 2” eyepiece, remove the 1.25” end of each observing session you will need only to eyepiece adapter from the diagonal by loosening the park your scope and your telescope will keep this thumbscrew(s). -
Page 23: One Star Alignment
Autostar II key to abort the Alignment). OTAs. 8. Autostar now acquires a “GPS Fix.” The LX850’s GPS Syncing your Eyepiece or Camera receiver acquires and syncs up with signals from using Starlock GPS satellites. -
Page 24: Test Your Collimation
Test your Collimation b. While looking at the defocused star image, notice Before collimating an LX850 telescope, you will need which direction the darker shadow is offset in the to test your collimation. ring of light or notice which part of the ring is the thinnest (Fig. -
Page 25: Calibrate Home
Always double check the image in the center of the Most users can use the default park position when field of the eyepiece. parking their LX850. The default park position is g. You may find after your initial adjustment that the identical to the home position; counterweight shaft dark center is off in a new direction (e.g., instead of... -
Page 26: Starlock Automatic Rate Calibration (Arc)
StarLock Automatic Rate and no movement of the StarLock is occurring. Calibration (ARC) Note that 10”, 12” and 14” LX850 ACF optical tubes include their own StarLock mounting bracket located at Obtaining best performance from StarLocked telescopes the top of the OTA, towards the rear cell. This second... -
Page 27: Autostar Ii Operation
AutoStar II Operation ¸ 2-Line LCD Display ENTER Key ¿ MODE Key “GO TO” Key · Arrow Keys ´ Number Keys » Scroll Keys º “?” Key Coil Cord Port ² Coil Cord Utility Light ¾ ¶ µ Figure 35: The AutoStar II Handbox category, then returns to the first option. -
Page 28: Autostar Navigation Exercise
7. Press MODE once to start moving back up through the AutoStar levels. The first level up is the Event menu. 8. Press MODE again to move up another level. This is the top level, “Select Item”. 9. Press MODE again to return to the starting Figure 37: AutoStar Levels point of “Select Item: Object”. -
Page 29: Autostar Ii Menu Tree
AutoStar II MENU TREE Figure 39: The AutoStar II Menu Tree... -
Page 30: Navigating Autostar Ii
9. Press the Up or Down Arrow key. Notice that a When one of these objects is selected from a library, letter of the alphabet displays. Continue to press Autostar II moves your telescope (if properly aligned) one of the Arrow keys until the first letter of your and points it at the selected object. -
Page 31: Event Menu
star-type classification, if the object is a star. If further Moonrise, Moon Transit, and Moonset: Calculate information is available, it displays as scrolling text. the time of Moon rise, Moon transit, or Moon set on the current date. Find rise and set times for other dates by Press GO TO. -
Page 32: Utilities Menu
such as a description of a planet or star. Press ENTER When ON is displayed, press ENTER to activate whenever a hypertext word is on screen and Autostar II the timer. When the timer runs out, four beeps goes to the glossary entry for that word. sound and the timer is deactivated. -
Page 33: Setup Menu
• Align OTA: Provides an alignment routine that aligning the telescope again. adjusts the OTA so that it is orthogonal to the LX850 Park Position provides two options. Use Current telescope mount. This routine should be run when Position uses the last position set by the user. - Page 34 Solar: Choose this option when observing with the telescope before StarLock takes a high- the Sun. (WARNING: NEVER US A MEADE precision star sighting. By default, this value is “0.” LX850 TELESCOPE TO LOOK AT THE...
-
Page 35: Hot Button" Menu
This is useful if one user has downloaded a new options including: version of Autostar II software from the Meade website (www.meade.com) and wants to pass this • Select: Displays the currently selected observing software along to friends. -
Page 36: Starlock Periodic Error Correction
It takes about 7 minutes to train one cycle. Focus Control Menus: If you have installed the Meade Zero Image Shift Micro Focuser, Press Number It is advised that you perform one training and then key “4” to select these menus directly from Autostar II’s immediately follow-up with two updates for maximum keypad. -
Page 37: Advanced Autostar Ii Features
Advanced AutoStar Features Before trying out the examples in this section, Zone” value may not need to be changed. familiarize yourself with the basic operations of Scroll to “Site: Edit” and press ENTER. “Edit: Autostar II described earlier in this manual. The Name”... -
Page 38: Using Autostar To Find Objects Not In Database
the object. This step is optional. Use the Number celestial objects (stars, nebulae, planets, etc.) that you keys to enter the size (in arcminutes), if so desired, can observe, you may eventually want to view objects that are not part of a library. Autostar II provides a and press ENTER to go to the next display. -
Page 39: To Go To A User-Entered Object
To GO TO a user-entered object: become part of your own permanent database, called “User Objects.” In this procedure, you will choose an object from the User Object list and GO TO the object. To enter coordinates of an object into the “User: Objects”... -
Page 40: Identify
3. Press MODE to pause the Survey. Press Solar System” displays. Enter to restart the survey at the first object of 5. Press the Scroll Up key twice and “Object: the survey. Landmarks” displays. Press ENTER. To check on the available amount of memory “Landmark: Select”... -
Page 41: Browse
Displayed information: Example: 7. After you have scrolled to the last item on the “Object Type” list, press MODE twice and the Catalog or common name ... Messier 107, Scroll Down key once. “Browse: Start Search” NGC 6171, Orion Nebula, etc displays. -
Page 42: Alternate Polar Alignments
Two-Star Polar Alignment Next, the LX850 will slew to an Eastern star and StarLock will monitor its drift on its CCD chip. Again, AutoStar choses and slews to two bright star that it the StarLock will suggest to the user the appropriate choses based on time and location. -
Page 43: Of Autostar Ii Software
Select (if you previously downloaded it separately from the “On” to enable the Smart Drive. Meade website) or from the Internet. Select one of the choices and follow the on-screen instructions. 8. The download will take about 10 minutes (download time depends on your Internet connection, speed of your computer and so forth). -
Page 44: Optional Accessories
Optional Accessories A wide assortment of professional Meade accessories stainless steel. is available for the LX850 telescope models. The Meade Series 5000 Premium Eyepieces: deliver premium quality of these accessories is well-suited all the amazing performance that the ACF and APO to the quality of the instrument itself. - Page 45 More accessories will soon be available for your the T-Adapter on to the rear cell of your telescope, LX850 model. To find out more about these and other followed by a T-Mount for your 35mm camera, and the accessories available for your telescope, check out camera body is rigidly coupled to the telescope.
-
Page 46: Maintenance
CUSTOMER 4. If your LX850 model is used outdoors on a humid night, telescope surfaces may accumulate water SERVICE condensation. While such condensation does not... -
Page 47: Specifications
SPECIFICATIONS 10 inch Advanced Coma- 12 inch Advanced Coma- 14 inch Advanced Coma- 130mm APO Free Free Free Product number 1008-85-01 1208-85-01 1408-85-01 0130-85-01 7 09942 60061 2 7 09942 60062 9 7 09942 60063 6 7 09942 60064 3 Optical design Advanced Coma-Free Apochromatic Refractor... - Page 48 +/- 1 arcsecond (with good seeing. 1-4 second correction update rate depending on star magnitude. Faintest guide star 11th mag. High-precision alignment Semi-automatic drift align procedure for ultra-precise polar alignment Weight 2.9 lbs (1.3 kg) Power supply 12v DC 5A using supplied Meade Universal Power Supply...
-
Page 49: Manual Drift Alignment
Manual Drift Alignment adjustment knob to move the star to the left and up. How to manually Drift Align the LX850 Telescope (Northern Hemisphere). 8. Use Autostar arrow keys to center the star again. Repeat steps 7 and 8 until the star no longer drifts The LX850 with StarLock is specially equipped to off the RA axis for a few minutes. -
Page 50: Starlock Utility
In order to run the Utility program the StarLock needs Connection button. Then, select which Imager you to attached to a Meade telescope by the StarLock wish to view by clicking on the “Wide Field” or “Narrow interface cable connected to the “StarLock Telescope Field”... - Page 51 The field of view of the display is approximately 20 firmware into the StarLock. The firmware release code must first be downloaded from Meade’s website. It should be put in an easily located directory such as your desktop. The file will be named “StarLock_Vxy.Ldr”.
- Page 52 In general, if seeing is poor, you will need to reduce aligned. Notice that the DEC guide corrections are your guide rate so you do not chase seeing. Under not centered around zero. This is because the object better conditions you can increase guide rates until is drifting down in declination due to the scope being over correction starts to make the scope jump back poorly polar aligned.
-
Page 53: Automatic Rate Calibration (Arc)
APPENDIX C: Go to the StarLock Menu by pressing the "7" key. Then scroll down to Auto Rate Cal. The hand box will Automatic Rate initially display Test Dec 33%. The percentage value Calibration (ARC) will change about once a minute while it evaluates different rates. -
Page 54: Latitude Chart
APPENDIX D: Northern hemisphere observers (N): If the site is over 70 miles (110 km) North of the listed city, add LATITUDE CHART one degree for every 70 miles. If the site is over 70 Latitude Chart for Major Cities of the World miles South of the listed city, subtract one degree per 70 miles. -
Page 55: Advanced Coma-Free Optical System
Unlike Schmidt-Cassegrain systems, Meade’s The Meade ACF optical system includes an oversized Advanced Coma-Free (ACF) optical system provides primary mirror, yielding a fully illuminated field-of-view razor-sharp pin-point star images all the way to the very significantly wider than is possible with a standard-size edge of the field of view. -
Page 56: Initial Set-Up Guide
Positioning the StarLock assembly The following provides guidelines for during your initial set-up of your 12” and 14” ACF LX850 Telescopes. These guidelines are meant only as a starting point, as you will need to fine tune the balance of your telescope depending on the equipment and accessories that you will be using. - Page 57 Notes...
-
Page 58: How To Recycle
RECYCLING INFORMATION (EU Countries only) Correct Disposal of this Product (Waste Electrical & Electronic Equipment) This marking shown on the product or its literature indicates that it must not be disposed of in unsorted municipal waste at the end of its working life To prevent possible harm to the environment or human health from uncontrolled waste disposal, please separate this from other types of wastes and recycle it as required... - Page 59 Notes...
- Page 60 Every Meade telescope, spotting scope, and telescope accessory is warranted by Meade Instruments Corp. (“Meade”) to be free of defects in materials and workmanship for a period of ONE YEAR from the date of original purchase in the U.S.A. and Canada. Meade will repair or replace a product, or part thereof, found by Meade to be defective, provided the defective part is returned to Meade, freight-prepaid, with proof of purchase.
Need help?
Do you have a question about the LX850 and is the answer not in the manual?
Questions and answers