Table of Contents
Advertisement
Available languages
Available languages
Model / Modelo:
dO NOT RETURN THiS PROdUCT TO THE STORE!
Call Customer Service for Assistance: 800-621-5485
¡NO LO dEVUELVA ESTE PROdUCTO A LA TiENdA!
Llame a Servicios al Cliente para Asistencia: 800-621-5485
SP2
Voltage / Tensión: 6, 12
Amperage / Amperaje: 1
REAd THE ENTiRE MANUAL BEFORE USiNG THiS PROdUCT.
FAiLURE TO dO SO COULd RESULT iN SERiOUS iNJURY
OR dEATH.
LEA EL MANUAL COMPLETO ANTES dE UTiLiZAR ESTE
PROdUCTO. CUALQUiER FALLA POdRÍA RESULTAR EN
SERiAS LESiONES O POdRÍA SER MORTAL.
OWNER'S MANUAL
MANUAL dEL USUARiO
Automatic Battery Charger
Cargador de Batería
Automático
0099001203-01
Advertisement
Table of Contents

Related Manuals for Schumacher SP2


Summary of Contents for Schumacher SP2
- Page 1 OWNER’S MANUAL MANUAL dEL USUARiO Model / Modelo: Automatic Battery Charger Cargador de Batería Automático Voltage / Tensión: 6, 12 Amperage / Amperaje: 1 dO NOT RETURN THiS PROdUCT TO THE STORE! Call Customer Service for Assistance: 800-621-5485 ¡NO LO dEVUELVA ESTE PROdUCTO A LA TiENdA! Llame a Servicios al Cliente para Asistencia: 800-621-5485 REAd THE ENTiRE MANUAL BEFORE USiNG THiS PROdUCT.
- Page 2 iMPORTANT: REAd ANd SAVE THiS SAFETY ANd iNSTRUCTiON MANUAL. SAVE THESE iNSTRUCTiONS – This manual will show you how to use your charger safely and effectively. Please read, understand and follow these instructions and precautions carefully, as this manual contains important safety and operating instructions. The safety messages used throughout this manual contain a signal word, a message and an icon.
- Page 3 Do not expose the charger to rain or snow. Use only recommended attachments. Use of an attachment not recommended or sold by Schumacher Electric Corporation ® may result in a risk of fire, electric shock or injury to persons or damage to property.
- Page 4 RiSK OF EXPLOSiVE GASES. 1.10 WORKING IN THE VICINITY OF A LEAD-ACID BATTERY IS DANGEROUS. BATTERIES GENERATE EXPLOSIVE GASES DURING NORMAL BATTERY OPERATION. FOR THIS REASON, IT IS OF UTMOST IMPORTANCE THAT YOU FOLLOW THE INSTRUCTIONS EACH TIME YOU USE THE CHARGER. 1.11 To reduce the risk of a battery explosion, follow these instructions and those published by the battery manufacturer and the...
- Page 5 Have plenty of fresh water and soap nearby in case battery acid contacts your skin, clothing or eyes. Wear complete eye and body protection, including safety goggles and protective clothing. Avoid touching your eyes while working near the battery. 2.10 If battery acid contacts your skin or clothing, immediately wash the area with soap and water.
-
Page 6: Charger Location
If the charger has an adjustable rate, charge the battery on the lowest rate first. Make sure that the charger cable clips make tight connections. CHARGER LOCATiON RiSK OF EXPLOSiON ANd CONTACT WiTH BATTERY ACid. Locate the charger as far away from the battery as the DC cables permit. -
Page 7: Follow These Steps When Battery Is Outside Vehicle
Stay clear of fan blades, belts, pulleys and other parts that can cause injury. Check the polarity of the battery posts. The POSITIVE (POS, P, +) battery post usually has a larger diameter than the NEGATIVE (NEG, N, -) post. Determine which post of the battery is grounded (connected) to the chassis. - Page 8 Check the polarity of the battery posts. The POSITIVE (POS, P, +) battery post usually has a larger diameter than the NEGATIVE (NEG, N, -) post. Attach at least a 24-inch (61 cm) long 6-gauge (AWG) insulated battery cable to the NEGATIVE (NEG, N, -) battery post. Connect the POSITIVE (RED) charger clip to the POSITIVE (POS, P, +) post of the battery.
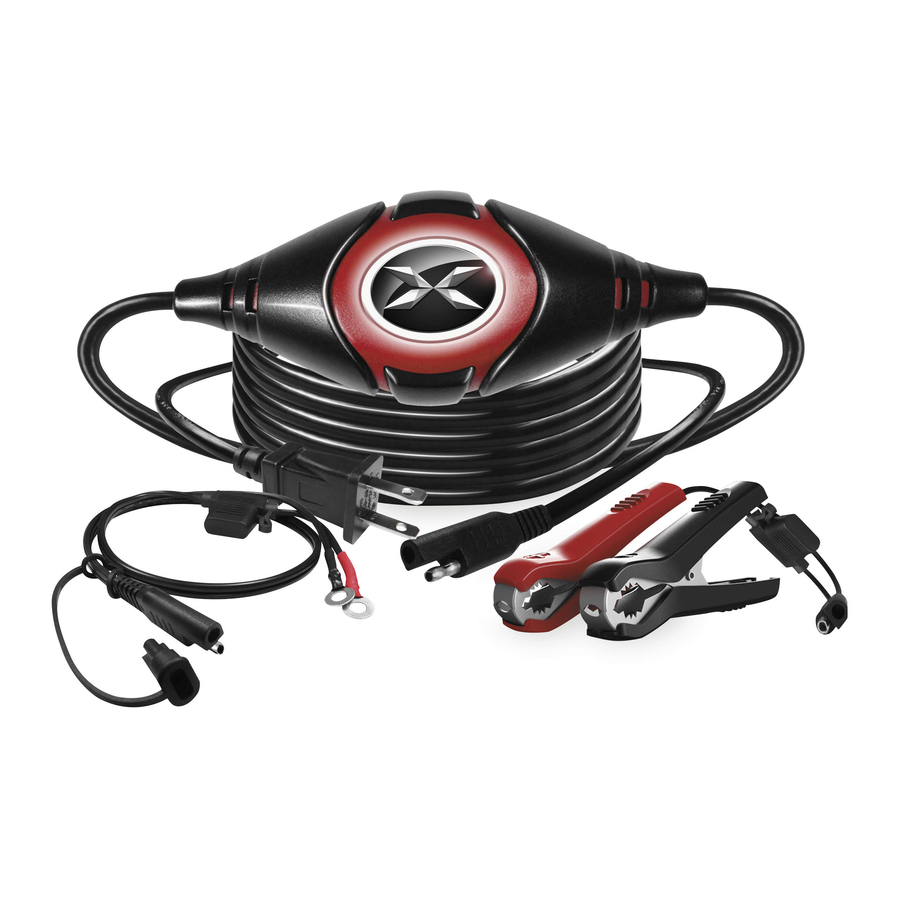
- Page 9 Recommended minimum AWG size for extension cord: • 100 feet (30.5 meters) long or less – use an 18 gauge (0.82 mm extension cord. • Over 100 feet (30.5 meters) long – use a 16 gauge (1.31 mm extension cord. FEATURES AC POWER (red) LED...
-
Page 10: Control Panel
CONTROL PANEL LEd indicators AC POWER (red) LEd lit: Indicates that there is AC power supplied to the battery charger. CHARGiNG (yellow) LEd lit: Indicates the charger is charging the battery. CHARGiNG (yellow) LED flashing: Indicates the charger is in abort mode. CHARGEd (green) LEd lit: Indicates the battery is fully charged and the charger is in maintain mode. - Page 11 USiNG THE QUiCK-CONNECT CABLE CONNECTORS There is a 2 amp, inline fuse in the cable assemblies to prevent damage to the charger, if it is connected to a battery incorrectly. If the charger does not charge the battery, check the fuse. If the fuse needs replacing, only replace it with a fuse of the same size and rating.
- Page 12 If there are none, have the battery checked or replaced. Maintaining a Battery The Schumacher SP2 is a battery maintainer that maintains both 6 and 12 volt batteries, keeping them at full charge. It can charge small batteries and maintain both small and large batteries. If you are maintaining a fully charged large battery, you are properly utilizing the battery charger.
-
Page 13: Maintenance Instructions
CALCULATiNG CHARGE TiME Find your battery’s rating on the chart below, and note the charge time given. The times given are for batteries with a 50% charge prior to recharging. Add more time for severely discharged batteries. CCA = Cold Cranking Amps AH = Amp Hour RC = Reserve Capacity MAINTAIN ONLY = See Maintaining a Battery in the “Operating... -
Page 14: Moving And Storage Instructions
14.4 Servicing does not require opening the unit, as there are no user-serviceable parts. 14.5 All other servicing should be performed by qualified service personnel. MOViNG ANd STORAGE iNSTRUCTiONS 15.1 Store the charger unplugged, in an upright position. The cord will still conduct electricity until it is unplugged from the outlet. - Page 15 PROBLEM POSSiBLE CAUSE REASON/SOLUTiON Charger will not Clips are not making Check for poor turn on when a good connection to connection to battery properly connected. the battery. and frame. Make sure (continued) connection points are clean. Rock clips back and forth for a better connection.
-
Page 16: Before Returning For Repairs
BEFORE RETURNiNG FOR REPAiRS 17.1 When a charging problem arises, make certain that the battery is capable of accepting a normal charge. Double check all connections, the AC outlet for a full 120-volts, the charger clips for correct polarity and the quality of the connections from the cables to the clips and from the clips to the battery system. - Page 17 Manufacturer does not provide any warranty for any accessories used with this product that are not manufactured by Schumacher Electric Corporation and approved for use with this product. This Limited Warranty is void if the product is misused, subjected to careless handling, repaired, or modified by anyone other than Manufacturer or if this unit is resold through an unauthorized retailer.
-
Page 18: Do Not Return This Product To The Store
Schumacher Electric Corporation Customer Service 1-800-621-5485 Monday-Friday 7:00 a.m. to 5:00 p.m. CST Schumacher and the Schumacher Logo are registered trademarks of Schumacher Electric Corporation To activate the warranty, please fill in the warranty registration card on page 18 and mail it in, OR go to www.batterychargers.com to register your product online. - Page 19 • 18 •...
- Page 20 • 19 •...
- Page 21 iMPORTANTE: LEA Y GUARdE ESTE MANUAL dE iNSTRUCCiONES Y SEGURidAd. GUARdE ESTAS iNSTRUCCiONES – Este manual le mostrará cómo utilizar su cargador en forma segura y efectiva. Por favor, lea, comprenda y siga estas instrucciones y precauciones cuidadosamente, ya que este manual contiene instrucciones operativas y de seguridad de importancia.
- Page 22 No exponga el cargador a la lluvia o a la nieve. Utilice solamente accesorios recomendados. El uso de un accesorio no recomendado o suministrado por Schumacher Electric Corporation puede ® provocar riesgo de incendio, descarga eléctrica o lesiones a personas o daño a la propiedad.
- Page 23 revisar por una persona capacitada que efectúe reparaciones. (Comuníquese con el servicio al cliente al: 1-800-621-5485.) No desarme el cargador; hágalo revisar por una persona capacitada que efectúe reparaciones cuando necesite servicio de mantenimiento o una reparación. Volver a ensamblar el cargador en forma incorrecta puede provocar riesgo de incendio o descarga eléctrica.
- Page 24 Utilice este cargador solamente para cargar baterías de PLOMO- ÁCIDO. Este cargador no está destinado a suministrar energía a sistemas eléctricos de baja tensión más que en una aplicación de un motor de arranque. No utilice este cargador de batería para cargar baterías de pila seca que por lo general se utilizan con artefactos domésticos.
-
Page 25: Ubicación Del Cargador
Limpie los terminales de la batería antes de cargar la batería. Durante la limpieza, evite que la corrosión producida por aire tenga contacto con sus ojos, nariz y boca. Utilice bicarbonato de sodio y agua para neutralizar el ácido de la batería y ayudar a eliminar la corrosión producida por aire. -
Page 26: Precauciones De Conexión En Cc
PRECAUCiONES dE CONEXiÓN EN CC Conecte y desconecte los ganchos de salida C.C. sólo después de haber establecido todos los interruptores del cargador a la posición de “apagado” (si es aplicable) y de haber desconectado el enchufe de C.A. del tomacorriente eléctrico. Nunca permita que los ganchos tengan contacto entre sí. -
Page 27: Siga Estos Pasos Cuando La Batería Se Encuentre Fuera Del Vehículo
carburador, líneas de combustible o cuerpos metálicos. Conecte a una pieza metálica de calibre grueso del marco o del bloque motor. En un vehículo con descarga a tierra por borne positivo, conecte el gancho NEGATIVO (NEGRO) del cargador de batería al borne NEGATIVO (NEG, N, -) sin descarga a tierra de la batería. - Page 28 distancia posible de la batería. Luego conecte el gancho NEGATIVO (NEGRO) del cargador al extremo libre del cable. No enfrentan la batería al realizar la conexión final. Conecte el condón de alimentación del cargador de CA al tomacorriente. Al desconectar el cargador, siempre hágalo en forma inversa al procedimiento de conexión y realice la primera conexión tan lejos de la batería como sea posible.
-
Page 29: Instrucciones De Montaje
CARACTERÍSTiCAS ALIMENTACIóN DE CA LED (rojo) CARGANDO LED (amarillo) CARGADA LED (verde) Cable para ensamble con pinzas para Batería. Cable para ensamble con terminal de anillo Cable para cargador de conexión rápida. iNSTRUCCiONES dE MONTAJE Desenrede todos los cordones y extienda los cables antes de usar el cargador de baterías. -
Page 30: Instrucciones De Operación
iNSTRUCCiONES dE OPERACiÓN Este cargador de baterías debe ser ensamblado correctamente de acuerdo a las instrucciones de ensamble antes de usar. Carga Asegúrese de que todas las piezas del cargador estén bien instaladas y en buenas condiciones para su función, por ejemplo, los protectores de plástico de las pinzas de la batería. - Page 31 Pinzas de Bateria de 50 Amps Conecte la punta del cable de salida del cargador a la punta del cable de pinzas de la Batería de 50 Amps. Siga los pasos expuestos en las secciones 6 y 7 para hacer la cenexión a las pinzas de la Batería.
- Page 32 Manteniendo una batería El Schumacher SP2, es un mantenedor de baterías, que mantiene baterías de 6 y 12 voltios, manteniéndolas a carga complete. Puede cargar baterías pequeñas y mantener pequeñas y grandes. Si usted está...
-
Page 33: Cálculo De Tiempo De Carga
CÁLCULO dE TiEMPO dE CARGA Encuentre el índice de su batería en el gráfico a continuación y observe el tiempo de carga. Los tiempos que se informan son para baterías con un 50% de carga antes de volver a cargar. Agregue más tiempo para las baterías que se descargaron varias veces. -
Page 34: Instrucciones Para El Manejo Y Almacenamiento
14.4 Para realizar mantenimiento no es necesario abrir la unidad, ya que no existen piezas a las cuales puede realizarle mantenimiento el usuario. 14.5 Cualquier otro servicio debe realizarse por personal calificado en el ramo. iNSTRUCCiONES PARA EL MANEJO Y ALMACENAMiENTO 15.1 Guarde el cargador desenchufado en posición vertical. - Page 35 PROBLEMA POSiBLE CAUSA SOLUCiÓN El cargador no se Buena batería pero La batería tal vez enciende incluso al extremadamente no decida aceptar estar bien conectado. descargada. una carga debido (continuado) a un estado de agotamiento. Permita que la carga continúe hasta que la batería tenga la oportunidad de recuperarse lo...
-
Page 36: Instrucciones Operativas
PROBLEMA POSiBLE CAUSA SOLUCiÓN El cargador no se El fusible de conjunto Chequee el fusible. enciende incluso al de cables en línea Si está fundido, sólo estar bien conectado. podría estar fundido. reemplácelo por otro (continuado) Las conexiones a la del mismo tamaño y inversa podrían ser calibre. -
Page 37: Especificaciones
ORiGiNAL dE ESTE PROdUCTO. LA PRESENTE GARANTÍA LiMiTAdA NO PUEdE TRANSFERiRSE Ni CEdERSE. Schumacher Electric Corporation (el “Fabricante”) otorga garantía por este cargador de batería por un plazo de 5 años contados a partir de la fecha de compra por menor por la existencia de cualquier material o de mano de obra defectuosos que pudieran surgir por su uso y cuidado normal. - Page 38 El Fabricante no presta garantía por lo accesorios utilizados con este producto que no sean los fabricados por Schumacher Electric Corporation y que no estén aprobados para su uso con este producto. La presente Garantía Limitada será nula si el producto se utiliza en forma errónea, se trata de manera inadecuada, es reparado o...
- Page 39 Schumacher Electric Corporation 1-800-621-5485 Lunes-viernes 7:00 a.m. a 5.00 p.m. CST Schumacher y el logo Schumacher son marcas registradas de Schumacher Electric Corporation Para hacer efectiva la garatía, por favor llene la tarjeta de garantía en página 19 y evíela, O, visite la página de internet www.batterychargers.com para registrar su producto en la red.
Need help?
Do you have a question about the SP2 and is the answer not in the manual?
Questions and answers