Table of Contents
Advertisement
Quick Links
Advertisement
Table of Contents

Related Manuals for Korg Pa588


Summary of Contents for Korg Pa588
- Page 1 ENGLISH OS Ver. 1.0...
-
Page 2: Important Safety Instructions
AC adapter from the IMPORTANT NOTICE TO CONSUMERS wall outlet. Then contact your nearest KORG dealer or the store This product has been manufactured according to strict specifica- where the equipment was purchased. - Page 3 Data in memory may sometimes be lost due to incorrect user The information contained in this manual have been carefully action. Be sure to save important data to a card. KORG will not be revised and checked through. Due to our constant efforts to responsible for damages caused by data loss.
- Page 4 Keep your keyboard up-to-date Your Pa588 can be constantly updated as new versions of the operating system are released by Korg. You can download the operating system from www.korgpa.com. Please, read the instructions supplied with the operating system. The BALANCE slider When turning the instrument on, please be assured the BALANCE slider is set to the cen- ter.
-
Page 5: Table Of Contents
Table of Contents Table of Contents Introduction Playing Sounds ......37 Playing Piano Solo . - Page 6 Table of Contents Pad panel ......... . . 85 Copy Key Range dialog box .
- Page 7 Song Edit: Velocity ........193 Connecting the Pa588 to a MIDI accordion ....232 Song Edit: Cut/Insert Measures .
- Page 8 Table of Contents...
-
Page 10: Easy Mode
If you have never used an instrument so rich in features as this At this point, the Easy Mode has been activated, and the ele- before, we suggest you to use your Pa588 in Easy Mode. Easy ments in the display appear less cluttered:... -
Page 11: The Style Play (Easy Mode) Page In Detail
Easy Mode The Style Play (Easy Mode) page in detail The Style Play (Easy Mode) page in detail Sounds assigned to the right hand (UP1 to UP3) Style name and info. Touch the Style’s name and to the left hand (LOW). Touch the Sound’s to open the Style Select window and choose name to open the Sound Select window and →... -
Page 12: The Song Play (Easy Mode) Page In Detail
Easy Mode The Song Play (Easy Mode) page in detail The Song Play (Easy Mode) page in detail Sounds assigned to the right hand (UP1 to UP3) Song assigned to Sequencer 1. Touch it to and to the left hand (LOW). Touch the Sound’s open the Song Select window and choose a name to open the Sound Select window and →... -
Page 13: The Lyrics Page In Detail
Easy Mode The Lyrics page in detail The Lyrics page in detail → Master Transpose. page 148 Chord (if included in the Song). Current beat and measure number. Use these tabs to see Lyr- ics of the Song assigned to Sequencer 1, Lyrics are shown in Sequencer 2 or the Style. -
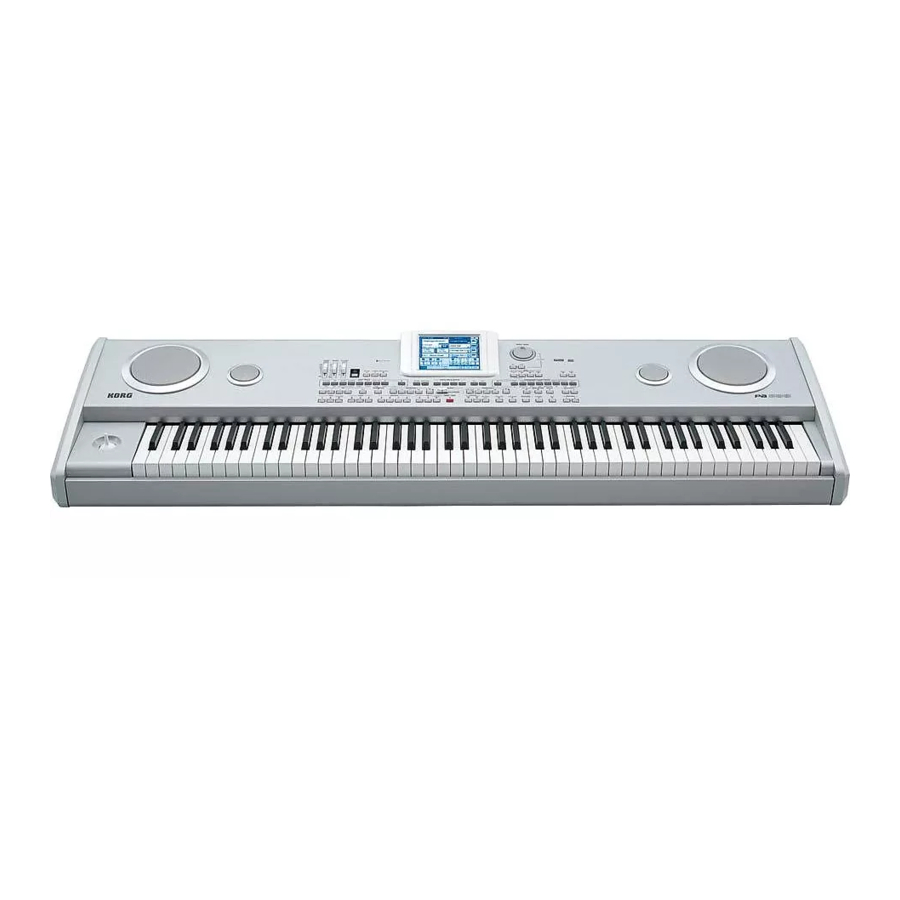
Page 14: Front Panel
Front panel Front panel... - Page 15 Front panel 32 33...
-
Page 16: Front Panel
Warning: At the maximum level, with rich-sounding Songs, Styles tracks can play. or Sounds, the internal speakers of Pa588 might distort during sig- nal peaks. Should this happen, lower the Master Volume a little. (With Easy Mode turned off) You can jump to the Style Play >... - Page 17 Front panel TOUCHVIEW™ GRAPHICAL DISPLAY If you keep the SHIFT button pressed, and press one of the buttons of this section, the “Write STS” window appears in Use this display to interact with the instrument. To set the dis- the display, with the current STS already selected, and you can play contrast, keep the MENU button pressed, and turn the save the current keyboard track settings in a STS (see “Write Sin- DIAL counter-clockwise to decrease brightness, or clockwise to...
- Page 18 You can reset all ‘frozen’ notes and controllers on the ing SHIFT pressed, starts both sequencers at the Pa588 and any instrument connected to its MIDI OUT or the same time. USB port, by using the “Panic” key combination. Just press SEQUENCER BALANCE slider SHIFT + START/STOP to stop all notes and reset all controllers.
- Page 19 Demo Songs, to let you under- When you select a Performance, the Style might stand the sonic power of the Pa588. To exit from change, according to which Style number is this mode, press any of the MODE buttons.
- Page 20 Front panel When you select a Performance, the Style and TEMPO LOCK Style track settings remain unchanged. Only Key- This button turns the Tempo Lock and Link Mode functions on board track settings are changed. or off. PERFORMANCE SELECT When you select a different Style or Performance, or select a different Song, the tempo does not Press this button to use the PERFORMANCE/SOUND SELECT change.
- Page 21 Front panel Chords are detected below the split point. The number of notes you should play to form a chord is defined by the “Chord Recognition Mode” parameter (see page 99). The Upper 1, Upper 2 and/or Upper 3 tracks play over the whole keyboard range.
-
Page 22: Rear Panel
Note: The card inserted in this drive can be read by a personal Pa588’s keyboard, controllers, and/or the internal computer, by connecting it to the Pa588 via the USB port. See sequencer. Connect it to an expander’s or com- “USB” on page 226. - Page 23 Rear panel PHONES connector Connect a pair of headphones to this output. You can use head- phones with an impedance of 16-200Ω (50Ω suggested). Use a headphone splitter to connect more than one pair of head- phones. Note: When inserting a jack into this connector, the speakers are automatically turned off.
-
Page 24: Welcome
Welcome! Live Performing Welcome! Welcome to the world of Korg Pa588! With its mix of digital tronic circuit Modeling System) technology, to deliver truly great sounding effects. piano and automatic accompaniment features, Pa588 is one of the most powerful musical instruments available today, both for •... -
Page 25: Useful Links
What’s in the box Your preferred Korg dealer not only carries this keyboard, but After you buy your Pa588, please check all the following items also a whole bunch of hardware and software accessories. You are included in the package. If some of them are missing, imme- should ask him for more Sounds, Styles, and other useful music diately contact your Korg dealer. -
Page 26: Making A Backup Of The Original Data
You can see which version of the operating systems is installed in your Pa588 by going to the “Utility” page of the Media mode (see “OS Version Number” on page 225). -
Page 27: Start Up
Assembling the stand Start up Assembling the stand Controlling the Volume Before you start using your new Pa588, you must assemble the Master Volume supplied piano stand. Please see “Assembling the stand” on page 238 for detailed instructions. Use the MASTER VOLUME slider to control the overall volume of the instrument. -
Page 28: Headphones
MIDI connections Connect a pair of headphones to the PHONES output, on the You can play the internal sounds of your Pa588 with an external back of the instrument. You can use headphones with an imped- controller, i.e. another keyboard, a MIDI guitar, a wind control- ance of 16-200Ω... -
Page 29: Glossary Of Terms
“feel” of the Style. tions in this section, you will get a better understanding of how all the different parts of the Pa588 work together to create a real- Fill-in istic musical performance. This will also help you to get the most out of the rest of the User’s Manual. -
Page 30: Performance
Keyboard tracks will be embellished by additional notes to create a complete chord voicing. The Ensemble knows which On the front panel of your Pa588 you have probably noticed notes to add by looking at the chord that the Style is playing. In some logos, and may have even wondered what they stand for. -
Page 31: Interface Basics
Similar to selecting windows, dialog boxes overlap the underlay- Menus and sections ing page. Press one of the button on the display to give Pa588 an answer, and the dialog box will close. Pages are grouped in sections, to be selected by touching the cor- responding buttons in the Edit menu that opens up when you press the MENU button. - Page 32 Interface basics The TouchView™ graphical user interface Checkboxes Lists and scrollbars This kind of parameters are on/off switches. Press them to Files on storage media, as well as other kinds of data, are shown change their status. as lists. Use the scrollbar to scroll the list content. Numeric fields Scrollbar When a numeric value can be edited, press it a second time to...
-
Page 33: Operative Modes
Interface basics Operative modes Operative modes Pa588 pages are divided into various operating modes. Each mode is accessed by pressing the corresponding button in the MODE section on the control panel. Three special modes (Global, Media, and SongBook) overlap the current operating mode, that remains active in the background. - Page 34 Interface basics Shortcuts...
-
Page 36: Turning The Instrument On And Listening To The Demos
Turning the instrument on Turn the Pa588 on by pressing the STANDBY button, located on the back panel. After you turn the power on, a welcome screen is shown for a few seconds, and then the main display (in Easy Mode) appears. -
Page 37: Playing The Demos
Turning the instrument on and listening to the demos Playing the demos Playing the demos A variety of demo songs have been included to demonstrate the sonic power of the Pa588. To open the Demo page, press the STYLE PLAY and SONG PLAY buttons at the same time. -
Page 38: Adjusting The Seating Posture, Display Contrast And Keyboard Touch Response
Adjusting the seating posture, display contrast and key- Adjusting the seating posture, display contrast and keyboard touch response Before starting to actually play the instrument, make your playing environment comfortable, by adjusting your posture, setting the display contrast, and how the keyboard feels. Play Piano button Display Display contrast... -
Page 39: Setting Up The Display Contrast
Adjusting the seating posture, display contrast and key- Setting up the display contrast The display might not show well enough for your angle of view or lighting condition. You can adjust the contrast at any time. • Keep the MENU button pressed, and turn the TEMPO/VALUE DIAL to adjust the display contrast. - Page 40 Adjusting the seating posture, display contrast and key- Play the keyboard to try how the selected curve feels. When you have found your preferred Velocity Curve, save the settings to memory. Touch the triangle in the upper right corner of the display to open the page menu, then choose the “Write Global-Global Setup”...
-
Page 41: Playing Sounds
Playing Sounds Playing Piano Solo Playing Sounds You can play up to three sounds at the same time on the keyboard. You can also split the keyboard into two parts, to play up to three sounds with your right hand (Upper), and one with your left hand (Lower). - Page 42 Playing Sounds Selecting a Sound and playing it on the keyboard If you want to play the Sound on the whole keyboard, be sure the key- board is in Full Upper mode. If it is split in two parts, press the SPLIT but- ton on the control panel to turn its LED off.
-
Page 43: Playing Two Or Three Sounds At The Same Time
Playing Sounds Playing two or three Sounds at the same time Play the Sound on the keyboard. Note: You can leave the Sound Select win- dow open in the display, even after selecting a Sound, by setting the Display Hold option to On (see “Display Hold On”... - Page 44 Playing Sounds Playing two or three Sounds at the same time Play the keyboard. Note how the ‘StringEns2’ sound (assigned to the Upper 3 track) has been added to the ‘Dark Pad’ (assigned to the Upper 2 track) and the ‘Grand Piano’...
-
Page 45: Playing Different Sounds With Your Left And Right Hand
Playing Sounds Playing different Sounds with your left and right hand Playing different Sounds with your left and right hand You can play a single Sound with your left hand, in addition to playing up to three Sounds with your right hand. -
Page 46: Changing The Split Point
Playing Sounds Changing the split point Play the keyboard. Note how the keyboard once again plays the Upper tracks for the entire length of the keyboard. Upper Changing the split point If you are not comfortable with the selected split point, you may set the split point to any key. Note: As an alterna- Keep the SPLIT button pressed, up until the “Press a key to set the Split tive, you can press the... -
Page 47: Selecting And Saving Performances
Please note that most of the settings saved in Performance 1 are automatically selected when the instrument is turned on. However, the Pa588 will always turn on with a Grand Piano sound assigned to the full keyboard. Single Touch Settings (STS) section... -
Page 48: Selecting A Performance
Selecting and saving Performances Selecting a Performance Selecting a Performance Press the Performance area in the display, to open the Performance Select window. Note: You can open Set of banks. [1/8] corresponds to the top the Performance Select row of Performances on the control panel, window also by pressing [9/16] to the lower row. -
Page 49: Saving Your Settings To A Performance
Selecting and saving Performances Saving your settings to a Performance Saving your settings to a Performance All the control panel settings, plus the Keyboard track settings and selected effects, can be saved to a single Performance, to be quickly recalled at a later time. Note: To open the Press the page menu icon to open the page menu. - Page 50 Selecting and saving Performances Saving your settings to a Performance Select a Bank and Performance location in memory, where you would like to save the Performance. To select the target Bank and Performance location, select the Bank and Performance parameters, and use the TEMPO/VALUE dial.
-
Page 51: Selecting And Playing Styles
Saving your settings to a Performance Selecting and playing Styles In addition to being a digital piano, Pa588 is an arranger, i.e. a musical instrument providing auto- matic accompaniments, or arrangements. Each arrangement style is called, as a consequence, “Style”. -
Page 52: Selecting And Playing A Style
Selecting and playing Styles Selecting and playing a Style Selecting and playing a Style Press the Style area in the display. The Style Select window appears. Note: You can open Set of banks. [1/8] corresponds to the top row of the Style Select window Styles on the control panel, [9/16] to the lower also by pressing one of... -
Page 53: Adjusting Tempo
Selecting and playing Styles Adjusting Tempo Press the SYNCHRO-START button to turn its LED on. Note: You could sim- ply press START/STOP to start the Style, but the Synchro-Start function allows you to make the Style start in sync with your playing on the key- board. -
Page 54: Intro, Fill, Variation, Ending
Selecting and playing Styles Intro, Fill, Variation, Ending Intro, Fill, Variation, Ending When playing Styles, you can select various “Style Elements” to make your playing richer. A Style is made of up to four basic patterns (Variations), three Intros (or two Intros and a Count-In), three Fills (or two Fills and a Break), and three Endings (with the third one very short). -
Page 55: Single Touch Settings (Sts)
Selecting and playing Styles Single Touch Settings (STS) When you like to stop playing, press one of the ENDING buttons to stop the Style with an Ending. When the Ending is fin- ished, the Style auto- matically stops. Single Touch Settings (STS) Each Style or SongBook entry may come with up to four Keyboard track settings, called STS (short for “Single Touch Settings”). -
Page 56: The Pads
Selecting and playing Styles The Pads The Pads Each Style can assign different sounds or patterns to the four PADS. These sounds or patterns can be played along with the Keyboard and Style tracks. Press one of the four PADS. Hint: You can see which sounds or patterns If the selected PAD triggers an endless sound or pattern (i.e. -
Page 57: Adding Harmony Notes To Your Right-Hand Melody With The Ensemble Function
Selecting and playing Styles Adding harmony notes to your right-hand melody with the ENSEMBLE function Adding harmony notes to your right-hand melody with the ENSEMBLE function Chords played with your left hand may be applied to the right-hand melody. Press the SPLIT button to split the keyboard. The Ensemble function only works in Split mode. - Page 58 Selecting and playing Styles Adding harmony notes to your right-hand melody with the ENSEMBLE function When the right harmonization type has been selected, press the EXIT but- ton to go back to the main page. While in an edit page, press EXIT to go back to the main page of the current operating mode.
-
Page 59: The Metronome
Adding harmony notes to your right-hand melody with the ENSEMBLE function The Metronome Pa588 incorporates a handy metronome, with which you can beat the tempo while practicing. While in Style Play mode, select the Metronome Style corresponding to the desired Time Signature. -
Page 60: Song Play
Selecting a Song to play Song Play Pa588 is equipped with two onboard sequencers that can be run at the same time to mix between dif- ferent Songs. Pa588 can read Songs in Standard MIDI File (SMF) and Karaoke™ (KAR) format. - Page 61 Song Play Selecting a Song to play Press the Sequencer 1 area to open the Song Select window. Hint: As an alterna- tive, you can open the Song Select window by pressing SONG SELECT button in the SEQUENCER 1 section on the control panel.
-
Page 62: Playing Back A Song
Song Play Playing back a Song Playing back a Song Once a Song has been selected, it may be played back by the sequencer. Be sure the SEQUENCER BALANCE slider is completely moved to the left (toward Sequencer 1). Press the (PLAY/STOP) button in the SEQUENCER 1 section to start playback. -
Page 63: Mixing Two Songs
Song Play Mixing two Songs Mixing two Songs You can select two Songs at the same time, and mix between them using the BALANCE slider. Press the Sequencer 1 area to open the Song Select window and high- light the Song to be played by Sequencer 1. Press Select to confirm. Once a song is assigned to Sequencer 1, press the Sequencer 2 area once to select it, and a second time to open the Song Select window. -
Page 64: The Songbook
Lyrics events in the midifile, or if you prefer to play the song live with the help of the Styles. You can add your own entries to the SongBook, as well as edit the existing ones. Korg has already sup- plied some hundred entries as standard. Furthermore, the SongBook allows you to create various cus- tom lists, that may suit your different shows. -
Page 65: Selecting The Desired Entry From The Main List
The SongBook Selecting the desired entry from the Main List Selecting the desired entry from the Main List A large database is already included with the instrument, and you can later customize it. You may browse through this database in a variety of ways. While you are in Style Play or Song Play mode, press the SONGBOOK button to open the SongBook window. -
Page 66: Displaying Artist Or Genre
The SongBook Displaying Artist or Genre Displaying Artist or Genre For space matter, either the Genre or Artist column can be seen in the display. You cannot see both at the same time. Press the page menu icon to open the page menu. Note: The Artist and Key fields of all supplied entries have been inten-... -
Page 67: Searching Entries
The SongBook Searching entries • As an alternative, you can change the sorting order by touching one of the labels in a list of names. Touch the Name label… …to alphabetically order the names in the list. Each time you touch the label, the order changes between Ascending and Descending. - Page 68 The SongBook Searching entries For example, you may want to find all songs containing the word “love” in the title (in any posi- tion in the string). If so, select the ‘Name’ criterion, and enter the word ‘love’ . Capitals are not relevant for the search.
-
Page 69: Adding Entries
The SongBook Adding entries Adding entries You can add your own entries to the SongBook database. Go to the Style Play or Song Play mode, depending on the type of entry you want to add to the SongBook database. Select the Style, Standard MIDI File to be added to the SongBook. Assign the selected Song to Sequencer 1. - Page 70 The SongBook Adding entries Press the New Song button in the display to add a new item to the Song- Book list. Press the (Text Edit) button next to the field(s) you want to edit. Set all other parameters. You can write the genre, artist name, and name of the associated STS. Select a Tempo matching the song’s tempo, and select the Meter and Key of the song.
-
Page 71: Creating A Custom List
The SongBook Creating a Custom List Creating a Custom List You can create several Custom Lists in the SongBook, to make a set of entries suitable for your various shows. Before starting a new Custom List, be sure you have added all needed entries to the SongBook main database (see “Adding entries”... - Page 72 The SongBook Creating a Custom List When finished adding entries to the Custom List, press the List Edit tab to go to the List Edit page, and use the various commands to edit the list. List name Scrollbar Select an entry on the list to edit Press Write to save the current Custom List.
-
Page 73: Selecting And Using A Custom List
The SongBook Selecting and using a Custom List Selecting and using a Custom List After creating one or more Custom Lists, you can select one and use it for your show. Press the Custom List tab to select the Custom List page. Use the List pop-up menu to select one of the available Custom Lists. -
Page 74: Recording A New Song
Recording a new Song There are several ways to create a Song on the Pa588. The easiest and fastest is to use the Styles to record what you are playing in realtime on the keyboard, while the arranger gives you the accompani- ment tracks. -
Page 75: Preparing To Record
Recording a new Song Preparing to record Select the Backing Sequence (Quick Record) option and press OK to enter the Backing Sequence Record mode. After choosing the Backing Sequence (Quick Record) option, the Backing Sequence Record page appears. Preparing to record When you enter Backing Sequence Record, the most recently used Style is already selected, and all tracks are ready to record. -
Page 76: Recording
Recording a new Song Recording Recording Select the Style Element you wish to use before starting to play. Select one of the Intros to start with an introduc- tion. Select any of the Variations before starting to record. Start recording, by pressing the START/STOP button. Note: If you do not wish to start the Song with the Style playing,... -
Page 77: Second-Take Recording (Overdubbing)
Recording a new Song Second-take recording (Overdubbing) Second-take recording (Overdubbing) You may wish to re-record, and add one of the two “grouped” tracks, or overwrite a bad recording with a new one. Usually, you will record all chord and Style Element changes during the first take, and record Keyboard tracks and Pads during the second take. - Page 78 Recording a new Song Saving a Song to a card Select the Save song command to open the Save Song window. After you select the Save song command, the Save Song page appears. Select a folder where you want to save your Song. Use the scroll bar to see all Songs in If a Song is selected (high- the list.
-
Page 80: Selecting Elements
Selecting elements Sound Select window Selecting elements The following windows are shown in the various operating Sounds modes, whenever you try to select a Sound, Performance, Style, Press one of these buttons in the display to select a Sound. Unless Pad, STS or Song. -
Page 81: Style Select Window
Selecting elements Style Select window If you press again the same PERFORMANCE/SOUND SELECT Styles button on the control panel, the next page in the same bank is Press one of these buttons in the display to select a Style. Unless selected. -
Page 82: Sts Select
Use this pop-up menu to re-select the card, and deselect every- instead of saving many files into the root (i.e., the main level) of the thing. card. This allows for faster accesses to the card, thus a quicker response of the Pa588 to your Media commands. Device Type CARD... - Page 83 Selecting elements Song Select window The actual name (label) of the device may appear within square Warning: While the directory may contain more than 9999 files, brackets ([]). you can’t select Songs outside the 0001-9999 range when using the numeric keypad. Song path Song Select page menu This line shows the current device path.
- Page 84 Selecting elements Song Select window Create New Folder Rename This command lets you create a new generic folder in the root of Available only when an item is selected in a list. any device, or inside any other generic folder. You can’t create a Use this function to change the name of an existing file or folder.
-
Page 85: Style Play Operating Mode
Note: Even if Performance 1-1 is recalled at start-up, PLAY PIANO area tracks is also turned on, so the Pa588 will always turn on with a piano area sound already selected. Select the various settings you would like to see automatically Perfor- selected when turning the instrument on. - Page 86 Style Play operating mode Main page (Normal view) Sequencer 1/2 area Recognized chord Displays the recognized chord, when you play a chord on the This is where Songs assigned to the two onboard sequencers are keyboard. If no chord abbreviation is shown, it means the shown.
-
Page 87: Style Tracks View Page
Style Play operating mode Style Tracks view page Sound name Style Tracks view page Name of the Sound assigned to the corresponding Keyboard track. Press the TRACK SELECT button to switch from the Normal • If the track is already selected (black background), press the view to the Style Tracks view. -
Page 88: Volume Panel
Style Play operating mode Volume panel Sound name Volume panel Sound assigned to the selected track. Press anywhere in this area to open the Sound Select window, and select a different Sound. Press the Volume tab to select this panel. This is where you can set the volume of each track, and mute/unmute tracks. -
Page 89: Sts Name Panel
Style Play operating mode STS Name panel Track status icons Sub-Scale panel Play/mute status of the current track. Select the track, then press the track area again to change its status. Press the Sub-Scale tab to select this panel. This panel replicates Play status. -
Page 90: Split Panel
When locked, the Split Point and Chord Recognition mode appear, asking you to press the new split point on the keyboard remain unchanged when selecting a different Performance or of your Pa588 (or to press the EXIT button to close the message STS. with no changes). -
Page 91: Edit Menu
Style Play operating mode Edit menu Parameters area Edit menu Each page contains various parameters. Use the tabs to select one of the available pages. For detailed information on the vari- ous types of parameters, see sections starting from page 87. From any page, press the MENU button to open the Style Play edit menu. -
Page 92: Mixer/Tuning: Fx Send
This page lets you set the level of the track’s direct (uneffected) output, mixed with the FXs. signal going to the Internal FX processors. The effect processors included in Pa588 are connected in parallel, so you can decide Track Out L/R which percentage of the direct signal can be effected. -
Page 93: Mixer/Tuning: Eq Gain
Style Play operating mode Mixer/Tuning: EQ Gain Mixer/Tuning: EQ Gain Mixer/Tuning: EQ Control In this page you can set the three-band equalization (EQ) for This page lets you reset or bypass track equalization, pro- each individual track. grammed in the previous page. Use the TRACK SELECT button to switch from the Keyboard to Use the TRACK SELECT button to switch from the Keyboard to the Style tracks, and vice-versa. -
Page 94: Mixer/Tuning: Tuning
STS. Note: Quarter Tone selection can be received by MIDI (i.e., by an external sequencer or controller). Conversely, selection of Quarter Tone settings can be sent by the Pa588 to an external MIDI recorder as System Exclusive data. Scale Selected scale. See “Scales” on page 39 of the Data Lists manual (in the Accessory CD) for a list of the available scales. - Page 95 Style Play operating mode Mixer/Tuning: Sub Scale How to program a scale in realtime using SC Preset buttons an SC (Scale) Preset Press these buttons to recall the corresponding presets. Each pre- set contains a custom detuning of each note of the scale, and When the Quarter Tone function is activated, you can choose memorizes the selected degree(s) of the scale (as programmed in one of the four SC (Scale) Presets, by using the soft button that...
-
Page 96: Effects: Fx Select
Style Play operating mode Effects: FX Select Effects: FX Select Effects: FX A…D This page allows you to select the A/B (Style and Pads) and C/D These pages contain the editing parameters for the four effect (Keyboard) effects. processors. Here is an example of the FX A page, with the Reverb Smooth Hall effect assigned. -
Page 97: Track Controls: Mode
MIDI devices. This is very useful to let one In the following example, CC#0 is the Control of Pa588’s track drive an external expander. In addition, here you Change 0 (Bank Select MSB), CC#32 is the Con- can set the polyphony mode for each track. -
Page 98: Track Controls: Drum Volume
Style Play operating mode Track Controls: Drum Volume Play/Mute icon Track Controls: Drum Volume Track’s play/mute status. Play status. The track can be heard. In this page you can adjust the volume for each family of Drum and Percussion instrument for the selected track. A list of fami- Mute status. -
Page 99: Keyboard/Ensemble: Keyboard Control
Style Play operating mode Keyboard/Ensemble: Keyboard Control Parameters Keyboard/Ensemble: Keyboard Control Attack Attack time. This is the time during which the sound goes from zero (at the moment when you strike a key) to it’s maximum level. This page lets you enable/disable the Damper and Expression pedals, plus the Joystick, for each of the Keyboard tracks. -
Page 100: Keyboard/Ensemble: Key/Velocity Range
Style Play operating mode Keyboard/Ensemble: Key/Velocity Range Keyboard/Ensemble: Key/Velocity Range Keyboard/Ensemble: Ensemble This page lets you program a key and dynamic (velocity) range This page lets you program the Ensemble function. This func- for each of the Keyboard tracks. tion harmonizes the right-hand melody (played in realtime) using the recognized chords of the left-hand. -
Page 101: Style Controls: Drum/Fill
Style Play operating mode Style Controls: Drum/Fill Repeat The played note is repeated in sync with the Style Controls: Drum/Fill Tempo parameter (see below). When playing a chord, only the last note is repeated. Echo As the Repeat option, but with the repeated notes In this page you can select various general parameters for the fading away after the time set with the Feedback Style. -
Page 102: Style Controls: Keyboard Range On/Off / Wrap Around
Style Play operating mode Style Controls: Keyboard Range On/Off / Wrap Around Fill Mode (1…3) Style Controls: Keyboard Range On/Off / These parameters set a Variation to be automatically selected at Wrap Around the end of each of the three available Fills (1…3). The same Variation, playing before selecting a Fill, will be selected again. -
Page 103: Pad: Pad
Style Play operating mode Pad: Pad Pad: Pad Preferences: Style Preferences This page lets you select a different sound for each of the four In this page you can set various general parameters for the Style PAD buttons. play mode. Settings can be saved to a Performance, or STS. Note: You can also assign different Hits or Sequences from the Pad Chord Recognition Mode panel of the main page. -
Page 104: Preferences: Style Play Setup
Style Play operating mode Preferences: Style Play Setup Lock icon Velocity Control All parameters in this page may be protected from selecting a Set this parameter to trigger one of the following functions sim- different Performance or STS. ply by playing louder with your left hand. When playing with a velocity value higher than the value set by the “Velocity Control This lock is reset when turning the instrument off, unless you Value”... -
Page 105: Page Menu
Style Play operating mode Page menu Style Change On By Default Page menu This parameter allows you to define the status of the STYLE CHANGE button at startup. Press the page menu icon to open the menu. Press a command to At startup, the LED of the STYLE CHANGE but- select it. -
Page 106: Write Performance Dialog Box
Style Play operating mode Write Performance dialog box The Solo function works in a slightly different way, depending Write Performance dialog box on the selected track: • Keyboard track: The selected Keyboard track is the only track you can hear when playing on the keyboard. All other Keyboard Open this window by selecting the Write Performance item from tracks are muted. -
Page 107: Write Single Touch Setting Dialog Box
Style Play operating mode Write Single Touch Setting dialog box Write Single Touch Setting dialog box Write Style Performance dialog box Open this window by selecting the Write Single Touch Setting Open this window by selecting the Write Style Performance item item from the page menu. -
Page 108: Style Record Mode
Then, depending on the selected Style Element, it determines which Chord Variation (CV) should be played by the arranger of the Pa588. A Style consists of a pre- played for the scanned chord. Which Chord Variation corre- defined number of Style Elements (E) (Pa588 features thirteen... -
Page 109: Style Import/Export
• Acc (Accompaniment) and Bass tracks: When a chord is As an alternative to creating Styles on the Pa588, you can import recognized, the programmed chord notes are transposed to a Standard MIDI Files (SMF) from your computer to a Pa588’s a suitable scale, according to the Note Transposition Style. -
Page 110: Exit By Saving Or Deleting Changes
Note: Some Control Change messages cannot be recorded directly page you are in. by using Pa588 integrated controls. To select a Chord Variation, go to the Main page of the Record/ All allowed controllers can be assigned to an Assignable Pedal/ Edit mode (see “Element (Style Element)”... -
Page 111: Main Page - Record 1
Style Record mode Main page - Record 1 Recording parameters area Main page - Record 1 Element (Style Element) This parameter lets you select a Style Element for editing. Each After pressing the RECORD button, and having chosen whether Style Element corresponds to a button on the control panel car- you want to edit an existing Style or create a new one, the main rying the same name. - Page 112 Metronome on, with a two-bar precount before Note: To conform to Korg specifications, it is advisable to record starting recording. both the “Major” and “minor” Chord Variations for the Intro 1 and Ending 1 Style Elements.
- Page 113 Fixed/No Transpose Note: To conform to Korg specifications, it is advisable to set the The programmed notes can only be transposed NTT to “No Transpose” on the Intro 1 and Ending 1. by the Master Transpose. They are never trans-...
-
Page 114: Main Page - Record 2/Cue
Style Record mode Main page - Record 2/Cue Delete Note button Main page - Record 2/Cue Use this command to delete a single note or a single percussive instrument from a track. For example, to delete a snare, keep the D2 note (corresponding to the snare) pressed. -
Page 115: Main Page - Guitar Mode
Style Record mode Main page - Guitar Mode Cue area Main page - Guitar Mode Cue mode for [Style element] This parameter lets you decide how the current Style Element While in the main page, and a Guitar track has been selected, will enter after it has been selected. - Page 116 Style Record mode Main page - Guitar Mode Recording strumming types Recording RX Noises The second octave is dedicated to selecting a strumming type. By Further on, the upper octaves are used to trigger RX Noises: pressing these keys, you play fast strumming samples: Full Down Slow Mute Full Up Mute Up Mute 4-Strings...
-
Page 117: Style Record Procedure
Style Record mode Style Record procedure Guitar mode parameters Style Record procedure Here is a detailed description of the parameters of the Guitar Mode page. There are two different methods for recording a Style: Realtime Key/Chord and Step. This parameter pair allows you to define the track’s original key •... - Page 118 Style Record mode Style Record procedure Realtime Record procedure Step Record procedure While in the main page of the Style Record mode, select the Select the track to record. Its status icon will turn to “Overdub Step Recording” command from the page menu, (Record).
- Page 119 Style Record mode Style Record procedure STOP to listen to the Style. Press START/STOP again to Ex.2: stop the playback. From the main page of the Style Record mode, select either the “Write Style” or the “Exit from Record” command to exit from the Style record mode, respectively by saving the Step Time = Step Time =...
-
Page 120: Edit Menu
Style Record mode Edit menu Other pages have a slightly different structure. Edit menu Operating mode Edit section Page menu icon From any page (apart for Step Record), press the MENU button to open the Style Record edit menu. This menu gives access to the various Style Record edit sections. -
Page 121: Event Edit: Event Edit
Style Record mode Event Edit: Event Edit Position Event Edit: Event Edit Position of the event, expressed in the form ‘aaa.bb.ccc’: • ‘aaa’ is the measure • ‘bb’ is the beat The Event Edit is the page where you can edit each single MIDI •... - Page 122 Style Record mode Event Edit: Event Edit Go Meas. Scroll though the various events by using the scrollbar. While the sequencer is not running, press this button to open Select an event to be edited by touching it in the display. the Go to Measure dialog box: This is usually a note, that you can edit.
-
Page 123: Event Edit: Filter
Style Record mode Event Edit: Filter Event Edit: Filter Style Edit: Quantize This page is where you can select the event types to be shown in The quantize function may be used to correct any timing mis- the Event Edit page. take after recording, or to give the pattern a “groovy”... -
Page 124: Style Edit: Transpose
Style Record mode Style Edit: Transpose Note: These parameters are available only when a Drum or Percus- Bottom / Top Note sion track is selected. Use these parameters to set the bottom and top of the keyboard range to be transposed. If you select the same note as the Bottom Execute and Top parameters, you can select a single percussive instru- Press this button to execute the operation set in this page. -
Page 125: Style Edit: Cut
Style Record mode Style Edit: Cut Value Track status icon Status of tracks. Press this icon to change the status. Velocity change value (±127). Play status. The track can be heard. Start / End Tick Use these parameters to set the starting and ending points of the Mute status. -
Page 126: Style Edit: Delete
Style Record mode Style Edit: Delete Note: Some CC data are automatically removed Style Edit: Delete during recording. See the table on page 106 for more information on the allowed data. This page is where you can delete MIDI events out of the Style. Start / End Tick This function does not remove measures from the pattern. -
Page 127: Style Edit: Copy From Style
Style Record mode Style Edit: Copy from Style E / CV (Style Element/Chord Variation) From… To E/CV (Style Element/Chord Variation) Use these parameters to select the Style Element and Chord Vari- Use these parameters to select the source and target Style Ele- ation for editing. -
Page 128: Pad Edit: Copy From Pad
Style Record mode Pad Edit: Copy from Pad the source will be copied once, then the first 2 measures Drum-Acc5 Single track of the selected Style, Style Element or will be copied to fit the remaining 2 measures. Chord Variation. 1 2 3 4 Execute Press this button to execute the operation set in this page. -
Page 129: Style Element Track Controls: Keyboard Range
Style Record mode Style Element Track Controls: Keyboard Range This monitor should help you keeping track of them, and let you Top/Bottom access Event Edit only on the tracks containing the messages. Use these parameters to set the bottom and top of the keyboard Press the START/STOP button to start playback, and look at the range for the corresponding track of the current Style Element. -
Page 130: Style Element Chord Table: Chord Table
Style Record mode Style Element Chord Table: Chord Table Track Type Style Element Chord Table: Chord Table Use this parameter to set the type of the corresponding track. Drum Drum track. This type of track is not transposed This is the page where you can assign a Chord Variation to each by the arranger, and is used for Drum Kits made of the most important recognized chord. -
Page 131: Import: Import Smf
Note: You cannot use this function to import data from any generic Percussion Song. The Standard MIDI File to be imported must be pro- grammed as if it was one of Pa588’s Chord Variations. 12-16 Accompaniment 1-5 Note: Only SMF in format 0 can be loaded. -
Page 132: Export Smf
Style Record mode Export SMF Export SMF Page menu The Export SMF function allows you to export a Chord Varia- Press the page menu icon to open the page menu. Press a com- tion as a Standard MIDI File (SMF), and edit it on your pre- mand to select it. -
Page 133: Write Style Dialog Box
Style Record mode Write Style dialog box See “Copy Key Range dialog box” on page 130 for more infor- Style mation. Target Style location in the selected bank. Use the TEMPO/ VALUE dial to select a different location. Copy Chord Table Note: A User Style is usually prompted when writing a Style. -
Page 134: Copy Sounds Dialog Box
Style Record mode Copy Sounds dialog box Copy Sounds dialog box Copy Key Range dialog box Open this window by choosing the Copy Sounds item from the Open this window by choosing the Copy Keyboard Range item page menu. Here you can copy all Sounds assigned to the cur- from the page menu. -
Page 135: Overdub Step Recording Window
Style Record mode Overdub Step Recording window Free Memory Overdub Step Recording window Remaining memory for recording. Duration The Step Record allows you to create a new Style by entering sin- Relative duration of the inserted note. The percentage is always gle notes or chords to each track, by playing them on the key- referred to the step value. -
Page 136: Pad Record Mode
Pad Record mode The Pad structure Pad Record mode By entering the Pad Record mode, you can create your own Pads, • After editing Pad Track parameters in Style Play mode, save or edit an existing Pad. them to the Style Performance by selecting the Write Cur- rent Style Performance command from the page menu of the Style Play mode (see “Write Style Performance dialog box”... -
Page 137: Exit By Saving Or Deleting Changes
Pad Record mode Exit by saving or deleting changes Exit by saving or deleting changes Main page - Record 1 When finished editing, you can save your Pad in memory, or The Main page of the Pad Record mode looks like a simplified cancel any change. - Page 138 Pad Record mode Main page - Record 1 Pad Track info area Beat The sequence will start at the next beat, in sync with the arranger’s or sequencer’s tempo. It will This line lets you see the Sound assigned to the selected track. start from its very beginning (i.e., tick 1 or mea- sure 1).
- Page 139 Fixed/No Transpose Note: To conform to Korg specifications, it is advisable to set the The programmed notes can only be transposed NTT to “No Transpose” on the Intro 1 and Ending 1. by the Master Transpose. They are never trans- posed when chords are changed.
-
Page 140: Main Page - Guitar Mode
Pad Record mode Main page - Guitar Mode Recording strumming types Main page - Guitar Mode The second octave is dedicated to selecting a strumming type. By pressing these keys, you play fast strumming samples: While in the main page, and a Guitar track has been selected, press the “Guitar Mode”... -
Page 141: Pad Record Procedure
Pad Record mode Pad Record procedure Recording RX Noises Playing back the pattern Further on, the upper three octaves are used to trigger RX When in Stye Play mode, the recorded Guitar pattern is trans- Noises: posed according to the chord recognized on the keyboard. The way it is transposed depends on the programmed pattern, with the chosen positions, strumming mods, etc.…... -
Page 142: Edit Menu
Pad Record mode Edit menu Other pages exhibit a slightly different structure. Edit menu Operating mode Edit section Page menu icon When pressing the MENU button while in Pad Record mode, the Pad Record Edit Menu will appear. Parameters area Tabs Operating mode This indicates that the instrument is in Pad Record mode. -
Page 143: Event Edit: Filter
Pad Record mode Event Edit: Filter Event Edit: Filter Pad Edit: Transpose This page is where you can select the event types to be shown in In this page you can transpose the selected track(s). the Event Edit page. Note: After transposing, please don’t forget to readjust the “Key/ Chord”... -
Page 144: Pad Edit: Velocity
Pad Record mode Pad Edit: Velocity Pad Edit: Velocity Pad Edit: Cut In this page you can change the velocity (dynamics) value of This function lets you quickly delete a selected measure (or a notes in the selected track. series of measures) from the selected Chord Variation. All fol- lowing events are moved back, to replace the cut measure(s). -
Page 145: Pad Edit: Delete
Pad Record mode Pad Edit: Delete Bottom / Top Note Pad Edit: Delete Use these parameters to set the bottom and top of the keyboard range to delete. This page is where you can delete MIDI events out of the Pad. Note: These parameters are available only when the All or Note This function does not remove measures from the pattern. -
Page 146: Pad Edit: Copy From Pad
Pad Record mode Pad Edit: Copy from Pad Note: If you copy too many events on the same “tick”, the “Too From Pad many events!” message appears, and the copy operation is aborted. Choose this option to select the source Pad to copy the Chord Note: When you copy over an existing Chord Variation, Program Variation from. -
Page 147: Pad Chord Table
Pad Record mode Pad Chord Table Expression Tension Use this knob to set the Expression (CC#11) value for the Pad Tension adds notes (a 9th, 11th and/or 13th) that have actually track. This value can be seen at the beginning of the Event Edit been played, even if they haven't been written in the Pad pattern. -
Page 148: Import: Import Smf
Pad Record mode Import: Import SMF Import: Import SMF Export: SMF The Import SMF function allows you to import MIDI data from The Export SMF function allows you to export a Chord Varia- a Standard MIDI File (SMF) created on your preferred external tion as a Standard MIDI File (SMF), and edit it on your pre- sequencer, and transform them in a Chord Variation. -
Page 149: Page Menu
Pad Record mode Page menu Page menu Write Pad dialog box Press the page menu icon to open the page menu. Press a com- Open this window by selecting the Write Pad item from the page mand to select it. Press anywhere in the display to close the menu. -
Page 150: Song Play Operating Mode
Pa588 cannot receive MIDI Clock messages from the MIDI IN. Settings for Song tracks, like pan, volume and FX sends, depend Pa588 transmits to the MIDI OUT and USB port only the MIDI on the midifile. Clock messages generated by Sequencer 1. For MIDI Clock mes- Changes to Song tracks made in Song Play mode cannot be sages to be sent, the “Clock Send”... -
Page 151: Nrpn Sound Parameters
Keyboard, Pad and Sequencer tracks Then, manually reassign the non-matching Sounds, replacing them with similar Sounds on the Pa588. Finally, save the SMF again, and you will be able to play it in Song Play mode with the The Pa588 is equipped with a double sequencer. Each Song can correct Sounds. -
Page 152: Main Page
Performance. It may also be changed when loading a extension: *.JBX) can be assigned to Sequencer 1, Standard MIDI File generated with an instrument of the Korg Pa but its name is not shown in this area. The JBX series. - Page 153 Song Play operating mode Main page Style area Song name Displays the name of the Song assigned to the corresponding Currently selected Style. You can select a Style while playing sequencer. Songs, to have it ready when switching to Style Play mode. Also, this lets you change the Pad and STS settings (since Pads and •...
-
Page 154: Song Tracks 1-8 And 9-16 Pages
Song Play operating mode Song Tracks 1-8 and 9-16 pages Keyboard track octave transpose Song Tracks 1-8 and 9-16 pages Non editable. Octave transpose of the corresponding track. To individually edit the octave transpose for each track, go to the “Mixer/Tuning: Tuning”... -
Page 155: Volume Panel
Song Play operating mode Volume panel Program Change Volume panel Program Change number sequence (Bank Select MSB, Bank Select LSB, Program Change). Press the Volume tab to select this panel. This is where you can Sounds area set the volume of each track, and mute/unmute tracks. Use the TRACK SELECT button to switch from Normal (Key- This area lets you see the octave transposition and Sound bank board tracks) to Song Tracks 1-8 and Song Tracks 9-16 views. -
Page 156: Jukebox Panel
Song Play operating mode Jukebox panel Track names Song list Under the sliders, a label for each track is shown. Use the TRK. Use this list to browse through the Songs in the Jukebox list. Use SEL button to switch between the various track views. the scrollbar to scroll the list. -
Page 157: Lyrics & Markers Panel
Lyrics & Markers panel Standard Song Markers contained in a midifile can be read with the Pa588, to quickly jump to a given position in the Song. Addi- tionally, you can set your own marker points on-the-fly. Lyrics side tabs Press one of these side tabs to access the Marker panel corre- sponding to one of the two sequencers. -
Page 158: Sts Name Panel
Song Play operating mode STS Name panel Text files loaded with Standard MIDI Files While in Edit Marker window, you can edit the name and position of the marker being edited. When a “.TXT” file exists in the same directory as a Standard Save the markers (as described below). -
Page 159: Edit Menu
Song Play operating mode Edit menu Selected sequencer Edit menu Before entering edit, select one of the two sequencers, by using the Song area of the main page (see “Switching between sequencers during editing” below). From any page, press the MENU button to open the Song Play edit menu. -
Page 160: Mixer/Tuning: Volume/Pan
Song Play operating mode Mixer/Tuning: Volume/Pan When changing volume to one of the Upper Mixer/Tuning: Volume/Pan tracks, only that track’s volume is changed. Other Upper tracks are left unchanged. This page lets you set the volume and pan for each of the Key- board or Song tracks. -
Page 161: Mixer/Tuning: Fx Send
Internal FX processors. Note: Song parameters cannot be saved when saving to a Perfor- mance or STS. The effect processors included in Pa588 are connected in paral- lel, so you can decide which percentage of the direct signal can be effected: In case you want to send all of a track’s signal to the effect (as... -
Page 162: Mixer/Tuning: Eq Gain
Hint: Track EQ can be memorized in the general preferences for the Song Play mode (they are named Song Play–Global Setup). This will help adapting the Pa588's sound to personal taste for any MIDIfile you will ever play. Need a lighter Bass track? Save the right equalization, and the Bass will stay light with all the subse- quent Songs. -
Page 163: Mixer/Tuning: Tuning
You can also create Songs that make use of all four effects in Sequencer mode. • A Song created on the Pa588 (in Sequencer mode) can use Effects: FX Select up to 4 effects (usually 2 reverbs + 2 modulating effects);... -
Page 164: Effects: Fx A
Song Play operating mode Effects: FX A…D Effects: FX A…D Track Controls: Drum Volume These pages contain the editing parameters for the four effect These parameters let you adjust the volume for each percussive processors. Here is an example of the FX A page, with the Reverb instrument family. -
Page 165: Jukebox Editor
Song Play operating mode Jukebox Editor Save Jukebox Editor Press this button to save the Jukebox file to a card. The Save Juke- box File dialog box appears, allowing you to edit the name and save your file to a card. The Jukebox function lets you play a list of Songs (127 max), at the simple touch of a button. -
Page 166: Preferences: Track Setting
Song Play operating mode Preferences: Track Setting Note Start Window Enables/disables quantization of the Note On event (i.e. begin- Area of quantize intervention, bordering the grid axis. ning of the note). The quantize window corresponds to the axis. No quantization happens. Note Duration The quantize window extends to the nearest win- Enables/disables quantization of the Note Off event (i.e. -
Page 167: Preferences: General Controls
Song Play operating mode Preferences: General Controls Lyrics/Markers Balance Link Preferences: General Controls This parameter allows you to use the SEQUENCER BALANCE slider to select the Sequencer whose lyrics or markers will be In this page, you can set various general parameters. shown in the built-in display. -
Page 168: Page Menu
first note. However, any setup data are read and considered. Note: When Pa588 is driving an external musical instrument, the fast transfer of MIDI data to the MIDI OUT or USB port may Write Performance cause a delay to the Song’s start. -
Page 169: Write Global-Song Play Setup Dialog Box
Song Play operating mode Write Global-Song Play Setup dialog box Note: When saved, the text file will be named after the selected To copy all four effects: Jukebox file. For example, a Jukebox file named “Dummy.jbx” will Select the source Performance, Style or STS, then go to the generate a “Dummy.txt”... -
Page 170: Songbook
SongBook Book SongBook List Header The SongBook is an onboard database that allows you to orga- nize various “musical resources” (Style, Standard MIDI Files, The List Header may change, depending on the type of data KAR files) for easy retrieving. associated with the selected entry. - Page 171 SongBook Book Filter… After you select this command, the “Num” column appears: Press this button to open the Filter dialog box, and select one or more filter criteria, to show a restricted set of entries in the main list. To see the “Key” column again, select the “Show Key (now Song Numbers)”...
-
Page 172: Book Edit 1
Style Play or Song Play mode. The Book Edit 1 page with a Style-based entry: At this point, Pa588 must receive on the special Control channel the NRPN Control Change messages #99 (MSB, with value 2) and #98 (LSB, with value 64) in fast succession, as an initializa- tion string. - Page 173 SongBook Book Edit 1 When you press Write, a link to the selected resource(s) is saved Key Info with the entry (provided “Write Current Resource” is selected Original key of the entry. The first field is the key name, the sec- when saving).
-
Page 174: Book Edit 2
SongBook Book Edit 2 Linked .TXT To assign a different name to the entry, press the (Text Edit) You can select a text (.TXT) file, and link it to the Style or Song button to open the Text Edit window. associated with the current SongBook entry. -
Page 175: Custom List
SongBook Custom List Custom List List Edit Use this page to select and use one of the available Custom Lists This page is only available after checking the “Enable List Edit” (contained in the “LISTDB.SBL” file saved in the same folder as command in the page menu (see page 173). -
Page 176: Lyrics/Sts
Song-based) as a “.TXT” file. See “Linked .TXT” on page 170 for more information on this issue. As as consequence, there are five ways of seeing Lyrics on the Pa588: • In Song Play mode, you can see lyrics contained in a Stan- dard MIDI File as Lyrics events. -
Page 177: Page Menu
SongBook Page menu • In case of an entry based on Standard MIDI Files: Artist/Genre Select this command to toggle between the Artist and Genre col- Associated Selected entry resource(s) umn on the SongBook list, appearing in the Book and Custom List page. -
Page 178: Sequencer Operating Mode
Sounds The native Song format for Pa588 is the Standard MIDI File. area When saving a Song as a SMF, an empty measure is automati- cally inserted to the beginning of the Song. This measure con- Track volume/status area tains various Song initialization parameters. - Page 179 Sequencer operating mode Sequencer Play - Main page Page menu icon Tempo (Tempo mode) Use this menu to select the Tempo change mode. Press the page menu icon to open the menu. See “Page menu” on page 196 for more information. Manual In this mode, you can change the Tempo using the TEMPO/VALUE dial.
-
Page 180: Entering Record Mode
Sequencer operating mode Entering Record mode Track volume/status area Entering Record mode This area is where you can set the volume of each Song track, and mute/unmute tracks. To enter Record mode, press the RECORD button while you are Use the TRACK SELECT button to switch between Song Tracks in Sequencer mode. -
Page 181: Record Mode: Multitrack Sequencer Page
Sequencer operating mode Record mode: Multitrack Sequencer page Overdub The newly recorded events will be mixed to any Record mode: Multitrack Sequencer existing events. page Overwrite The newly recorded events will replace any exist- ing events. Auto Punch Recording will automatically begin at the “Start” While in Sequencer mode, press the RECORD button and select position, and stop at the “End”... -
Page 182: Multitrack Recording Procedure
Sequencer operating mode Record mode: Multitrack Sequencer page Multitrack recording procedure Tempo Select this parameter, and use the TEMPO/VALUE dial to set the Here is the general procedure to follow for the Multitrack tempo. Recording. Note: You can always change the Tempo, when other parameters Press SEQUENCER to enter Sequence mode. -
Page 183: Record Mode: Step Record Page
Sequencer operating mode Record mode: Step Record page Note parameter area Record mode: Step Record page Meter Time signature of the current measure. This parameter cannot The Step Record allows you to create a new Song by entering sin- be edited. You can set a Meter change by using the Insert func- gle notes or chords to each track. - Page 184 Velocity and Duration parameters. See “Veloc- ity” and “Duration” on page 179. With Pa588, you are not obliged to insert single notes in a track. There are several ways to insert chords and double voices. For • To insert a rest, just press the Rest button in the display. Its more information, see “Chords and second voices in Step...
-
Page 185: Record Mode: Backing Sequence (Quick Record) Page
Sequencer operating mode Record mode: Backing Sequence (Quick Record) page Resolution Record mode: Backing Sequence (Quick Use this parameter to set the quantization during recording. Record) page Quantization is a way of correcting timing errors; notes played too soon or too late are moved to the nearest axis of a rhythmic “grid”, set with this parameter, thus playing perfectly in time. - Page 186 Sequencer operating mode Record mode: Backing Sequence (Quick Record) page Track volume/status area Kbd/Pad: This Backing Sequence track includes the four Key- board tracks and the four Pads. After finishing recording, they This area is where you can set the volume of each single Key- will be saved as Song tracks 1-8, as in the following table: board track, and mute/unmute tracks.
-
Page 187: Record Mode: Step Backing Sequence Page
Sequencer operating mode Record mode: Step Backing Sequence page Start recording by pressing the left (PLAY/STOP) Record mode: Step Backing Sequence button or the START/STOP button. page • By pressing the left (PLAY/STOP) button (or the START/STOP button), you can record a keyboard intro with no Style playing. - Page 188 3/4 time). Style Element Tick Smallest position value. Both Pa588 internal This is the Style Element (i.e., a Variation, Fill, Intro, or Ending). sequencers feature a resolution of 384 ticks per The length of the selected Style Element is always shown by the quarter.
- Page 189 Sequencer operating mode Record mode: Step Backing Sequence page Step Backing Sequence procedure Hint: Save the Song to a card, by selection the “Save Song” com- mand from the page menu, to avoid losing it when turning the Here is the general Step Backing Sequencer recording procedure. instrument off.
-
Page 190: Edit Menu
Sequencer operating mode Edit menu Tabs Edit menu Use tabs to select one of the edit pages of the current edit section. From any page, press the MENU button to open the Sequencer edit menu. This menu gives access to the various Sequencer edit sections. Mixer/Tuning: Volume/Pan When in the menu, select an edit section, or press EXIT to exit the menu. -
Page 191: Mixer/Tuning: Fx Send
This page lets you set the level of the track’s direct (uneffected) Play/Mute icon signal going to the Internal FX processors. The effect processors included in Pa588 are connected in parallel, so you can decide Track’s play/mute status. which percentage of the direct signal can be effected. -
Page 192: Mixer/Tuning: Eq Gain
Sequencer operating mode Mixer/Tuning: EQ Gain Mixer/Tuning: EQ Gain Mixer/Tuning: EQ Control In this page you can set the three-band equalization (EQ) for This page lets you reset or bypass track equalization, pro- each individual track. grammed in the previous page. Use the TRACK SELECT button to switch between Song tracks Use the TRACK SELECT button to switch between Song tracks 1-8 and 9-16, and vice-versa. -
Page 193: Mixer/Tuning: Tuning
Conversely, selection of Quarter Tone set- tings, or activation of the Sub-Scale on each track of the Song, can be sent by the Pa588 to an external MIDI recorder as System Exclu- sive data. Note: A Quarter Tone Sub-Scale can be selected by using the SC... -
Page 194: Effects: Fx A
Sequencer operating mode Effects: FX A…D Effects: FX A…D Event Edit: Event Edit These pages contain the editing parameters for the four effect The Event Edit is the page where you can edit each single MIDI processors. Here is an example of the FX A page, with the Reverb event of the selected track. - Page 195 Sequencer operating mode Event Edit: Event Edit And here are the events contained in the Master track. Go/Catch This is a dual-function command. Type First value Second value • While the sequencer is not running, it works as a Go to Mea- Tempo Tempo change –...
-
Page 196: Event Edit: Filter
Pitch Bend Pitch Bend events. instrument in a Drum track. Pa Controls Controls exclusive of the Pa588, like the FX and Note: These parameters are available only when a Drum track is Scale settings. These controls are recorded to the selected. -
Page 197: Song Edit: Transpose
Sequencer operating mode Song Edit: Transpose After setting the various parameters, press Execute to start the Song Edit: Transpose operation. Track Here you can transpose the Song, a track or a part of a track. Use this parameter to select a track. All tracks selected. -
Page 198: Song Edit: Cut/Insert Measures
Sequencer operating mode Song Edit: Cut/Insert Measures Event Song Edit: Cut/Insert Measures Type of MIDI event to delete. All events. Measures will not be removed from In this page you can cut or insert measures from the Song. the Song, and will remain empty. Note All notes in the selected range. -
Page 199: Song Edit: Move
Sequencer operating mode Song Edit: Move Mode Song Edit: RX Convert Use this parameter to select the Copy mode. Merge Copied data are merged with the data at the tar- You can use the RX Convert page to convert notes of the midifile get position. -
Page 200: Preferences: Sequencer Setup
Sequencer operating mode Preferences: Sequencer Setup Preferences: Sequencer Setup Page menu In this page, you can select a MIDI Setup for the Sequencer Press the page menu icon to open the menu. Press a command to mode. select it. Press anywhere in the display to close the menu without selecting a command. -
Page 201: Write Global-Sequencer Setup Dialog Box
Sequencer operating mode Write Global-Sequencer Setup dialog box Delete Current Track Write Global-Sequencer Setup dialog box Select this command to delete the track currently selected in the Track area (see “Track volume/status area” on page 178). Open this window by selecting the Write Global-Song Setup Solo Track item from the page menu. -
Page 202: Save Song Window
Sequencer operating mode Save Song window Storage device Save Song window Use this pop-up menu to re-select the card and deselect every- thing. The recorded Song is contained in RAM, and is lost when turn- Device Type ing the instrument off. The Song is also lost when you over- write it in Record mode, or if you confirm the warning CARD Secure Digital (SD) or MultiMedia (MMC) memory... - Page 203 Sequencer operating mode Save Song window Play/Mute status saved with the Song Save Song procedure When saving a Song, the Play/Mute status is saved with the Song. If you are in Record mode, stop the sequencer and exit This status is preserved also when playing back the same Song in from the Record mode.
-
Page 204: Global Edit Mode
Global edit mode What is it, and how the Global is structured Global edit mode The Global edit environment is the place where you can set glo- Edit menu bal functions, i.e. functions overriding the single Performance, STS or Style. This edit environment overlaps the current operat- ing mode (Style Play, Song Play, Sequencer, Sound Edit). -
Page 205: General Controls: Basic
Global edit mode General Controls: Basic Page menu icon Reverb Offset Press this icon to open the page menu (see “Page menu” on This is the master offset for all reverbs. Use it to adjust reverb page 211). tails to the room where you are playing. Use negative values when you are in a very reverberant room, positive values if the Parameters area room is too dry. -
Page 206: General Controls: Transpose Control
Global edit mode General Controls: Transpose Control Position General Controls: Transpose Control Scale and Transpose position The Scale and Transpose Position allows you to define the rela- This page is where you can select to which tracks the Master tion between the Scale and the Master Transpose. Transpose is applied to, and adjust some related parameter. -
Page 207: General Controls: Lock
Hint: To save the status of the various parameters as a fixed status recalled. This scale assigns a -50 cent value to all notes, and turns for the Pa588, save all the parameters to Performance 1 of bank 1 all scale degrees off. - Page 208 Global edit mode General Controls: Lock STS SubScale Quarter Tone This is useful if, for example, you prefer to always play in Full Keyboard Mode, with chords recog- When the lock is closed, scale settings will not nized on the whole keyboard range. change when choosing a different STS or Song- Book entry.
-
Page 209: General Controls: Interface
How to select the Help language Manual Bass When locked, selecting a Performance or STS will Since Pa588 must be reset at the end of this procedure, be not change the Manual Bass status. sure to first save all unsaved data. -
Page 210: Controllers: Pedals/Slider
Global edit mode Controllers: Pedals/Slider Track Activity Controllers: Pedals/Slider Show Track Activity This page lets you to calibrate and select a function to the Use this parameter to turn on/off the Track Activity display. Assignable Pedal/Footswitch, calibrate and select the polarity for When it is turned on, you can monitor events coming from the the Damper Pedal, and assign a function to the Assignable Slider. -
Page 211: Midi: Midi Setup / General Controls
Global edit mode MIDI: MIDI Setup / General Controls You are now asked to set the pedal to the minimum value. MIDI: MIDI Setup / General Controls Release the footswitch, or press the pedal to the minimum position (usually back pressed). Press the “Push”... -
Page 212: Midi: Midi In Control
There are two separate Chord channels. This is very useful when The Local parameter turns the keyboard on or off. you must send chords to Pa588 on two different channels (like with some MIDI accordions). Note: The Local parameter is automatically reactivated each time you turn the instrument on. -
Page 213: Midi: Midi In Channels
All received velocity values are converted to the selected value. MIDI: MIDI In Channels In this page, you can assign Pa588 tracks to any of the MIDI IN channels. Channels You can assign to each channel one of the following tracks: No track assigned. -
Page 214: Midi: Filters
Mode Use this page to set up to 8 filters for the MIDI data received or Use this parameter to activate the metronome for the Style Play sent by the Pa588. and/or Song play operating modes. No metronome is heard. -
Page 215: Touch Panel Calibration
FORMANCE/SOUND buttons, via the Auto Select functions (see page 206). This way, the next time you will turn the Pa588 on, the preferred When in this page, first touch exactly inside the set of Styles, Sounds and Performances will be still assigned to the rele- arrows in the upper left corner of the display. -
Page 216: Write Global - Global Setup Dialog Box
Global edit mode Write Global - Global Setup dialog box Write Global - Global Setup dialog box Write SC Preset dialog box Open this dialog box by selecting the Write Global-Global Setup Open this dialog box by selecting the Write SC Preset item from item from the page menu. -
Page 217: Media Edit Mode
This edit environment overlaps the current operating mode (Style Play, Song Play, Sequencer, Sound Edit). The following tables describe all the file and folder types the Pa588 can manage. Here are the files you can read or write with Storage devices and internal memory the Pa588. -
Page 218: Media Structure
Each card (and the internal memory) can contain files and fold- There is no main page in the Media edit mode. When pressing ers. Data in the Pa588 is slightly more rigidly structured than in EXIT, you exit the Media mode, and the underlying operating a computer, due to the pre-configured type of data inside the... -
Page 219: Navigation Tools
Media edit mode Navigation tools Scrollbar Load Use the scrollbar to scroll the list. Touching the arrows will scroll one step at a time, while touching the bar will scroll one page at a time. In this page you can load User data files (Performances, User Sounds, User Styles, the SongBook, the Global) from a card to Pressing the arrows while SHIFT is kept pressed jumps to the the internal memory (SSD). - Page 220 Media edit mode Load Loading a single bank User data appears (Global, Performance, SongBook, Sounds, Style…). You can load a single bank of User data (User Sounds, User Styles, Performances) with a single operation. A bank corre- sponds to a STYLE SELECT or PERFORMANCE/SOUND SELECT button.
- Page 221 Voice Processor section, and includes some different Factory Sounds, Drum Kit and PCM data. At the same time, most Pa588 data can be read by any Pa2X/ Pa800. However, keep in mind that, due to the different content and organization, the SongBook will point to different Styles.
-
Page 222: Save
Loading i-Series data Pa588 is compatible with the Styles of the older i-Series instru- ments. You can load them as if they were ordinary Pa588 data. Copy the old i-Series data into a card, and insert the card into the card drive of the Pa588. - Page 223 Media edit mode Save Saving the full memory content Saving all data of a specified type You can save the full memory content with a single operation. In addition to the above, you can save all data of a specified type by selecting the corresponding folder.
- Page 224 Media edit mode Save Saving a single bank A dialog box appears, asking you to select one of the avail- able User locations inside the folder: You can save a single User bank with a single operation. A bank corresponds to a button on the control panel of the instrument (i.e.
- Page 225 Creating a new “.SET” folder Select the desired bank, and press Open to gain access to the single files. Pa588 proprietary data must be saved in special folders with the “.SET” extension. These special folders can be saved inside ordi- nary folders.
-
Page 226: Copy
Media edit mode Copy Copying a single file or folder Copy You can copy a single file or folder, from a generic folder to a dif- ferent one. The file or folder must be located in the root (the main/highest level in the card hierarchy) or into a generic folder. In this page you can copy files and folders. -
Page 227: Erase
When copying files, a file or folder with the same name of a source element might be found in the target device. In this case, Pa588 asks you if you want to overwrite it. When a duplicate file or folder is met, the following dialog box... -
Page 228: Format
Media edit mode Format Format Utility The Format function lets you initialize an SD (Secure Digital) or This page includes a set of backup utilities. MMC (MultiMedia) memory card. Full Resources Backup Warning: When formatting a card, all data it contains is lost for- This command allows you to make a backup of the Factory and ever! User Musical Resources (excluding the Operating System) on a... -
Page 229: Preferences
Media edit mode Preferences After pressing Backup, a dialog box will appear, asking you Preferences to select a name for the backup file, and whether compres- sion must be turned on or off during the backup. This page includes various protect options. Press the (Text Edit) button to open the Text Edit win- dow. -
Page 230: Usb
Mac), by just connecting the Pa588 to the computer’s USB inter- fer. Be careful to press it only when you are abso- face. This way, you can exchange files between the Pa588 and a lutely sure data transfer has been completed. -
Page 231: Page Menu
Media edit mode Page menu Object(s) info Page menu Select this command to see the size of any selected file or folder. Also, the number of files and directories (folders) it contains are shown. Press the page menu icon to open the menu. Press a command to select it. -
Page 232: Sd And Mmc Cards
The Type label, above the file list, is shown in white. the Pa588. Don’t use your computer or digital camera to format (initialize) a card you plan to use with the Pa588. If the card was formatted on a different device, it may not work correctly with the... - Page 233 Press the card inward and release it, and the card will pop out. Note: Before you can use an SD card, you must format it on the Pa588. The card may not work if it was formatted on another device.
-
Page 234: Midi
Program Change (PC) – When you select a Sound, a Program Change message is generated on the channel. Use this message, Here is a brief overview of MIDI, as related to the Pa588. If inter- together with Control Change 00 and 32, to remotely select ested, you may find more information on the general use of... -
Page 235: Standard Midi Files
Sequencer mode. status of the SPLIT button of the control panel. All the notes – When in Song Play mode, the Pa588 can also display SMF lyrics both above and below the split point – will be sent to the chord in Solton, M-Live (Midisoft), Tune1000, Edirol, GMX, HitBit, recognition. -
Page 236: Connecting Pa588 To An External Keyboard
If the external keyboard transmits over the Global channel of the page 100 and “Midi Setup” on page 163). Pa588, the split point and the status of the SPLIT button in the control panel will affect the notes received from the external key- Note: A different MIDI Setup may be selected for the Style board. -
Page 237: Connecting The Pa588 To An External Sequencer
The sequencer will receive the notes played on the Pa588 keyboard and send them to the selected track of the song. The In order to connect the Pa588 to a computer, you need to have a track will transmit the data to the internal sound generation of computer with the MIDI interface. -
Page 238: Playing Another Instrument With The Pa588
Select the “Sequencer 1” or “Sequencer 2” MIDI Setup (depend- instrument’s MIDI IN. ing on the Sequencer you are using on the Pa588) to set the Set the other instrument to the same channels you want to channels as follows. -
Page 240: Installing The Korg Usb Midi Driver
USB can be used in parallel with the MIDI ports. For example, you can connect your Pa588 to a sequencer running on your Please connect the Pa588 to the computer via an USB cable only computer, and at the same time control another MIDI instru- after having installed the KORG USB-MIDI Driver Tools. -
Page 241: Mac Os X: Installing Korg Usb-Midi Driver
(e.g., sequencer) among the other MIDI devices: PA588 KEYBOARD: This allows for reception of MIDI messages from the Pa588 (keyboard and controller’s data) to the MIDI application running on the Mac. PA588 SOUND: This allows for transmission of MIDI messages from the MIDI application running on the Mac, to the internal tone generator of the Pa588. -
Page 242: Assembling The Stand
Assembling the stand Assembling the stand Cautions for assembly • When placing the instrument on the stand, be careful not to pinch your hands. • Be sure that the correct parts are assembled in the correct orientation and position, and follow the steps in order. •... - Page 243 Assembling the stand Open the stand (A) by unfolding the legs (A’) and diagonal Lay the pedal (C) on the pedal bar (B). bars (A”), as shown in the following illustration. Lift the instrument (D) with two or more people, and fix it Use the two short screws (b) to fix the diagonal bars (A”).
-
Page 244: Check After Assembly
Assembling the stand Check after assembly Fix the instrument (D) to the stand (A) from below, by using the two wing bolts (c). Be sure you insert a washer [•] Are any parts left over? (d) between the stand’s bottom surface and each of the wing bolts. -
Page 245: Shortcuts
Shortcuts Shortcuts You can keep the SHIFT button pressed, and press another but- Shift + Functions ton on the control panel to directly jump to an edit page. Here is Upper Octave Selects the Tuning page (Mixer/Tuning sec- the list of “shortcuts”. (either) tion) Style... -
Page 246: Troubleshooting
MIDI Clock parameter to MIDI or USB (depending on the port the Pa588 is hooked to the other device through) and make sure that the external device trans- mits MIDI Clock data. Does not respond to MIDI mes- Make sure that all MIDI or USB cables are connected correctly. -
Page 247: Technical Specifications
Pedals 1 Damper (with half-pedal support), 1 Assignable Footswitch/Pedal (optional) Power Supply DC 12 V external power supply (supplied) SUPPLIED ACCESSORIES Damper Pedal Korg DS-2H (supporting half-pedaling) Other Piano stand, Music stand, AC adapter, Power cord, Accessory CD-ROM, User’s manual... - Page 248 Technical specifications Features KORG Pa588 OPTIONS Expression/Volume Pedal Korg EXP-2 - Korg XVP-10 Switch Pedal Korg PS-1 PHYSICAL DATA Consumption 15 Watt × × × × × × Dimensions (W 55.7 17.2 7.3 inches (1416 187 mm) - without stand and music rest ×...
-
Page 249: Index
Index Index Global channel Groove Quantize Arabic Scale Assignable Sliders Audio Inputs Audio Outputs , ??– Inputs Auto Style/Perf/Sound Select Intro Write Jukebox Backup Balance (Keyboard/Style or Seq) Balance (Sequencer) Bank Select Local Off Bass & Lower Backing Lower Lock Lyrics Contrast Markers... - Page 250 Index Outputs , ??– Variation Style Performance Selecting, see Style Writing Pads Style Play mode – Style Record mode – Pads Synchro Start/Stop Song tracks Style tracks PANIC (SHIFT+START/STOP) Pedals Tap Tempo Performance Tempo/Value section Selecting Touch Panel Selecting (Auto) Calibration Writing Track Select...
- Page 252 Address KORG ITALY SpA Via Cagiata, 85 I-60027 Osimo (An) Italy www.korgpa.com www.korg.co.jp www.korg.com www.korg.co.uk © KORG Italy 2008. All rights reserved...
Need help?
Do you have a question about the Pa588 and is the answer not in the manual?
Questions and answers