Advertisement
Quick Links
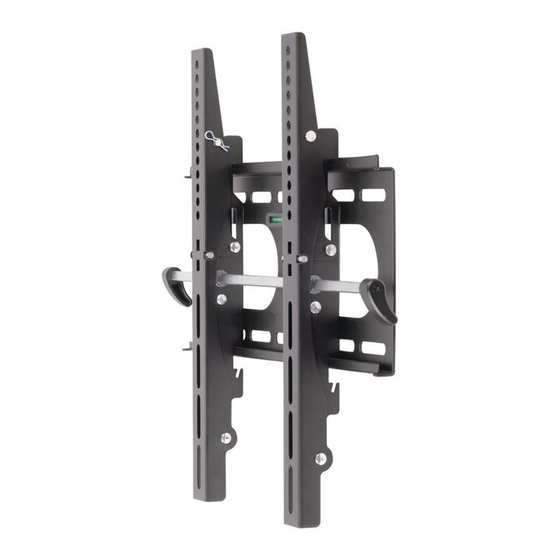
fl at panel solutions
Wall Mount for LCD, Plasma, and
LED Displays
Installation Manual
Thank you for choosing the RCA MAF75BKR Universal Flat Panel
TV Wall Mount. This mount can be used for all major brands of
26" - 40" fl at panel TVs, 100 lbs (45 kg) or under. This wall mount
features a 0-15-degree tilt for easy viewing. Before attempting
to mount your television set, please remove all parts from this
package and read the installation instructions carefully.
WARNING: Use of this mount with a TV weighing over 100
lbs. or with a screen larger than 40" could cause the mount
to fail causing property damage and/or personal injury.
Safety precautions
Follow these precautions to ensure safe installation and mounting of your fl at panel TV.
1.
Read these instructions carefully before you begin.
If you are unsure of any part of the process, contact
a professional contractor or installer for assistance.
Improper installation can result in injury or damage.
2.
The wall or mounting surface must be capable of
supporting the combined weight of the mount and
the display; if not, the structure must be reinforced.
3.
Safety gear and proper tools must be used. Failure
to do so can result in injury and/or damage. A
minimum of two people are required for installation.
Do not attempt to install this mount alone under any
circumstances.
4.
Follow all instructions and recommendations
regarding adequate ventilation and suitable
locations for mounting your display. Consult the
owner's manual for your particular display for more
information.
Preparing to install
Before beginning the installation process, verify that you have all the necessary tools on hand. The following
tools are required for proper installation:
Tools
Phillips Head Screwdriver
Ratchet or Driver with 13 mm (1/2") Socket
Electric or Portable Drill
3/16" (4.8 mm) Drill Bit and Stud Finder for Drywall
Installation
3/8" (10 mm) Masonry Bit for Concrete Installation
This wall mount is intended for use
only with the maximum weight of
45 kg/100 lbs. Use with heavier
than the maximum weights
indicated may result in instability
causing possible injury. Follow
the installation and operation
instructions carefully.
5.
For drywall installation, it is essential for the
wall mount plate to be attached to wall studs.
(Use a stud fi nder.)
6.
Use the included hardware for mounting purposes.
This hardware has been provided to ensure a safe
and secure mount.
7.
Hire a licensed electrician to relocate an electrical
outlet, if needed.
8.
Be sure to purchase wires long enough to connect
the TV to the audio and video components in your
installation.
Keep your sales receipt to obtain warranty parts and
service and for proof of purchase. Attach it here and
record the model number. This number is located on
the product.
Model No. ____________________________________
Purchase Date _________________________________
Dealer/Address/Phone _________________________
Package Contents
Wall Plate (x1)
Mount Arm (x2)
Tilt Adjustment Rod (x1)
Safety Bar (x1)
Instruction Manual (x1)
Hardware Kit (x1)
Continues on next page...
MAF75BKR
Fits TVs 26"- 40"
Maximum Load
Capacity – 100 lb (45 kg)
CAUTION:
Pour des instructions
en français, se
reporter à la page 6.
Para obtener
instrucciones en
español, consulte la
página 11.
Advertisement

Related Manuals for RCA MAF75BKR


Summary of Contents for RCA MAF75BKR
-
Page 1: Installation Manual
LED Displays Capacity – 100 lb (45 kg) Installation Manual Thank you for choosing the RCA MAF75BKR Universal Flat Panel CAUTION: TV Wall Mount. This mount can be used for all major brands of 26" - 40" fl at panel TVs, 100 lbs (45 kg) or under. This wall mount... -
Page 2: Mounting The Wall Plate
Hardware Kit (G) M6 x 30 Bolt (x4) (A) M8 x 63 Lag Bolt (x4) (H) M8 x 12 Bolt (x4) (B) Lag Bolt Washer (x4) (I) M8 x 30 Bolt (x4) (C) Concrete Anchor (x4) (J) M6 Washer (x4) (D) M4 x 12 Bolt (x4) (K) Spacer (x8) (E) M4 x 20 Bolt (x4) - Page 3 Concrete/Brick Installation IMPORTANT! For safety reasons, the concrete wall must be capable of supporting the combined weight of the mount and the display. The manufacturer takes no responsibility for failure caused by walls of insuffi cient strength. Place the wall plate against the wall in the desired Insert a Concrete location and level it using the integrated bubble Anchor (C) into each...
- Page 4 Attach the mount arms to the back of your display using the screws identifi ed in Steps 1 and 2 (see Fig.11): A. If you are using the M4 or M6 screws you will also need to use the M6 washers (J). M8 screws do not require washers.
-
Page 5: Final Installation
Final Installation With the help of another person, carefully lift your display and place it on the wall plate. Do not release the display until the mount arms have securely hooked onto the wall plate. Insert the safety bar at the bottom of the mount to Fig.13 prevent the display from being lifted from the wall plate. -
Page 6: Limited Lifetime Warranty
Limited Lifetime Warranty Audiovox Electronics Corporation (the “Company”) warrants to you the original retail purchaser of this product that should it, under normal use and conditions, be proven defective in material or workmanship during its lifetime while you own it, such defect(s) will be repaired or replaced (at the Company’s option) without charge for parts and repair labor.