Table of Contents
Advertisement
Advertisement
Table of Contents

Related Manuals for Fantec MR-35DU3


Summary of Contents for Fantec MR-35DU3
- Page 1 FANTEC MR-35DU3 USER MANUAL...
-
Page 2: Table Of Contents
Menu Menu ..................1 1. Product Introduction ............2 2. Operation ................3 2.1 USB Interface ..............6 2.1.1 JBOD Modus ............. 6 2.1.2 BIG Modus ..............7 2.1.3 RAID0 ................ 8 2.1.4 RAID1 ................ 9 2.1.5 Partitioning Volumes ..........10 3. -
Page 3: Product Introduction
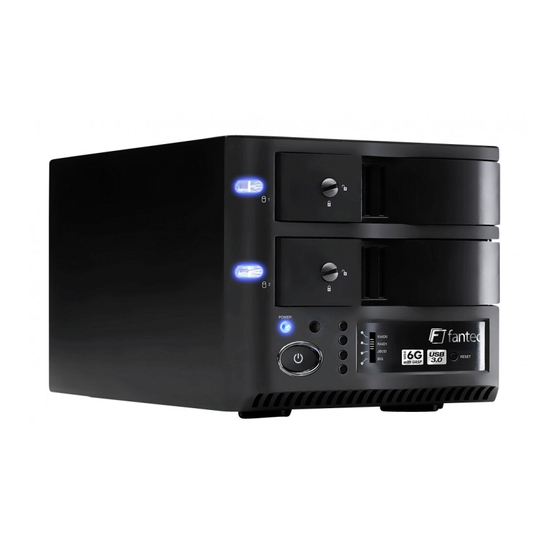
1. Product Introduction SATA 2x HDD to USB 3.0 5.0G interface. Front Back... -
Page 4: Operation
2. Operation The Hard Disk Installation: Sway from side to side the lock , and pull the doorknob to insert 1 or 2 hard disk. Close the doorknob and the installation will be completed (The step will be represented in terms of following graphs) Note: Sway from side to side the lock at the instructed point which you could... - Page 5 Connect to the computer host through USB, and turn on the power Turn the switch to RAID0, LED will keep bright and the host will be entering the RAID0 active status. Turn the switch to RAID1, RAID1 LED keep bright, and the host will be entering the RAID1 active status.
- Page 6 LED condition: Switch on power and insert two HD in terms of different working pattern PATTERN HDD carries on the self-checking Data transmission RAID0 HDD1 and HDD2 LED flashing in During Data transmission: The turn with purple lights. HDD1 and the HDD2 LED flashing Self- checking completes when LED with purple light.
-
Page 7: Usb Interface
Attention: 1. If you use two HDD simultaneously and discover that the LED1 or LED2 flashing with lights in turn for a long time. Please check and see if the HDD has installed purple correctly. 2. If you simultaneously use two HDD, and the HDD damaged under RAID0, JBOD, and BIG pattern, the data on the HDD will lose. -
Page 8: Big Modus
2.1.2 BIG Modus Insert the two disks in the HDD1 and HDD2 rack and connect the device with the USB & Power cable. Turn on the power, switch the Mode to BIG and press the Reset button for a few seconds, the computer will automatically recognize the USB device. -
Page 9: Raid0
2.1.3 RAID0 Insert the two disks in the HDD1 and HDD2 rack and connect the device with the USB & Power cable. Turn on the power, switch the Mode to RAID0 and press the Reset button for a few seconds, the computer will automatically recognize the USB device. Right-click on “My Computer”... -
Page 10: Raid1
2.1.4 RAID1 Insert the two disks in the HDD1 and HDD2 rack and connect the device with the USB & Power cable. Turn on the power, switch the Mode to RAID1 and press the Reset button for a few seconds, the computer will automatically recognize the USB device. Right-click on “My Computer”... -
Page 11: Partitioning Volumes
2.1.5 Partitioning Volumes This section explains how to partition volumes after initializing them. You must partition volumes for the host computer's operating system before you can store data on the volumes. Refer to the operating system's documentation for further guidance. Partitioning a hard drive MS Windows Important: Before reconfiguring a volume, back up your data and delete previously... - Page 12 Every disk should appear with the word “Basic”, a size value that shows the available storage capacity, and a status of “Online”. Instead of Basic, a disk could appear Unknown, Dynamic, or Not Initialized. A window opens with the selected disk (all Unknown disks may appear in this window).
- Page 13 5. Select the Primary or Extended option and click Next. 6. Specify the partition size. By default, the partition occupies the entire volume. Click Next. 7. Assign a drive letter or mount path and click Next. 8. Name and format the partition and click . 9.
- Page 14 Mac OS X Important: Before reconfiguring a volume, back up your data and drag the old drive to the trash to un-mount previously defined partition. If no hard drives are connected to the Storage Appliance, the Processor disk (8.0 GB Config Disk Media) will appear. Do not remove or modify that partition.
-
Page 15: Note
5. Select Mac OS Extended (journaled) from the Format drop-down list. 6. Specify the size of the partition in the Size field. 7. Click the Partition button. 8. Click Partition to acknowledge the warning. Disk Utility mounts the created partition and represents it with an icon on the desktop. The icon is labeled with the partition name. -
Page 16: Features
4.3. 4 Working Modes (BIG,JBOD,RAID0,RAID1) You can configure the FANTEC MR-35DU3 to use any of the following Storage Policies to map the appliance's physical hard drives to virtual drives that are visible to the host computer. The virtual drives are called volumes in the GUI. The host operating system treats each volume as if it were a single physical drive. - Page 17 The BIG storage policy concatenates a series of physical hard drives as a single large volume; resulting in a seamless expansion of virtual volumes beyond the physical limitations of singularly connected hard drives. BIG storage policy delivers maximum storage space without a single large capacity and costly hard drive. Hard drive A and B are concatenated into a single virtual volume in the Figure below with a storage capacity that is equal to the sum of each of the physical hard drives A and B.
- Page 18 RAID0 The RAID0 storage policy distributes access across all hard disks, also called striping. RAID0 presents the best data speed but no data redundancy. RAID0 storage policy accelerates hard disk operating speed by using many disks in parallel. Hard drive data segments are written to different disks simultaneously which increases performance while sacrificing data redundancy.
-
Page 19: Supported Systems
4.4 Supported Systems: Windows 2000/XP/VISTA/7 and MAC OS 9.0 and higher 4.4.1 System Expansion for Windows Overview This appendix describes the procedures needed with Microsoft Windows for expanding file systems that have been created on volumes that have increased in size, while preserving all of your existing data. -
Page 20: Package Contens
“Unallocated” was not accessible for data usage. After using the disk part utility to extend the hard drive partition/volume capacity, the Windows host side matches the virtual hard drive partition/volume. 5. Package content FANTEC MR-35DU3 - User manual - AC Cable - USB Cable...
Need help?
Do you have a question about the MR-35DU3 and is the answer not in the manual?
Questions and answers