Table of Contents
Advertisement
Quick Links
Advertisement
Table of Contents

Related Manuals for Fantec MB-X2U31R


Summary of Contents for Fantec MB-X2U31R
- Page 2 FANTEC MB-X2U31R Manual - english 2x 3,5“/2,5“ SATA HDD/SSD USB 3.2 Gen 2* Typ-C 10G Technologie * 2,5“ SSD/HDD only together with optional accessory „FANTEC MB-Bracket 25“ (Art.No.:2534).
- Page 3 USB 2/3 compatible a suitable cable with type-A connector is included in the scope of delivery. The perforated front doors together with the 40mm fan, provide optimal cooling. 2,5“ SDD/HDD 2,5“ SSD/HDD only together with optional accessories: „FANTEC MB-Bracket 25“ (Art.No.:2534).
- Page 4 Instructions STEP • Follow all instructions. • Do not use the device in the immediate vicinity of water. • Clean the device with a soft dry cloth. • Do not block any ventilation openings. • Carry out the installation according to these instructions. •...
-
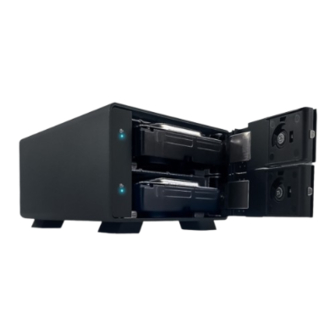
Page 5: Front And Back
Front and Back STEP... - Page 6 Explanation STEP Description - Front Status LED for each hard disk: lights up Blue: hard disk is switched on and active flashing Blue: hard disk being accessed LED is off: the hard disk is switched off, or the USB cable is disconnected. The hard disk is switched on but inactive: e.g.
- Page 7 RAID-Modi STEP SINGLE MODE In Single Mode or „Non-RAID“ mode, the hard drives of a set are displayed independently and directly as drives on the computer. This function can be used when RAID is not required, when only one hard drive is installed, or when two different brands or capacities of hard drives are installed.
-
Page 8: Raid 1 Mirroring
RAID-Modi STEP RAID 0 STRIPING Striping combines multiple drives into one large virtual drive as a single logical unit. Data is written in parallel across all hard drives, resulting in an increase in data transfer rate. Once a hard drive fails or is damaged, all data is lost and can only be reconstructed with professional help. -
Page 9: Installation
Installation STEP 1. Connect the power cable and turn on the power. Plug in the USB cable and connect the other end of the cable to your PC. 2. Unlock the door and pull the door handle, to open the slide-in module. 3. - Page 10 Installation STEP 4. Slide the hard drives into the enclosure. 5. Close the door. 6. To remove the hard disk, execute the action „Safely remove hardware“ in your operating system, switch off the case at the back, open the door and remove the hard disk again.
-
Page 11: Raid Mode - Setup
RAID Mode - SETUP STEP SETUP SINGLE MODE The MB-X2U31R offers four different modes: • the RAID modes RAID1, RAID0 Striping and RAID0 Spanning (BIG), • the SINGLE mode. Important notes in advance: • Always create a backup of important data. - Page 12 RAID Mode - SETUP STEP 1. switch off the housing and start the disk management on your PC. disk management on your PC. 2. set the switch (4) on the rear panel to the desired RAID mode. 3 - If you want to use a RAID mode, always place two hard disks in the enclosure. - If you want to use SINGLE mode, you can insert one or two hard disks.
- Page 13 Initialize and format hard disks STEP Microsoft Windows If you are using unformatted hard disks, they must first be initialized. To do this, tap the Windows key on your keyboard and type „diskmgmt.msc“ (without quotes). Then press the „ENTER“ key. 1.
- Page 14 Initialize and format hard disks STEP 3. Hard disk is formatted. MBR or GPT mode Important: Please use GPT if the hard disk has a capacity over 2TB. Use MBR if the hard disk capacity is max. 2TB. Selected MBR mode for hard disk below 2TB MBR (Master Boot Record) Selected GPT mode for hard disk over 2TB GPT (GUID Partition Table)
- Page 15 Initialize and format hard disks STEP MAC OS X 10.13 or above 1. start the „Disk Utility“. 2. Initialize hard disk 3. Click Delete > select details and press Delete.
- Page 16 Initialize and format hard disks STEP 4. Hard disk being formatted. 5. Hard disk ready formatted.
-
Page 17: Problem Handling
Problem handling STEP If the inserted hard drive does not turn on, check if the power cable is plugged in properly and the central power switch is turned on. If the USB connection is not established, check if the USB cable is plugged in. If your USB is causing problems: USB3 drivers that come with the installation of an operating system are often not optimally matched to your motherboard. - Page 18 Billwerder Billdeich 605B 21033 Hamburg Declaration of Conformity: Herewith we declare that the article is in conformity with the provisions of the RL 1999/EG http://www.fantec.de/unternehmen/bestimmungenrichtlinien/ce/ Typing errors, mistakes and changes reserved. Illustrations similar FANTEC GmbH, 2023 - All rights reserved.
Need help?
Do you have a question about the MB-X2U31R and is the answer not in the manual?
Questions and answers