Table of Contents
Advertisement
Available languages
Available languages
Quick Links
Advertisement
Table of Contents

Subscribe to Our Youtube Channel
Related Manuals for M-Audio AIR 192|8


Summary of Contents for M-Audio AIR 192|8
- Page 1 User Guide English ( 3 – 8 ) Guía del usuario Español ( 9 – 14 ) Guide d'utilisation Français ( 15 – 20 ) Guida per l'uso Italiano ( 21 – 26 ) Benutzerhandbuch Deutsch ( 27 – 32 ) Appendix English ( 34 –...
-
Page 3: Box Contents
3. Read the End-User License Agreement, then check the box to Agree and click Next to continue. 4. Click Install to begin the installation. You may be asked to connect AIR 192|8 to your computer during the installation process. Click Install on any further system messages during the installation. - Page 4 5. Select your Sample Rate and then click OK to close the Setup window. 6. Go to the Setup > I/O and select M-Audio AIR 192|8 for the Input and Output devices. You can now add tracks to send and receive audio and MIDI from sources connected to AIR 192|8 inputs and stream recorded audio back through the AIR 192|8 outputs.
-
Page 5: Connection Diagrams
Connection Diagrams Items not listed under Introduction > Box Contents are sold separately. Example 1 Powered Monitors Top/Front Panel Computer Acoustic Guitar Rear Panel Headphones Example 2 Powered DJ Mixer Monitors Computer Top/Front Panel Rear Panel MIDI Device Headphones Keyboard Example 3 Powered Top/Front Panel... -
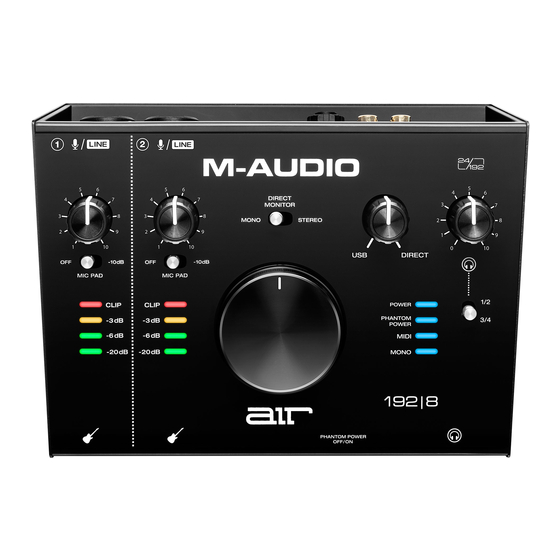
Page 6: Top Panel
Top Panel Power LED: This LED illuminates when a valid USB connection has been established between your computer and AIR 192|8. Use this light to verify that AIR 192|8 is receiving power and is ready to use. Input Gain: Adjusts the input's gain level. Set this knob so the corresponding LED Meter (located below the knob) displays a "healthy"... - Page 7 Monitor Level: Adjusts the output volume of Main TRS and RCA Outputs (1/L 2/R), which should be connected to your powered monitors or amplifier system. 10. Monitor Mix: Adjusts the mix of the audio signal from your inputs (Direct) and the audio output of your computer (USB) that will be sent to the Main Outputs and Headphone Output.
-
Page 8: Rear Panel
Use the included USB-C-to-USB-C or USB-C-to-USB-A cables to connect the AIR 192|8 to a computer. Connect the USB-C end of the cable by firmly pressing it into place to ensure a strong connection is felt. The AIR 192|8 requires a USB 2.0 connection (or higher). -
Page 9: Contenido De La Caja
4. Haga clic en Install (Instalar) para comenzar la instalación. Es posible el sistema le solicite conectar el AIR 192|8 a su ordenador durante el proceso de instalación. Haga clic en Install en respuesta a todos los posibles mensajes adicionales del sistema durante la instalación. - Page 10 En la ventana Audio Devices (Dispositivos de audio), seleccione AIR 192|8 en la columna izquierda. Haga clic derecho en AIR 192|8 y seleccione Use this device for sound input (Utilizar este dispositivo para la entrada de sonido). Haga clic derecho en AIR 192|8 y seleccione Use this device for sound output (Utilizar este dispositivo para la salida de sonido).
-
Page 11: Diagramas De Conexión
Diagramas de conexión Los elementos que no se enumeran en Introducción > Contenido de la caja se venden por separado. Ejemplo 1 Monitores Panel superior/frontal Computadora alimentados Guitarra acustica Panel trasero Auriculares Ejemplo 2 Mezclador de DJ Monitores alimentados Computadora Panel superior/frontal Panel Dispositivos... -
Page 12: Panel Superior
LED de encendido: Este LED se enciende cuando se establece una conexión USB válida entre su ordenador y el AIR 192|8. Utilice esta luz para verificar que el AIR 192|8 está conectado al suministro eléctrico y está listo para usar. - Page 13 Nivel de monitoreo: Ajusta el volumen de salida de las salidas Salidas principales TRS y RCA (1/L 2/R), las cuales deberían estar conectadas a monitores alimentados o a un sistema de amplificación. 10. Monitor Mix: Ajusta la mezcla de la señal de audio proveniente de sus entradas (Direct) y la salida de audio de su ordenador (USB) que se enviará...
-
Page 14: Panel Trasero
El AIR 192|8 requiere una conexión USB 2.0 (o superior). Utilice el adaptador de 3,5 mm (1/8 pulg.) a MIDI para enviar información MIDI a un dispositivo externo. Importante: No conecte dispositivos de audio (por ejemplo, auriculares, monitores, etc.) a este conector. -
Page 15: Contenu De La Boîte
Pour de l'assistance supplémentaire, veuillez visiter m-audio.com/support. Démarrage Paramètres audio Utilisateurs Windows : Avant de brancher l'AIR 192|8 à votre ordinateur pour la première fois, vous devez installer le pilote : 1. Veuillez visiter m-audio.com/support/drivers et télécharger la dernière version du pilote AIR... - Page 16 Vous pouvez maintenant ajouter des pistes et recevoir un signal audio et des messages MIDI des sources branchées aux entrées de l'AIR 192|8 et transmettre en continu des fichiers par le biais des sorties de l'AIR 192|8. Pour configurer l'AIR 192|8 pour Ableton Live Lite Utilisez le câble USB fourni pour brancher l'AIR 192|8 à...
-
Page 17: Schéma De Connexion
Les éléments qui ne figurent pas dans Présentation > Contenu de la boîte sont vendus séparément. Exemple 1 Moniteurs amplifiés Panneau supérieur/avant Ordinateur Guitare acoustique Panneau arrière Casque d'écoute Exemple 2 Mixeur DJ Moniteurs amplifiés Panneau Ordinateur supérieur/avant Panneau Appareils arrière... -
Page 18: Caractéristiques
DEL d’alimentation : Cette DEL s’allume lorsqu’une connexion USB est établie entre votre ordinateur et l'AIR 192|8. Cette DEL permet de vérifier que l'AIR 192|8 est alimenté et prêt à être utilisé. Gain d'entrée : Ces boutons permettent d'ajuster le niveau de gain du signal d'entrée. Réglez ce bouton afin que le vumètre à... - Page 19 Direct Monitor sur Mono. Ce bouton est utile afin de régler des problèmes de latence lors de l'enregistrement sur votre logiciel audionumérique. La latence est définie comme le délai entre le signal entrant (lorsque vous jouez d'un instrument, vous chantez, etc.) et le signal sortant (que vous entendez dans votre logiciel...
-
Page 20: Panneau Arrière
Sorties principales (1–2) : Utilisez des câbles TRS 6,35 mm (1/4 po) standards pour relier ces sorties à vos moniteurs amplifiés, à un système d'amplification, etc. Le mix que vous entendez via ces sorties est déterminer par le bouton Monitor Mix et le sélecteur Direct Monitor. Le niveau de ces sorties est commandé... -
Page 21: Italiano
5. Una volta completata l’installazione, cliccare su Finish (fine). Per utilizzare il driver Windows, aprire il pannello di controllo M-Audio AIR 192|8 Control Panel. Qui è possibile configurare la Preferred Buffer Size (dimensione del buffer) e la Sample Rate (frequenza... - Page 22 Recarsi su Applicazioni > Utilità > Audio MIDI Setup. Nella finestra Audio Devices (dispositivi audio), selezionare AIR 192|8 nella colonna sinistra. Fare clic col tasto destro su AIR 192|8 e selezionare Use this device for sound input (utilizza questo dispositivo per ingresso audio).
-
Page 23: Schemi Di Collegamento
Schemi di collegamento Elementi non elencati sotto Introduzione > Contenuti della confezione sono venduti separatamente. Esempio 1 Monitor alimentati Pannello superiore/anteriore Computer Cuffie Chitarra acustica Pannello posteriore Esempio 2 Monitor Mixer DJ alimentati Pannello Computer superiore/anteriore Cuffie Pannello posteriore Dispositivi MIDI Tastiera Esempio 3... -
Page 24: Pannello Superiore
Strumento. LED MIDI: questo LED si illumina quando viene inviato MIDI da o verso il dispositivo. LED mono: questo LED si illumina quando il segnale di ingresso direct monitor dei canali 1 e 2 è impostato su Mono. LED di alimentazione phantom: questo LED si illumina quando l'interruttore di alimentazione Phantom è... - Page 25 Direct Monitor su Mono. Questa manopola è utile per gestire la “latenza” quando si registra nel DAW. La latenza è il ritardo che si può avere tra il suono in ingresso (lo strumento suonato, il canto, ecc.) e il suono in uscita (quando si sente nel DAW).
-
Page 26: Pannello Posteriore
Collegare l’estremità USB-C del cavo inserendolo saldamente in posizione per garantire un collegamento saldo. L'AIR 192|8 richiede un collegamento USB 2.0 (o superiore). Uscita MIDI: Servirsi dell'adattatore da 3,5 mm (1/8") a MIDI in dotazione per inviare i dati MIDI a un dispositivo esterno. -
Page 27: Deutsch
Systemmeldungen während der Installation klicken Sie auf Installieren. 5. Sobald die Installation abgeschlossen ist, klicken Sie auf Fertigstellen. Um den Windows-Treiber zu verwenden, öffnen Sie das M-Audio AIR 192|8 Control Panel. Hier können Sie Ihre Bevorzugte Puffergröße und Sample-Rate einstellen. - Page 28 Wählen Sie Anwendungen > Dienstprogramme > Audio-MIDI-Setup. Wählen Sie im Fenster Audiogeräte die Option AIR 192|8 in der linken Spalte aus. Klicken Sie mit der rechten Maustaste auf AIR 192|8, und wählen Sie Dieses Gerät für Soundeingabe verwenden. Klicken Sie mit der rechten Maustaste auf AIR 192|8 und wählen Sie Dieses Gerät für Soundausgabe verwenden.
- Page 29 Anschlussdiagramm Teile, die nicht unter Einführung > Lieferumfang angegeben sind, sind separat erhältlich. Beispiel 1 Aktivemonitore Ober-/Vorderseite Computer Akustische Gitarre Rückseite Kopfhörer Beispiel 2 DJ-Mixer Aktivemonitore Computer Ober-/Vorderseite Rückseite MIDI- Geräte Kopfhörer Keyboard Beispiel 3 Aktivemonitore Ober-/Vorderseite Computer Elektrische Gitarren Kopfhörer Rückseite...
- Page 30 Oberseite Power-LED: Diese LED leuchtet, wenn eine gültige USB-Verbindung zwischen Ihrem Computer und AIR 192|8 hergestellt wurde. Überprüfen Sie mithilfe dieses Lichts, ob das AIR 192|8 mit Strom versorgt wird und einsatzbereit ist. Input Gain: Passt den Verstärkungsfaktor des Eingangs an. Stellen Sie diesen Regler so ein, dass die entsprechende LED-Anzeige (unterhalb des Reglers) während der Performance einen „gesunden“...
- Page 31 Monitorpegel: Passt die Ausgangslautstärke der Haupt-TRS- und RCA-Ausgänge (1/L 2/R) an, welche mit den Aktivboxen oder dem Verstärker verbunden sein sollten. 10. Monitor Mix: Passt den Mix aus dem Audiosignal von Ihren Eingängen (Direct) und dem Audio- Ausgang des Computers (USB) an, der an die Hauptausgänge und die Kopfhörerausgäng gesendet wird.
- Page 32 Verwenden Sie die im Lieferumfang enthaltenen USB-Cauf-USB-C oder USB-C-auf-USB-A- Kabel, um Ihr AIR 192|8 an einen Computer anzuschließen. Schließen Sie das USB-C-Ende des Kabels an, indem Sie es fest einstecken, um sicherzustellen, dass eine sichere Verbindung spürbar ist. AIR 192|8 benötigt einen USB 2.0-Anschluss (oder höher).
-
Page 34: Technical Specifications
Frequency Response 20 Hz – 20 kHz (±0.1 dB) 108 dB (A-weighted) Dynamic Range Signal-to-Noise Ratio 104 dB (+1.0 dBu, A-weighted) 0.001% (1 kHz, +0.8 dBu, -1 dBFS) THD+N Preamp EIN -126 dBu (150-ohm, unweighted) +1.8 dBu Max Input Level... -
Page 35: Trademarks And Licenses
0.90 kg Specifications are subject to change without notice. Trademarks & Licenses M-Audio and AIR Music Tech are registered trademarks of inMusic Brands Inc., registered in the U.S. and other countries. Ableton is a trademark of Ableton AG. Pro Tools is a registered trademark of Avid Technology, Inc. in the U.S. and other countries. - Page 36 Manual Version 1.1...
Need help?
Do you have a question about the AIR 192|8 and is the answer not in the manual?
Questions and answers
Which sockets should I use for mics?