Table of Contents
Advertisement
1
Digi-061799
version:
Table of Contents
FCC Class B and CE Compliance ................................................ 2
Features............................................................................................. 3
Overview .......................................................................................... 4
Installation........................................................................................ 5
Panels - Fig. 1 ................................................................................... 6
Panel Description ............................................................................ 7
Front Panel ........................................................................... 7
Back Panel ........................................................................... 8
Operation ........................................................................................ 9
Creating a New Patch......................................................... 9
Editing Existing Patch ...................................................... 10
Editing MIDI Receive Channel........................................ 11
Turning MIDI Thru On and Off ...................................... 11
Bulk Data Dumps via MIDI............................................. 12
Appendix 1 - Diagnostic Test ..................................................... 12
Appendix 2 - MIDI Implementation ......................................... 15
Appendix 3 - Mac "Panel" Software ......................................... 16
Appendix 4 - PC "Panel" Software............................................ 18
Lifetime Limited Warranty ...........................................................19
Digipatch 12x6
™
MANUAL
Advertisement
Table of Contents

Related Manuals for M-Audio Digipatch 12x6


Summary of Contents for M-Audio Digipatch 12x6
-
Page 1: Table Of Contents
Digipatch 12x6 ™ MANUAL Digi-061799 version: Table of Contents FCC Class B and CE Compliance ..........2 Features..................... 3 Overview ..................4 Installation..................5 Panels - Fig. 1 ................... 6 Panel Description ................7 Front Panel ................7 Back Panel ................8 Operation .................. -
Page 2: Fcc Class B And Ce Compliance
Lifetime Limited Warranty ............19 READ THIS ! ... READ THIS ! ..Included with DigiPatch 12x6 are factory diskettes ™ containing Mac and PC DigiPatch applications. Either of these programs can be installed on your computer in the conventional manner . -
Page 3: Features
I/O cables. This product also complies with European CE requirements. Features The DigiPatch 12x6 is an automated patchbay which routes digital audio connections between gear equipped with S/PDIF and Adat* compatible digital audio connectors. The DigiPatch 12x6 has the fol- lowing features: •... -
Page 4: Overview
* Adat is a registered trademark of Alesis Corporation Overview Thanks for choosing a DigiPatch to automate your digital audio routings. Like the name says, the DigiPatch 12 x 6 is a twelve by six digital audio patchbay. It has twelve completely independent inputs called sources, and six PAIRS of outputs called targets. -
Page 5: Installation
cal connections between the two formats. Installation Your DigiPatch box should contain this manual, the power trans- former, and the unit itself. Save all packing materials in case you should ever want to ship the unit. The DigiPatch takes up one space in a standard 19” equipment rack. Install it as you would any other piece of gear, but keep in mind that digital audio cable lengths should be as short as possible. - Page 6 digital in.
-
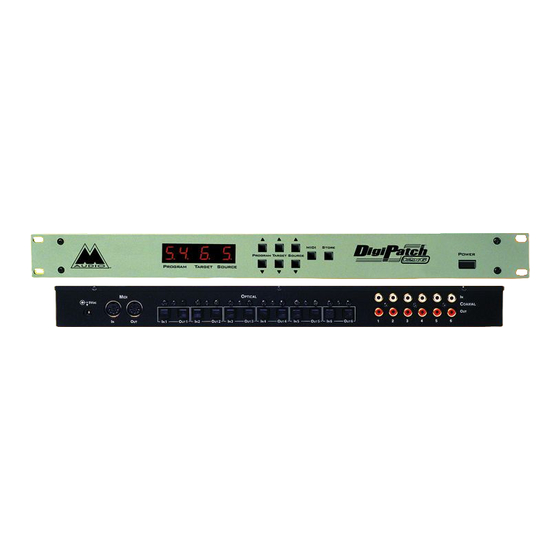
Page 7: Panels - Fig. 1
Panels - Fig. 1 Panel Description Front Panel 1. Program indicator: This normally displays the current program number, but when the MIDI button is held it will display the midi channel. 2. Target indicator: This normally displays the current target num- ber, but when the MIDI button is held it will display the midi thru ON / OFF status. -
Page 8: Back Panel
Rear Panel 9. Power connector: Use only the power transformer that came with your DigiPatch. 10. MIDI In connector: This is a standard MIDI in jack. The DigiPatch can respond to program change and system exclusive messages. 11. MIDI Out: This is a standard MIDI out jack. It can also function like a standard midi thru connector if the MIDI thru feature is enabled. -
Page 9: Operation
Operation The digital audio outputs of the DigiPatch are arranged in pairs. If you look at the unit’s rear panel you will see six coaxial (RCA) out- puts, and six optical outputs. Each of these like-numbered output pairs are called a target. For example, coaxial output 1 together with optical output 1 make up target 1. -
Page 10: Editing Existing Patch
by pressing the Source Inc (▲) and Dec (▼) buttons until a “0” (for “0ff”) appears in the Source window. Whenever any kind of edit of a patch is performed a decimal point will immediately appear next to the program indicator as a reminder that the program has been modified. -
Page 11: Editing Midi Receive Channel
new patch information will be stored in the same program location. Editing MIDI Receive Channel The DigiPatch MIDI receive channel can be viewed and edited while holding down the MIDI button. As soon as the MIDI button is released the DigiPatch will revert to its normal mode of operation. In other words, the MIDI button is a “dead man”... -
Page 12: Bulk Data Dumps Via Midi
Appendix 1 - Diagnostic Tests Overview The DigiPatch 12x6 has several built in diagnostic tests. Important: All of these tests are performed by holding down special button combinations as the unit powers up. After each test is complete you can either start another test, or exit the test mode and allow the unit to boot up normally. - Page 13 characters, etc. The LED test ends (and the button test begins) when any button is Button Number PROG INC TARGET INC SOURCE INC PROG DEC TARGET DEC SOURCE DEC MIDI STORE pressed. Each button when pressed will display the following numbers: During the button test, the source indicator will display the corre- sponding number for each button so long as it is held down (the dis-...
- Page 14 1 = success, 0 = failure Note: This test will force the unit to rebuild the serial EEPROM con- tents regardless of how test mode is exited. MIDI I/O Test (MIDI + Prog ▼) This test requires that a midi cable be connected between the DigiPatch Midi Out jack and Midi In jack before it begins.
-
Page 15: Appendix 2 - Midi Implementation
Appendix 2 - MIDI Implementation ™ DigiPatch 12x6 MIDI Implemetation Chart Software Version 1.00 Function Transmitted Recognized Remarks Basic Channel Default Changed 1 - 16 1 - 16 Mode Default Message Altered Note Number True Voice Velocity Note ON Note OFF... -
Page 16: Appendix 3 - Mac "Panel" Software
Appendix 3 - Mac “Panel” Software The Mac application — DigiPatch Panel™ — included with your unit, is a remote control program that allows you to control up to fif- teen units through MIDI system exclusive messages. It requires a Mac with a 68020 processor or greater, System 7.10 or greater, and supports the following MIDI drivers: Mark of the Unicorn’s FreeMIDI version 1.2 or greater. - Page 17 In all cases, DigiPatch units should be MIDI wired in a series. That is, take the ‘MIDI out’ of you computer interface and plug it into the ‘MIDI in’ of the first DigiPatch unit. Take the ‘ MIDI out’ of your first DigiPatch unit and connect it to the ‘...
-
Page 18: Appendix 4 - Pc "Panel" Software
Appendix 4 - PC “Panel” Software The PC Windows application — DigiPatch Panel™ — included with your unit, is a remote control program that allows you to control up to fifteen units through MIDI system exclusive messages. It requires a PC with a 80386 processor or greater, Windows 3.1 or later, and supports MIDI interfaces with software drivers that adhere to the Windows multimedia extensions (MME). -
Page 19: Lifetime Limited Warranty
Lifetime Limited Warranty MIDIMAN warrants that this product is free of defects in materials and workmanship under normal use so long as the product is owned by the original purchaser and that purchaser has registered his/her ownership of the product by sending in the completed warranty card. In the event that MIDIMAN receives written notice of defects in materials or workmanship from such an original purchaser, MIDIMAN will either replace the product, repair the product, or refund the purchase price at its... - Page 20 DIG-061799...
Need help?
Do you have a question about the Digipatch 12x6 and is the answer not in the manual?
Questions and answers